Review sản phẩm
Bí Kíp Quay Trở Về Quá Khứ (Chỉ Với Queen Mobile!) [ad_1]
 [ad_1] 3")
Th5
## Bí Kíp Quay Trở Về Quá Khứ (Chỉ Với Queen Mobile!)
Giới thiệu “Bí Kíp Quay Trở Về Quá Khứ”: Ai bảo chỉ có trong phim mới có chuyện du hành thời gian? Với Queen Mobile, bạn sẽ được trải nghiệm công nghệ hiện đại nhất, những sản phẩm đỉnh cao như thể đang bước vào tương lai! Hãy quên đi những chiếc điện thoại cũ kỹ, những chiếc máy tính bảng chậm chạp. Hãy “quay ngược thời gian” sang một kỷ nguyên công nghệ hoàn toàn mới mẻ với Queen Mobile!
“Quay ngược thời gian” với công nghệ hiện đại từ Queen Mobile:
Queen Mobile không chỉ là nơi bán hàng điện tử, mà là cánh cửa đưa bạn đến tương lai. Chúng tôi tự hào mang đến cho khách hàng những sản phẩm công nghệ tiên tiến nhất, giúp bạn trải nghiệm cuộc sống tiện nghi và hiện đại hơn. Hãy tưởng tượng:
* iPhone: Chiếc điện thoại thông minh nhất hành tinh, với tốc độ xử lý đáng kinh ngạc, camera sắc nét, và hàng triệu ứng dụng tuyệt vời. Như thể bạn đang sống trong một thế giới hoàn toàn khác biệt so với những chiếc điện thoại cũ kỹ.
* iPad: Máy tính bảng mạnh mẽ, đa năng, cho phép bạn làm việc, giải trí và sáng tạo không giới hạn. “Quay ngược thời gian” để tận hưởng những khoảnh khắc thư giãn tuyệt vời với iPad.
* Smartwatch: Đồng hồ thông minh, theo dõi sức khỏe, cập nhật thông tin tức thời, giúp bạn luôn kết nối với thế giới. Như thể bạn có một trợ lý ảo luôn bên cạnh, giúp bạn quản lý thời gian hiệu quả hơn.
* Phụ kiện Apple chính hãng: Hoàn thiện trải nghiệm công nghệ của bạn với các phụ kiện chất lượng cao, đảm bảo tính ổn định và độ bền. “Quay trở về quá khứ” chỉ để thấy mình đã bỏ lỡ những trải nghiệm tuyệt vời này như thế nào!
Tận hưởng tương lai ngay hôm nay tại Queen Mobile:
Đừng để những công nghệ lỗi thời “giam cầm” bạn trong quá khứ. Hãy đến ngay Queen Mobile để trải nghiệm những sản phẩm công nghệ tiên tiến nhất và “quay ngược thời gian” sang một kỷ nguyên hoàn toàn mới. Chúng tôi cam kết cung cấp:
* Sản phẩm chính hãng 100%: Đảm bảo chất lượng và độ bền vượt trội.
* Giá cả cạnh tranh: Mang đến cho bạn những sản phẩm tốt nhất với mức giá hợp lý.
* Dịch vụ khách hàng chuyên nghiệp: Hỗ trợ tận tình, chu đáo trong suốt quá trình mua sắm và sử dụng sản phẩm.
Mua ngay sản phẩm tại Việt Nam: QUEEN MOBILE
Chuyên cung cấp điện thoại iPhone, máy tính bảng iPad, đồng hồ Smartwatch và các phụ kiện Apple chính hãng, cùng các giải pháp điện tử và nhà thông minh khác.
#QueenMobile #DuHànhThờiGian #CôngNghệHiệnĐại #iPhone #iPad #Smartwatch #Apple #MuaSắmOnline #ĐiệnThoại #MáyTínhBảng #PhụKiệnApple #GiảiPhápNhàThôngMinh #CôngNghệ #ThờiTrangCôngNghệ
Giới thiệu How to go back in time
: How to go back in time
Hãy viết lại bài viết dài kèm hashtag về việc đánh giá sản phẩm và mua ngay tại Queen Mobile bằng tiếng VIệt: How to go back in time
Mua ngay sản phẩm tại Việt Nam:
QUEEN MOBILE chuyên cung cấp điện thoại Iphone, máy tính bảng Ipad, đồng hồ Smartwatch và các phụ kiện APPLE và các giải pháp điện tử và nhà thông minh. Queen Mobile rất hân hạnh được phục vụ quý khách….
_____________________________________________________
Mua #Điện_thoại #iphone #ipad #macbook #samsung #xiaomi #poco #oppo #snapdragon giá tốt, hãy ghé [𝑸𝑼𝑬𝑬𝑵 𝑴𝑶𝑩𝑰𝑳𝑬]
✿ 149 Hòa Bình, phường Hiệp Tân, quận Tân Phú, TP HCM
✿ 402B, Hai Bà Trưng, P Tân Định, Q 1, HCM
✿ 287 đường 3/2 P 10, Q 10, HCM
Hotline (miễn phí) 19003190
Thu cũ đổi mới
Rẻ hơn hoàn tiền
Góp 0%
Thời gian làm việc: 9h – 21h.
KẾT LUẬN
Hãy viết đoạn tóm tắt về nội dung bằng tiếng việt kích thích người mua: How to go back in time
While Google Maps helps us navigate our expansive cities, Google Earth takes things slightly higher (quite literally). It gives us an immersive virtual experience of watching our planet from far above. And you don’t need a powerful device to use the web version of Google Earth. Even the most affordable Chromebooks will do the trick. With Google Earth’s smooth zoom-ins and 3D buildings, you can spend countless hours watching those curated, stunning tours as often as you want.
One standout feature not found on the web version is the impressive historical imagery using the Google Earth Pro desktop app for Windows, Mac, and Linux. You can go back in time to see how a place has changed over several decades. It’s an incredible tool for academic research and for fun. The feature is available to everyone, and it’s free for all users. Here’s everything you need to know about historical imagery and going back in time on Google Earth.
How to go back in time on Google Earth for desktop
Google Earth’s historical imagery tool combines data from many sources to show how a particular area looked in the past. Some locations allow you to rewind the map data dating back to the 1930s. However, you can only use this feature on the Google Earth Pro desktop app. The software may look dated, but it has everything you need to go back in time for historical map imagery.
To go back in time using the Google Earth Pro desktop app, do the following:
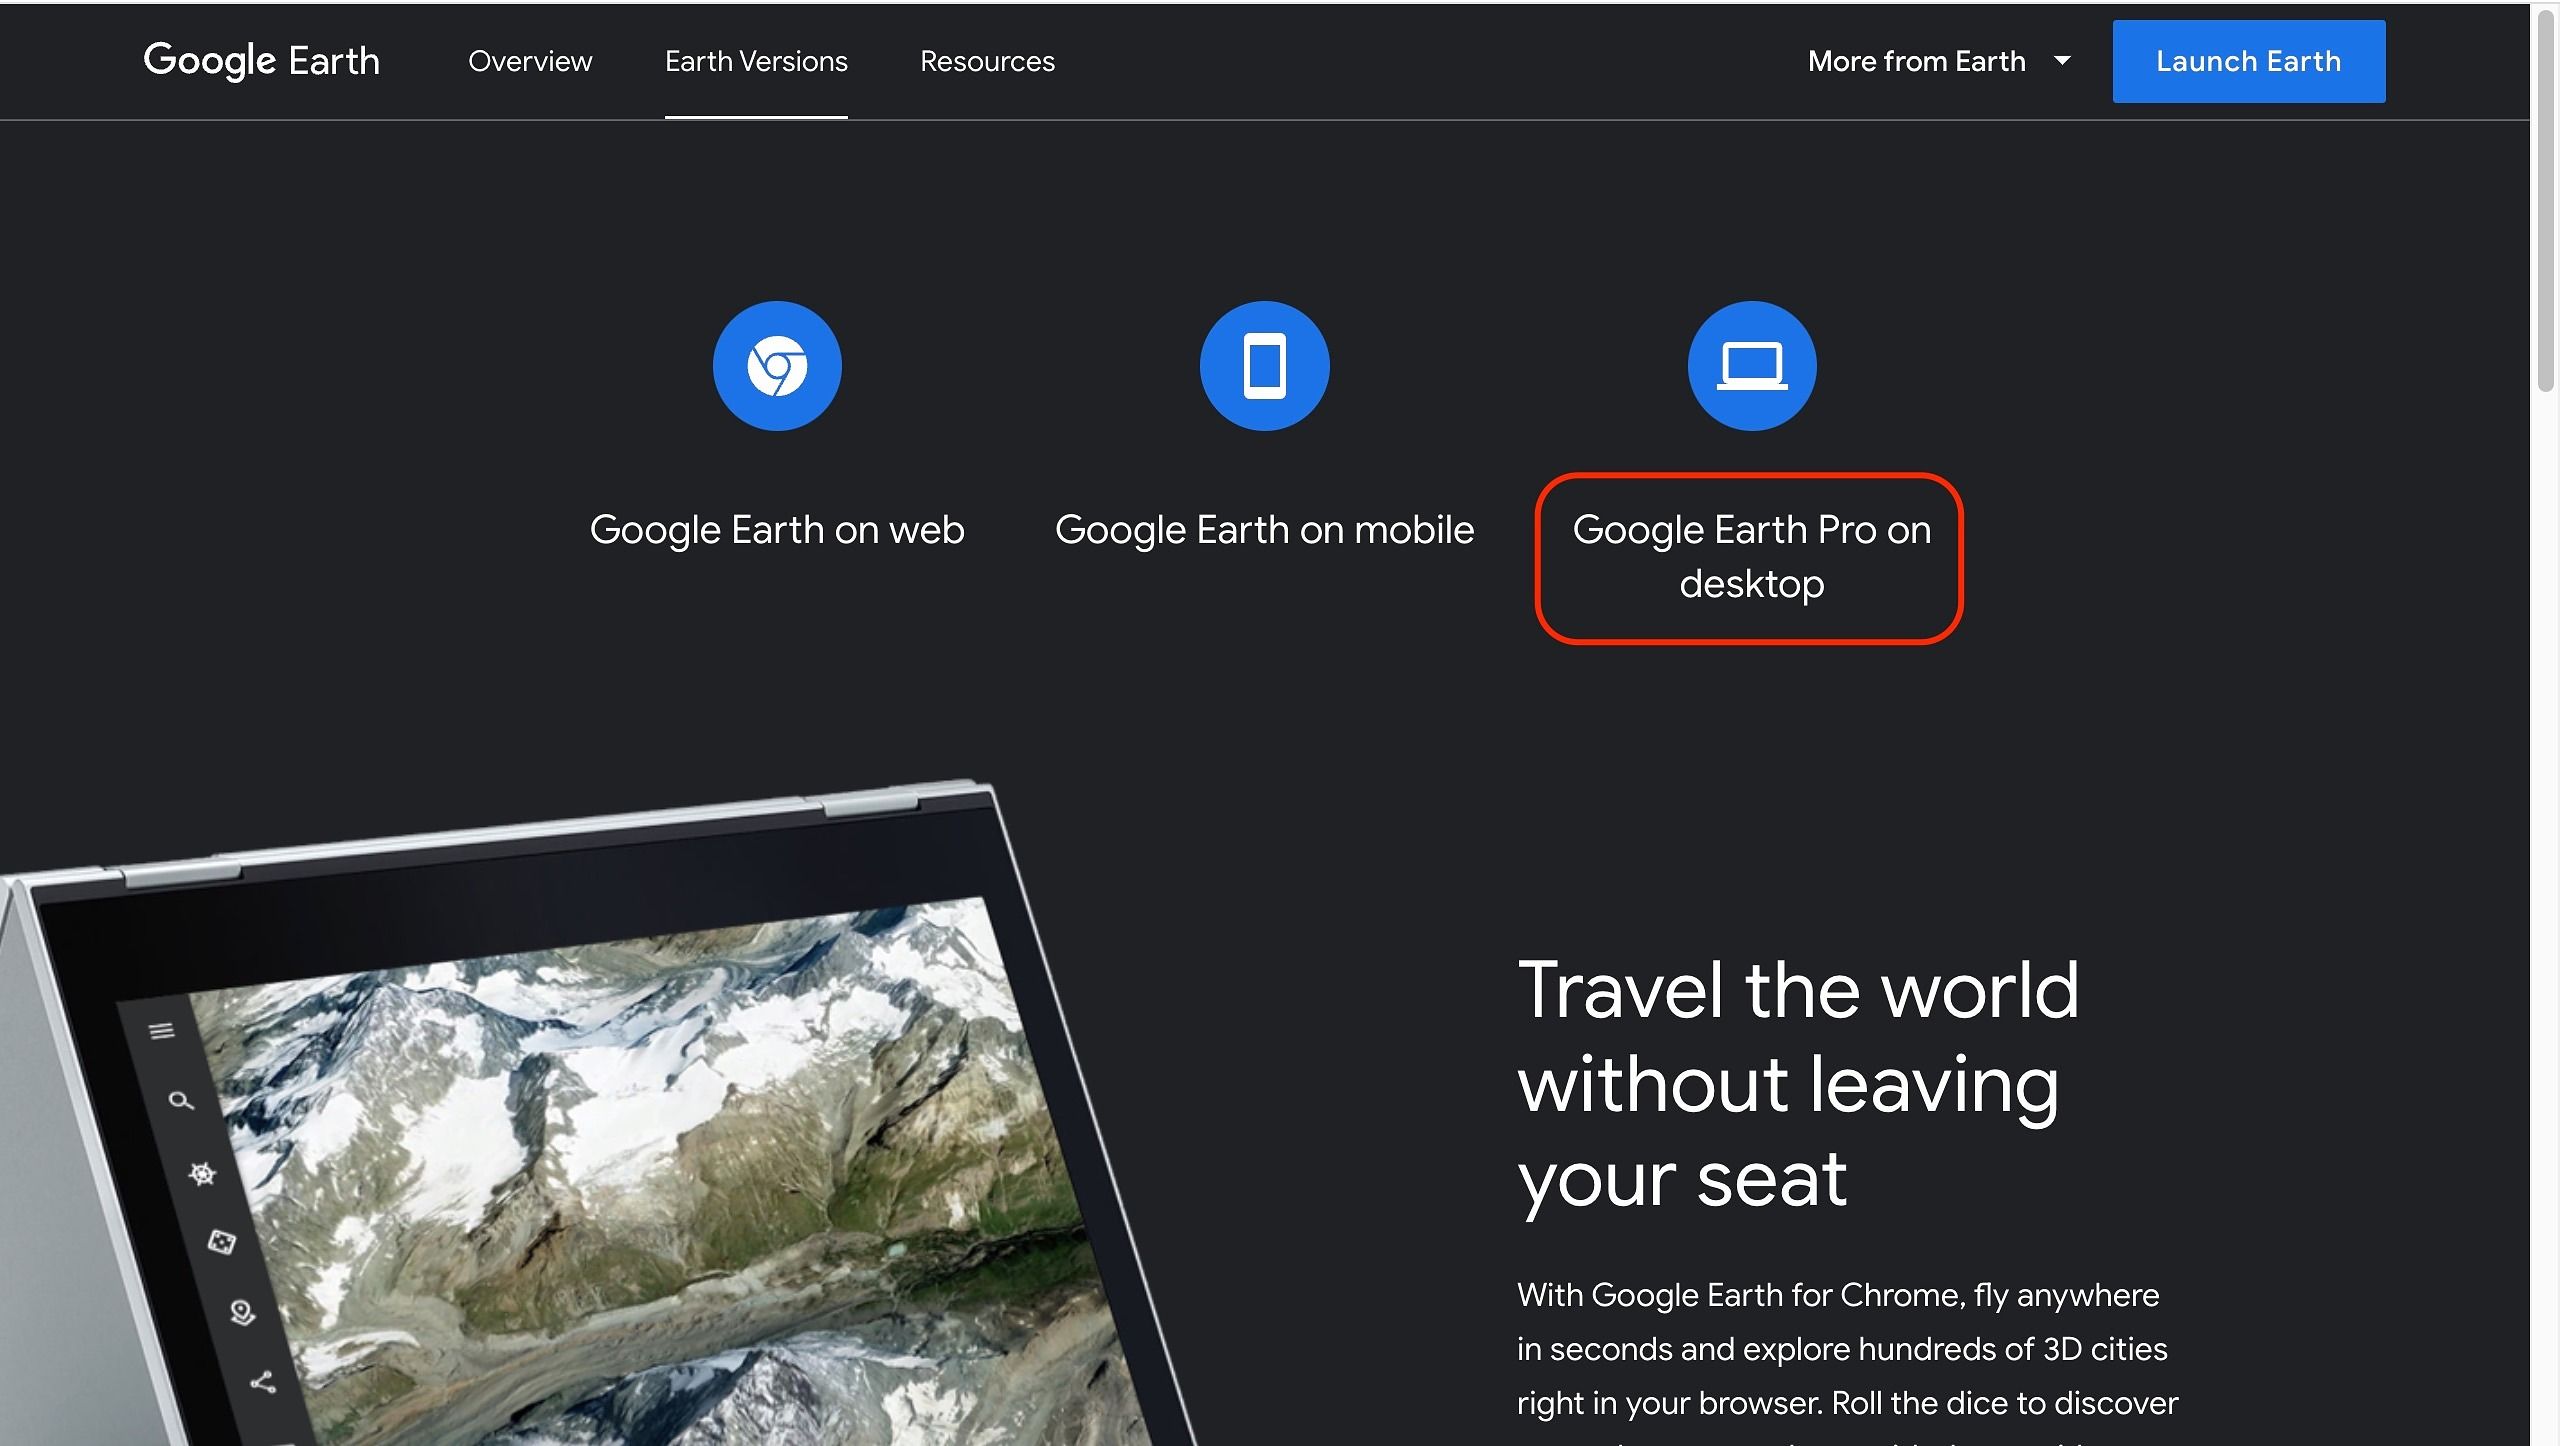
- Visit this link to download Google Earth Pro for your computer.
- Click Download Earth Pro on Desktop.
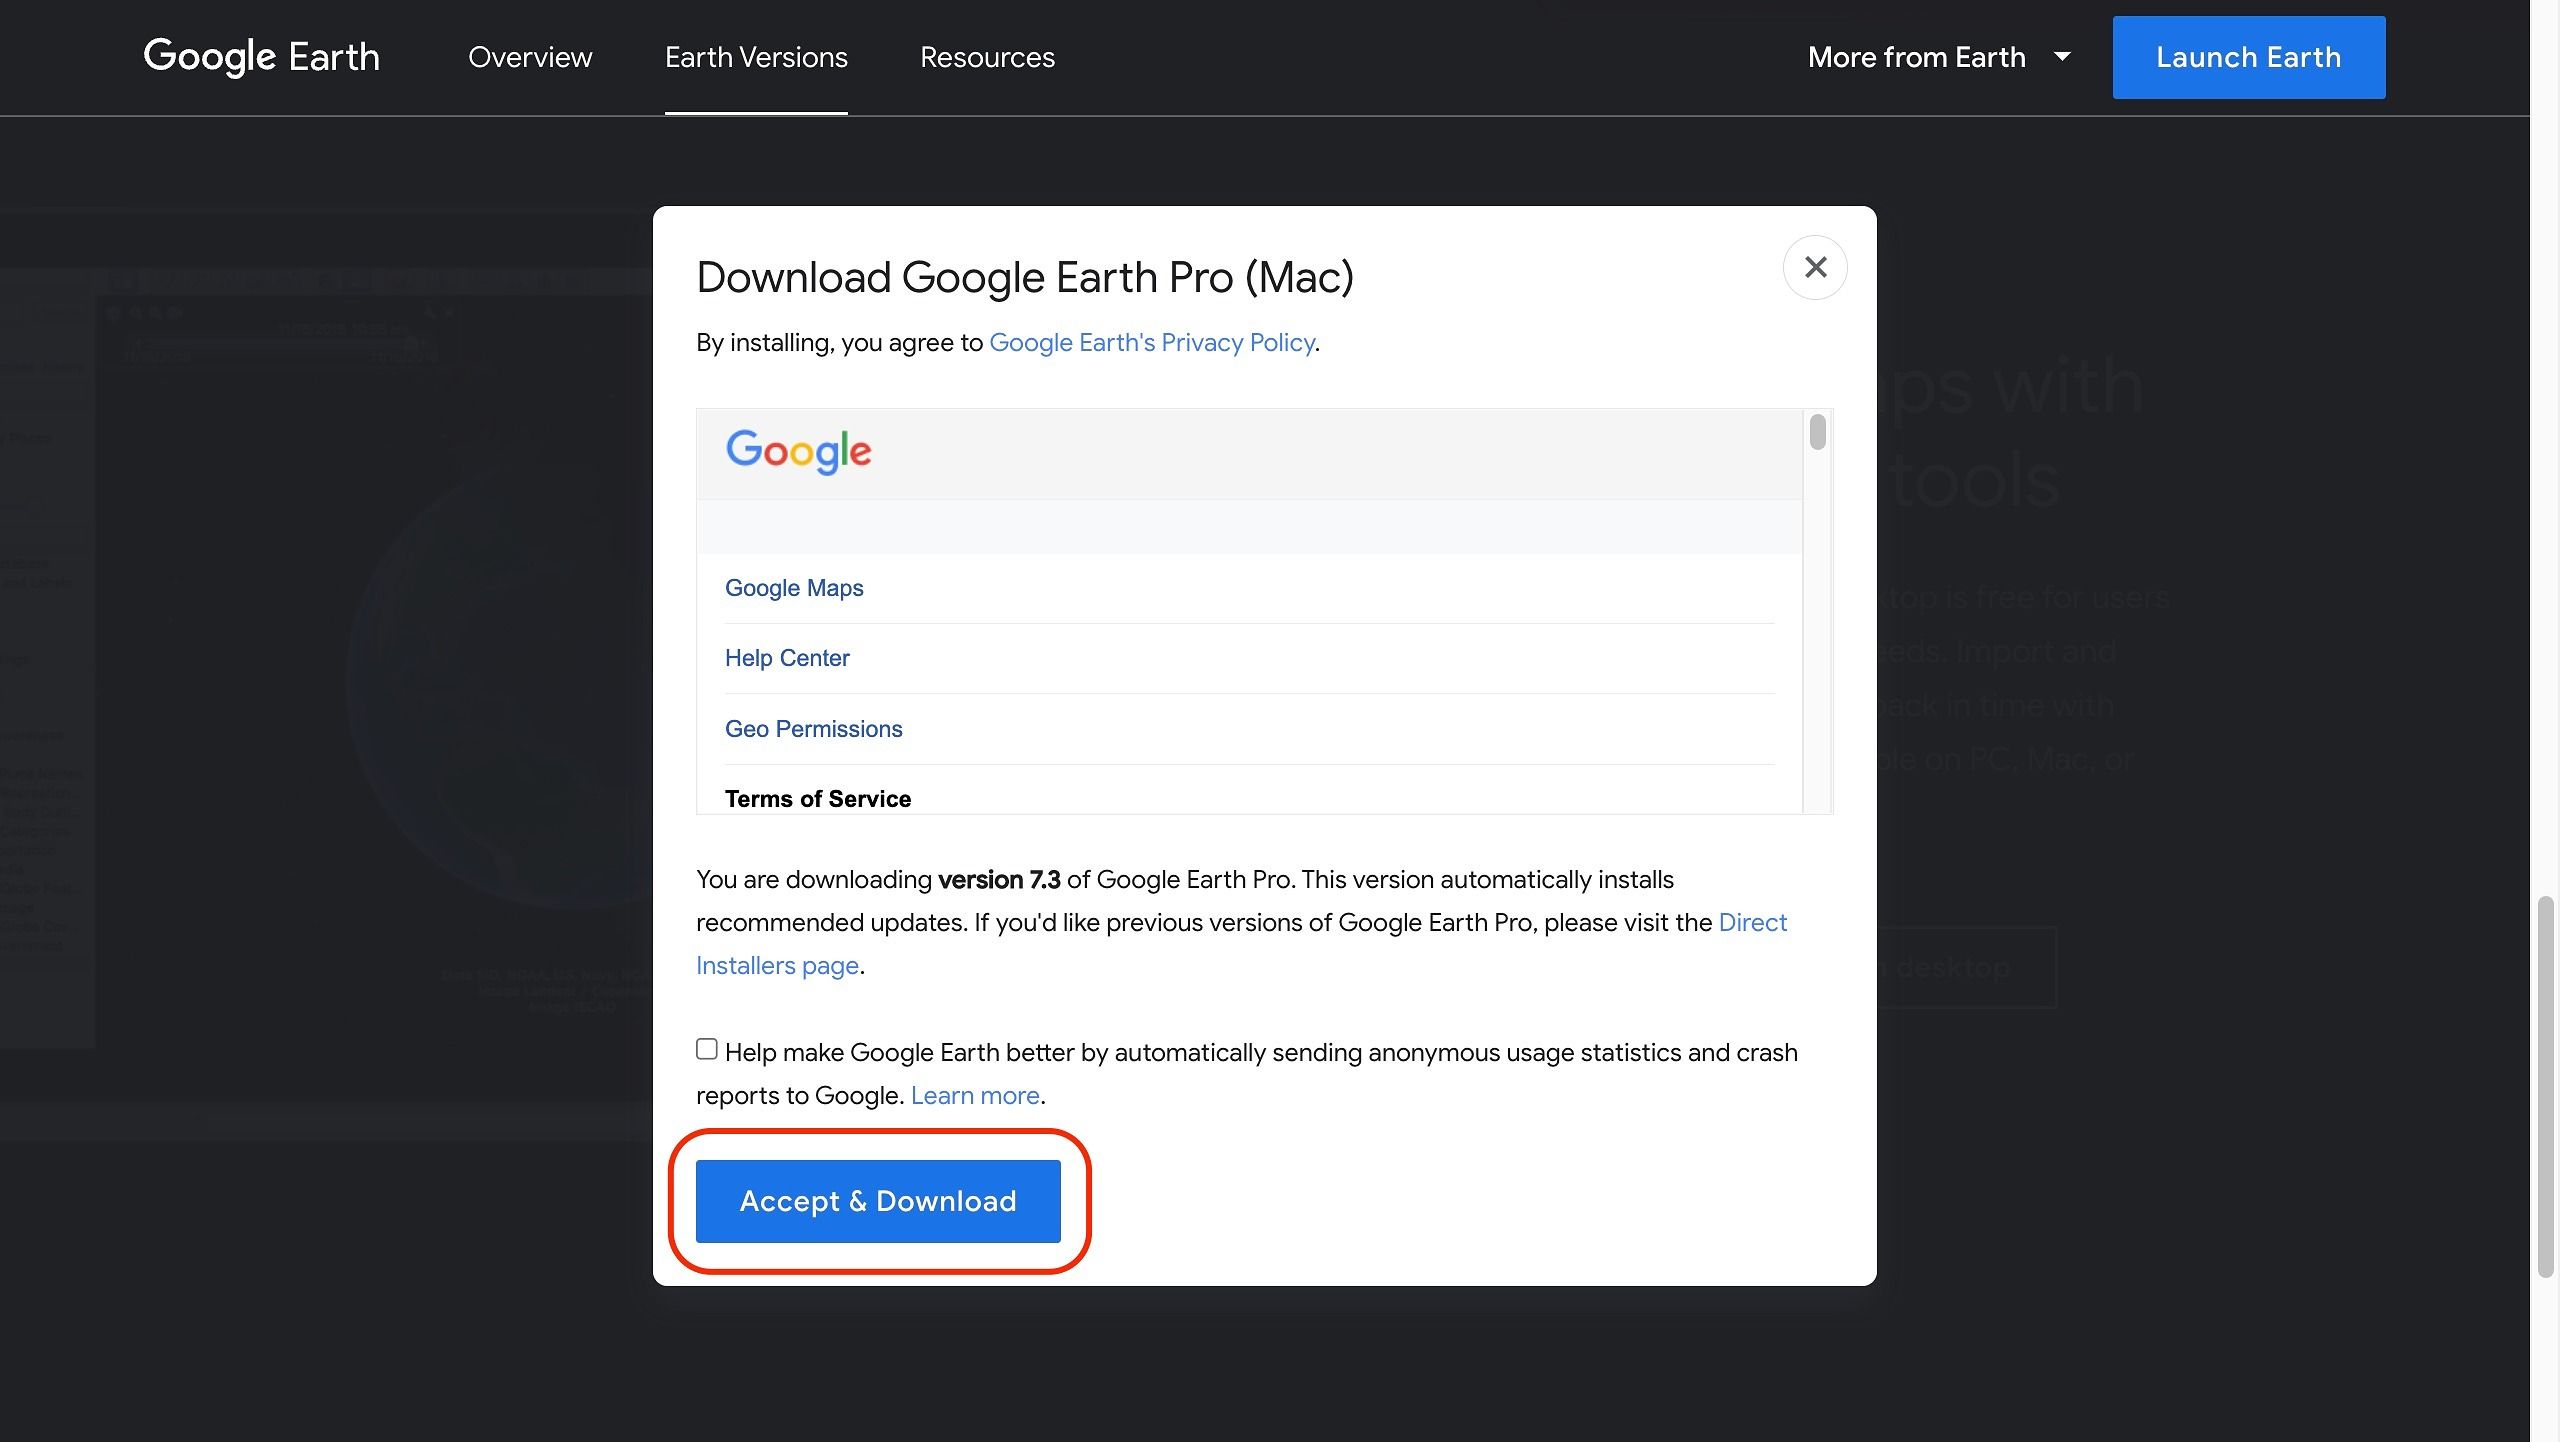
- Click the Accept & Download button to accept the terms and get started. To prevent extra data collection, uncheck the box before downloading the app.
- When the download finishes, install the app on your computer.
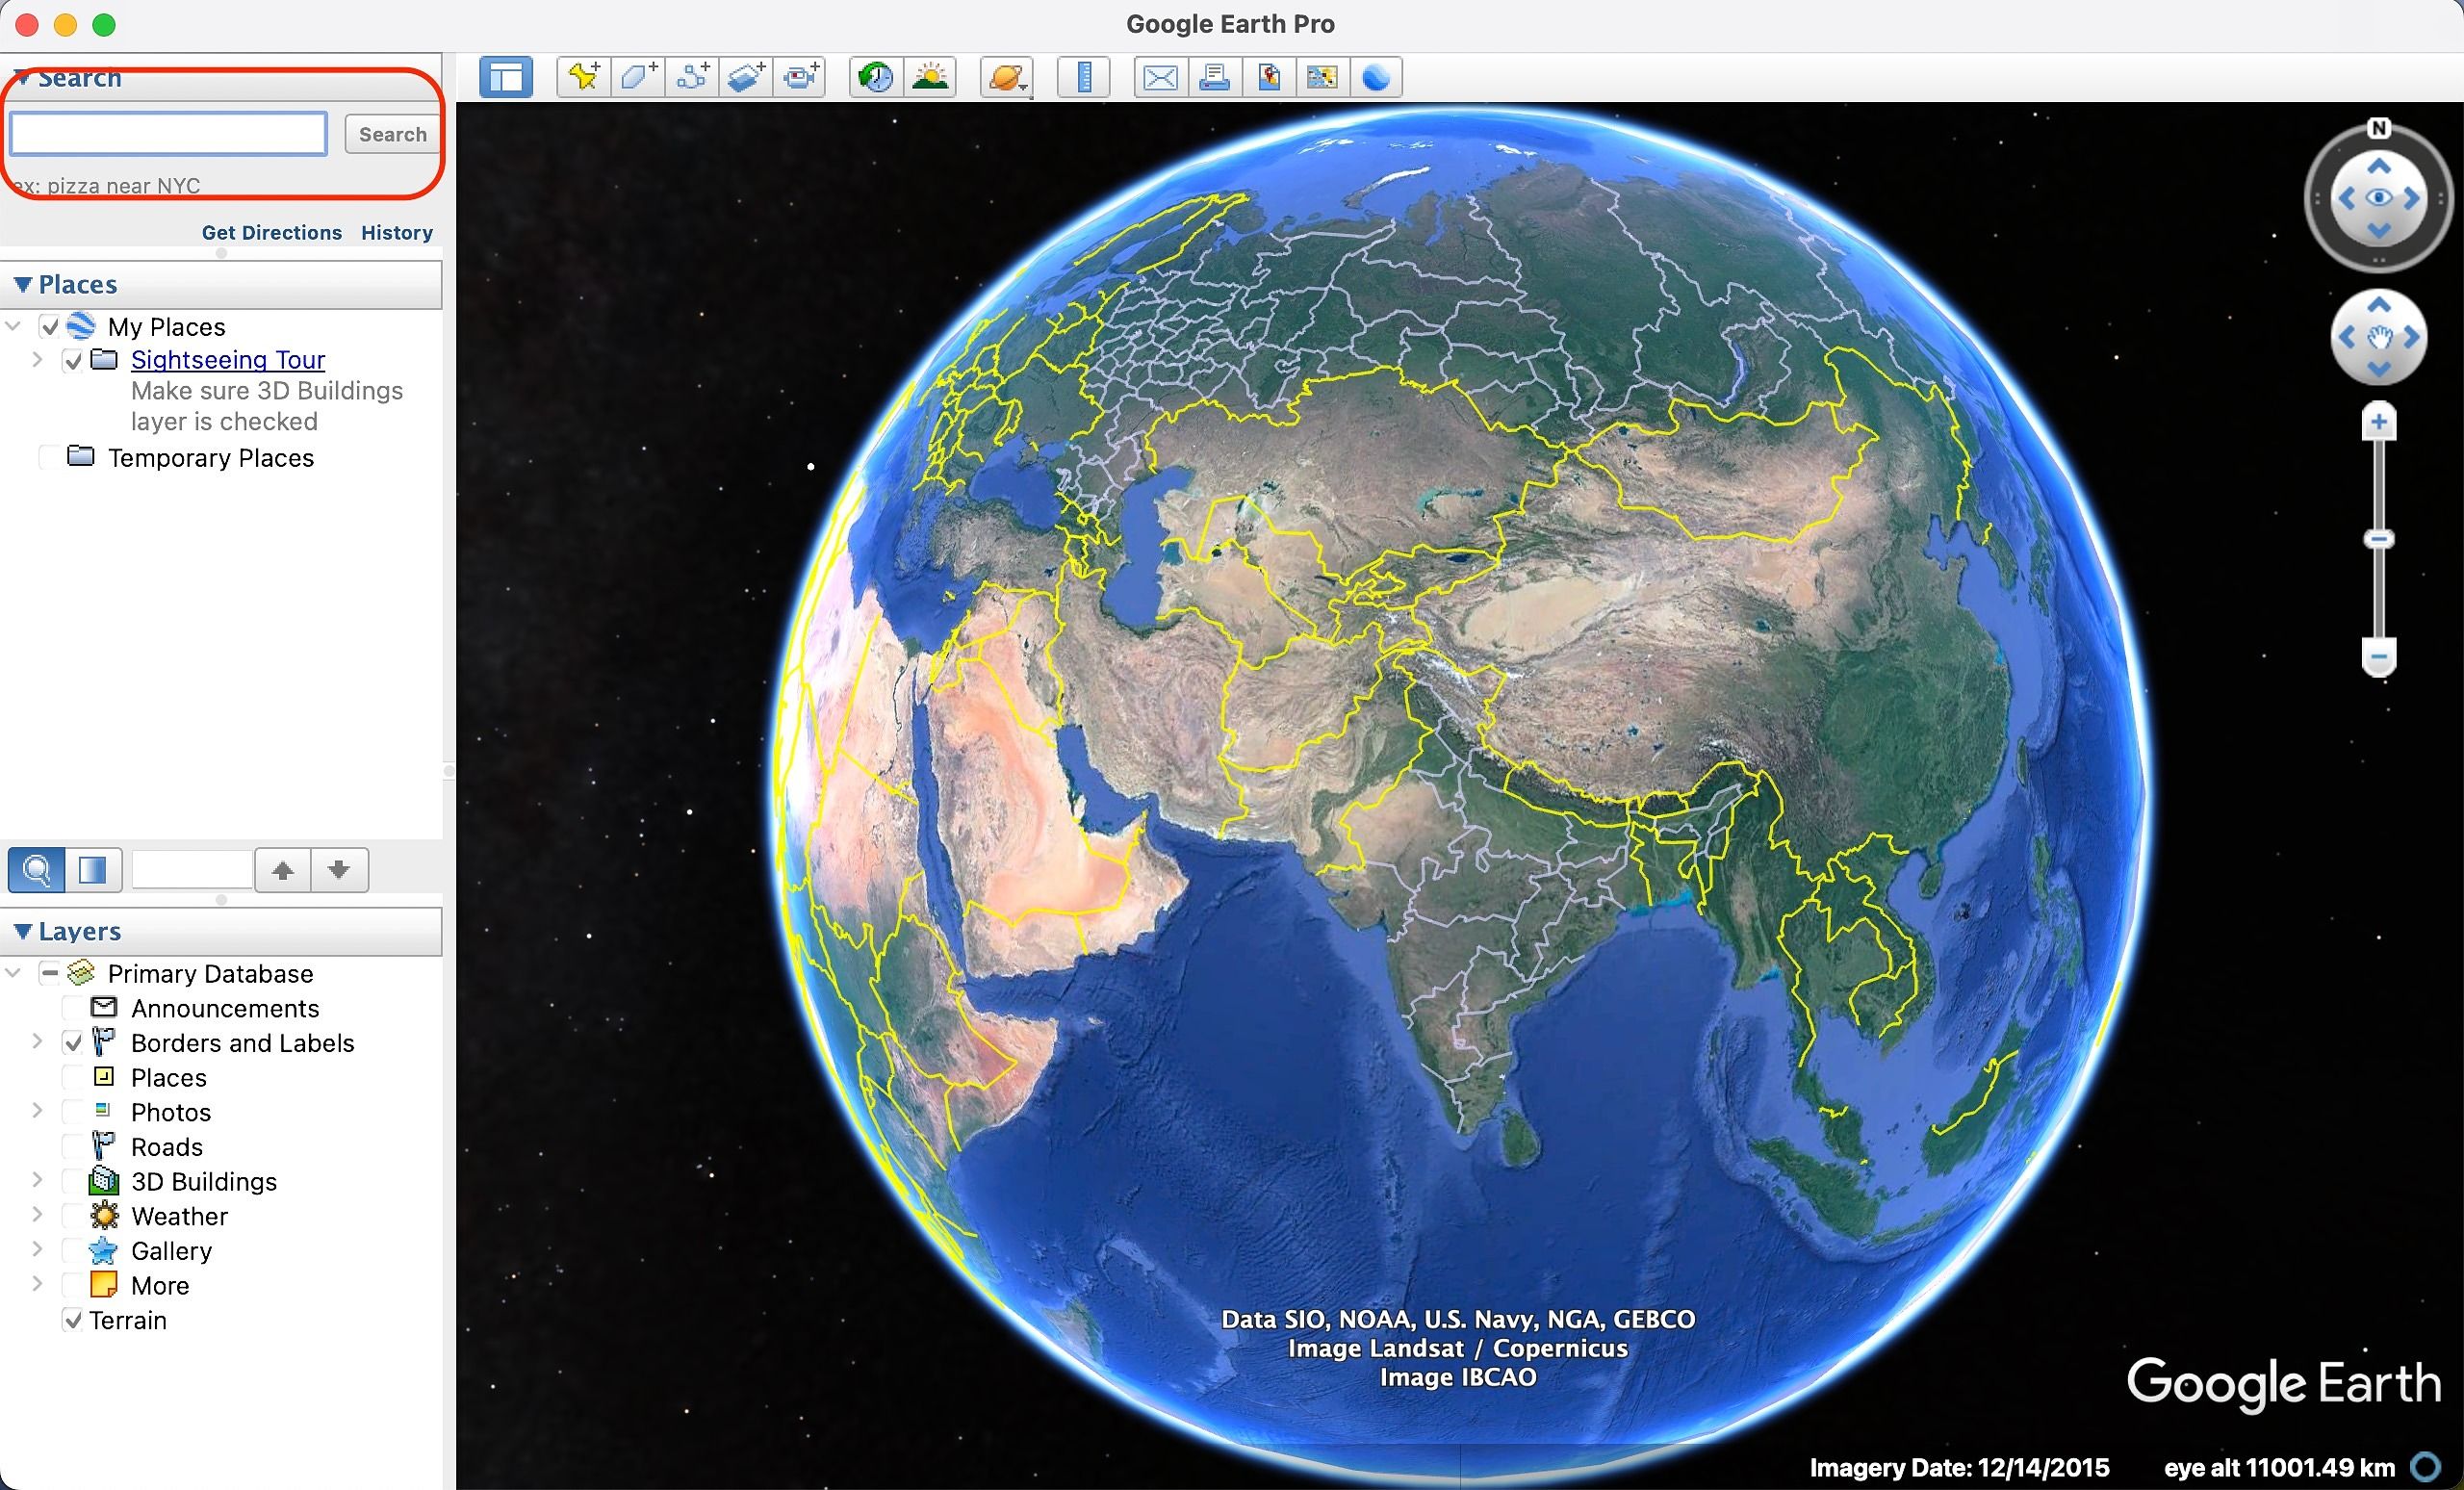
- Open the Google Earth Pro app and locate the search bar in the upper-left corner.
- Enter the location you want to see older map images for and click Search.
- You are taken to that location while it slowly zooms down.
- In the top toolbar, select the clock icon, which reads Show historical imagery. Alternatively, use the app menu on a Mac to find the Historical Imagery option under View.
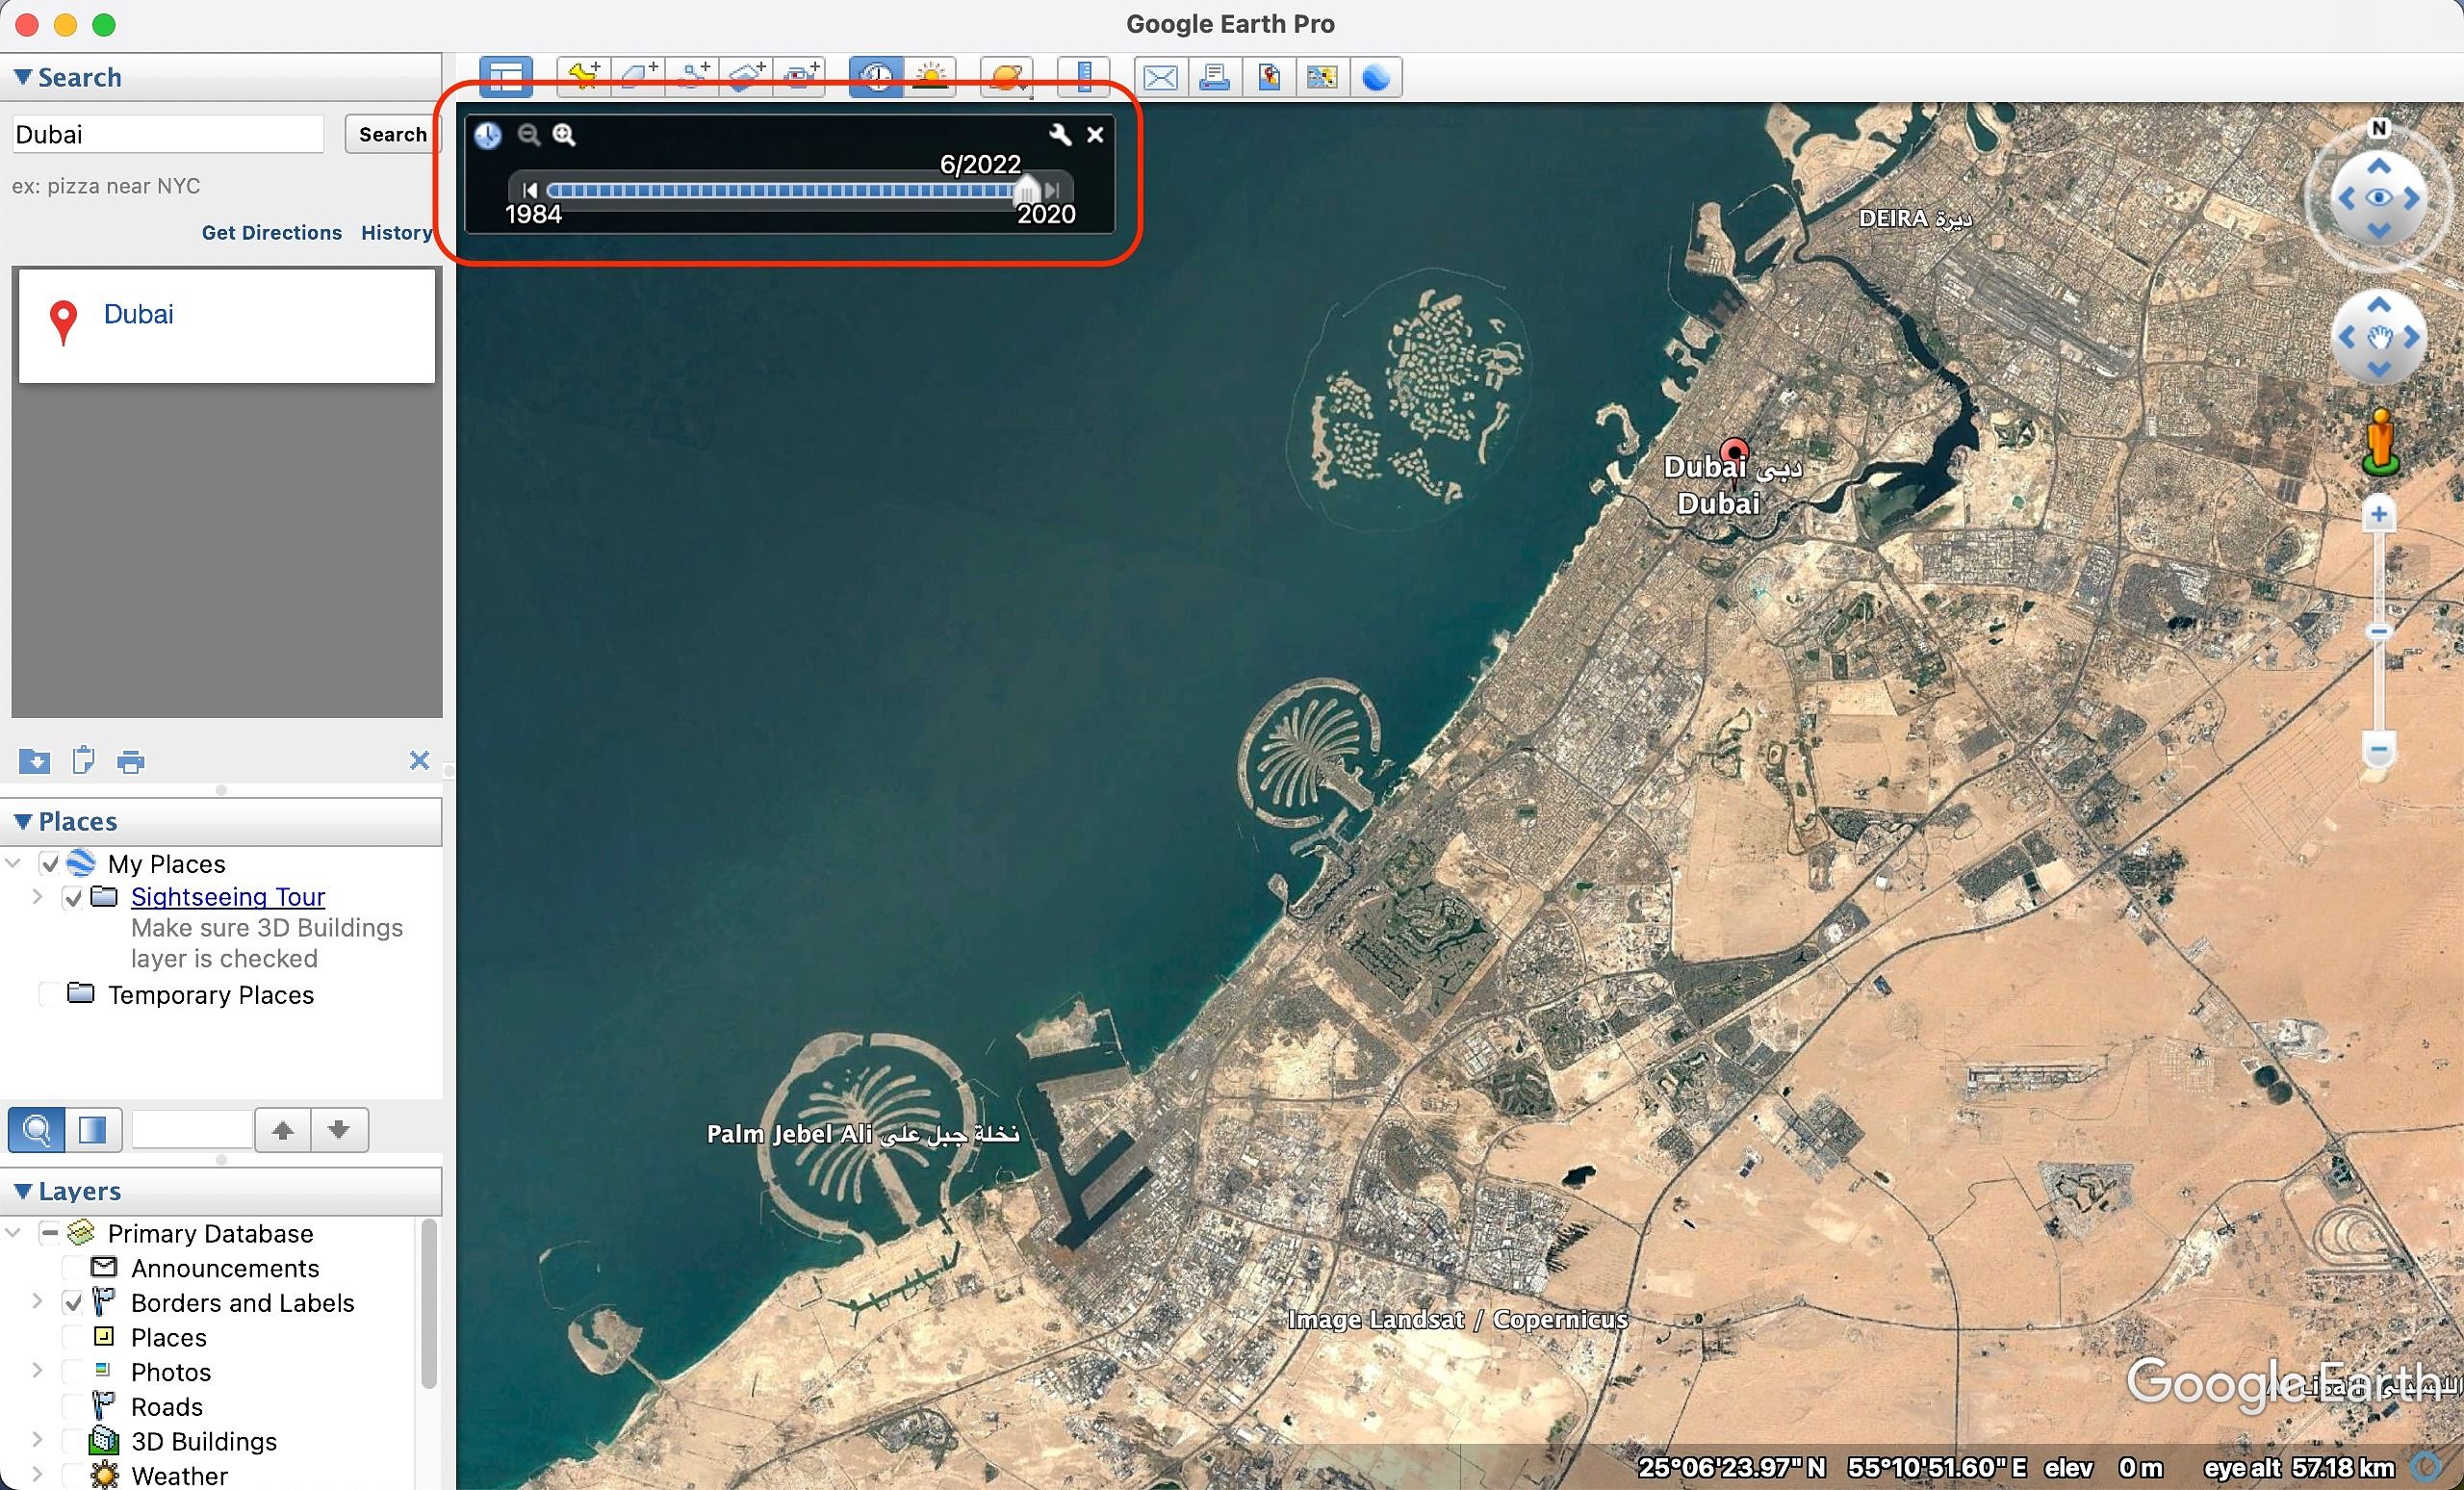
- A date selector slider appears over the map in the upper-left corner.
- After you adjust the slider date, the map image changes according to the year selected.
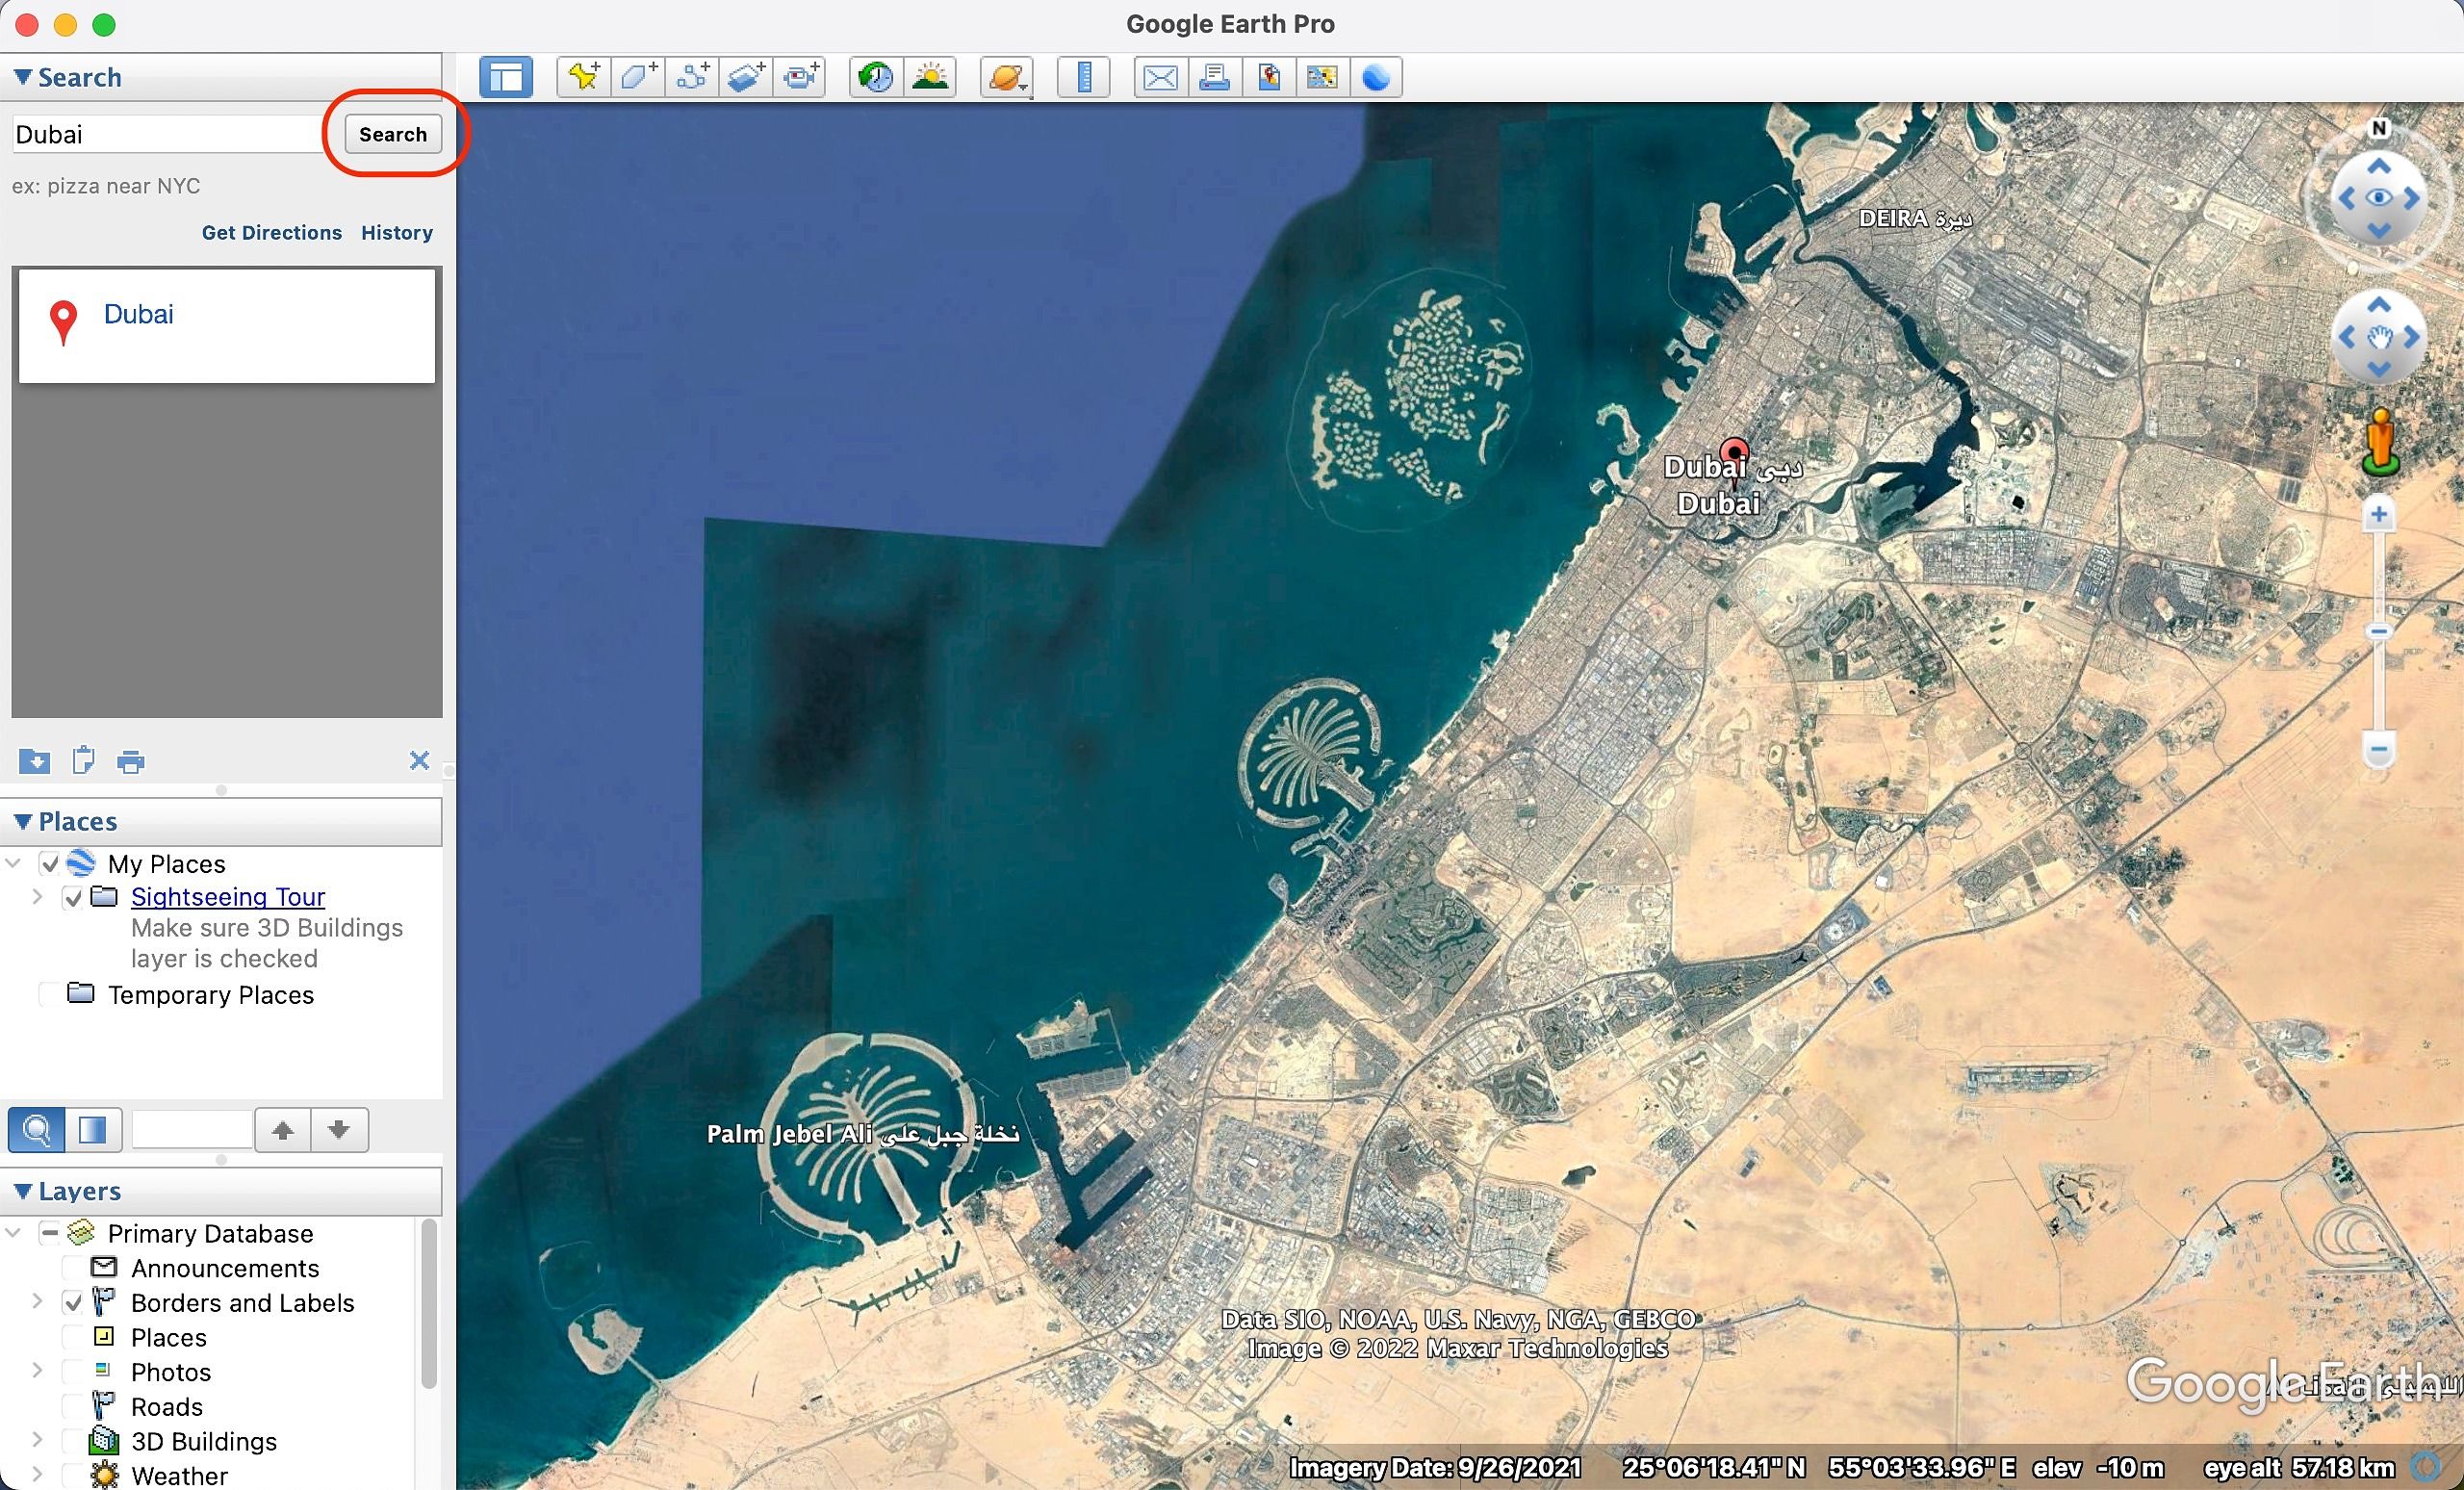
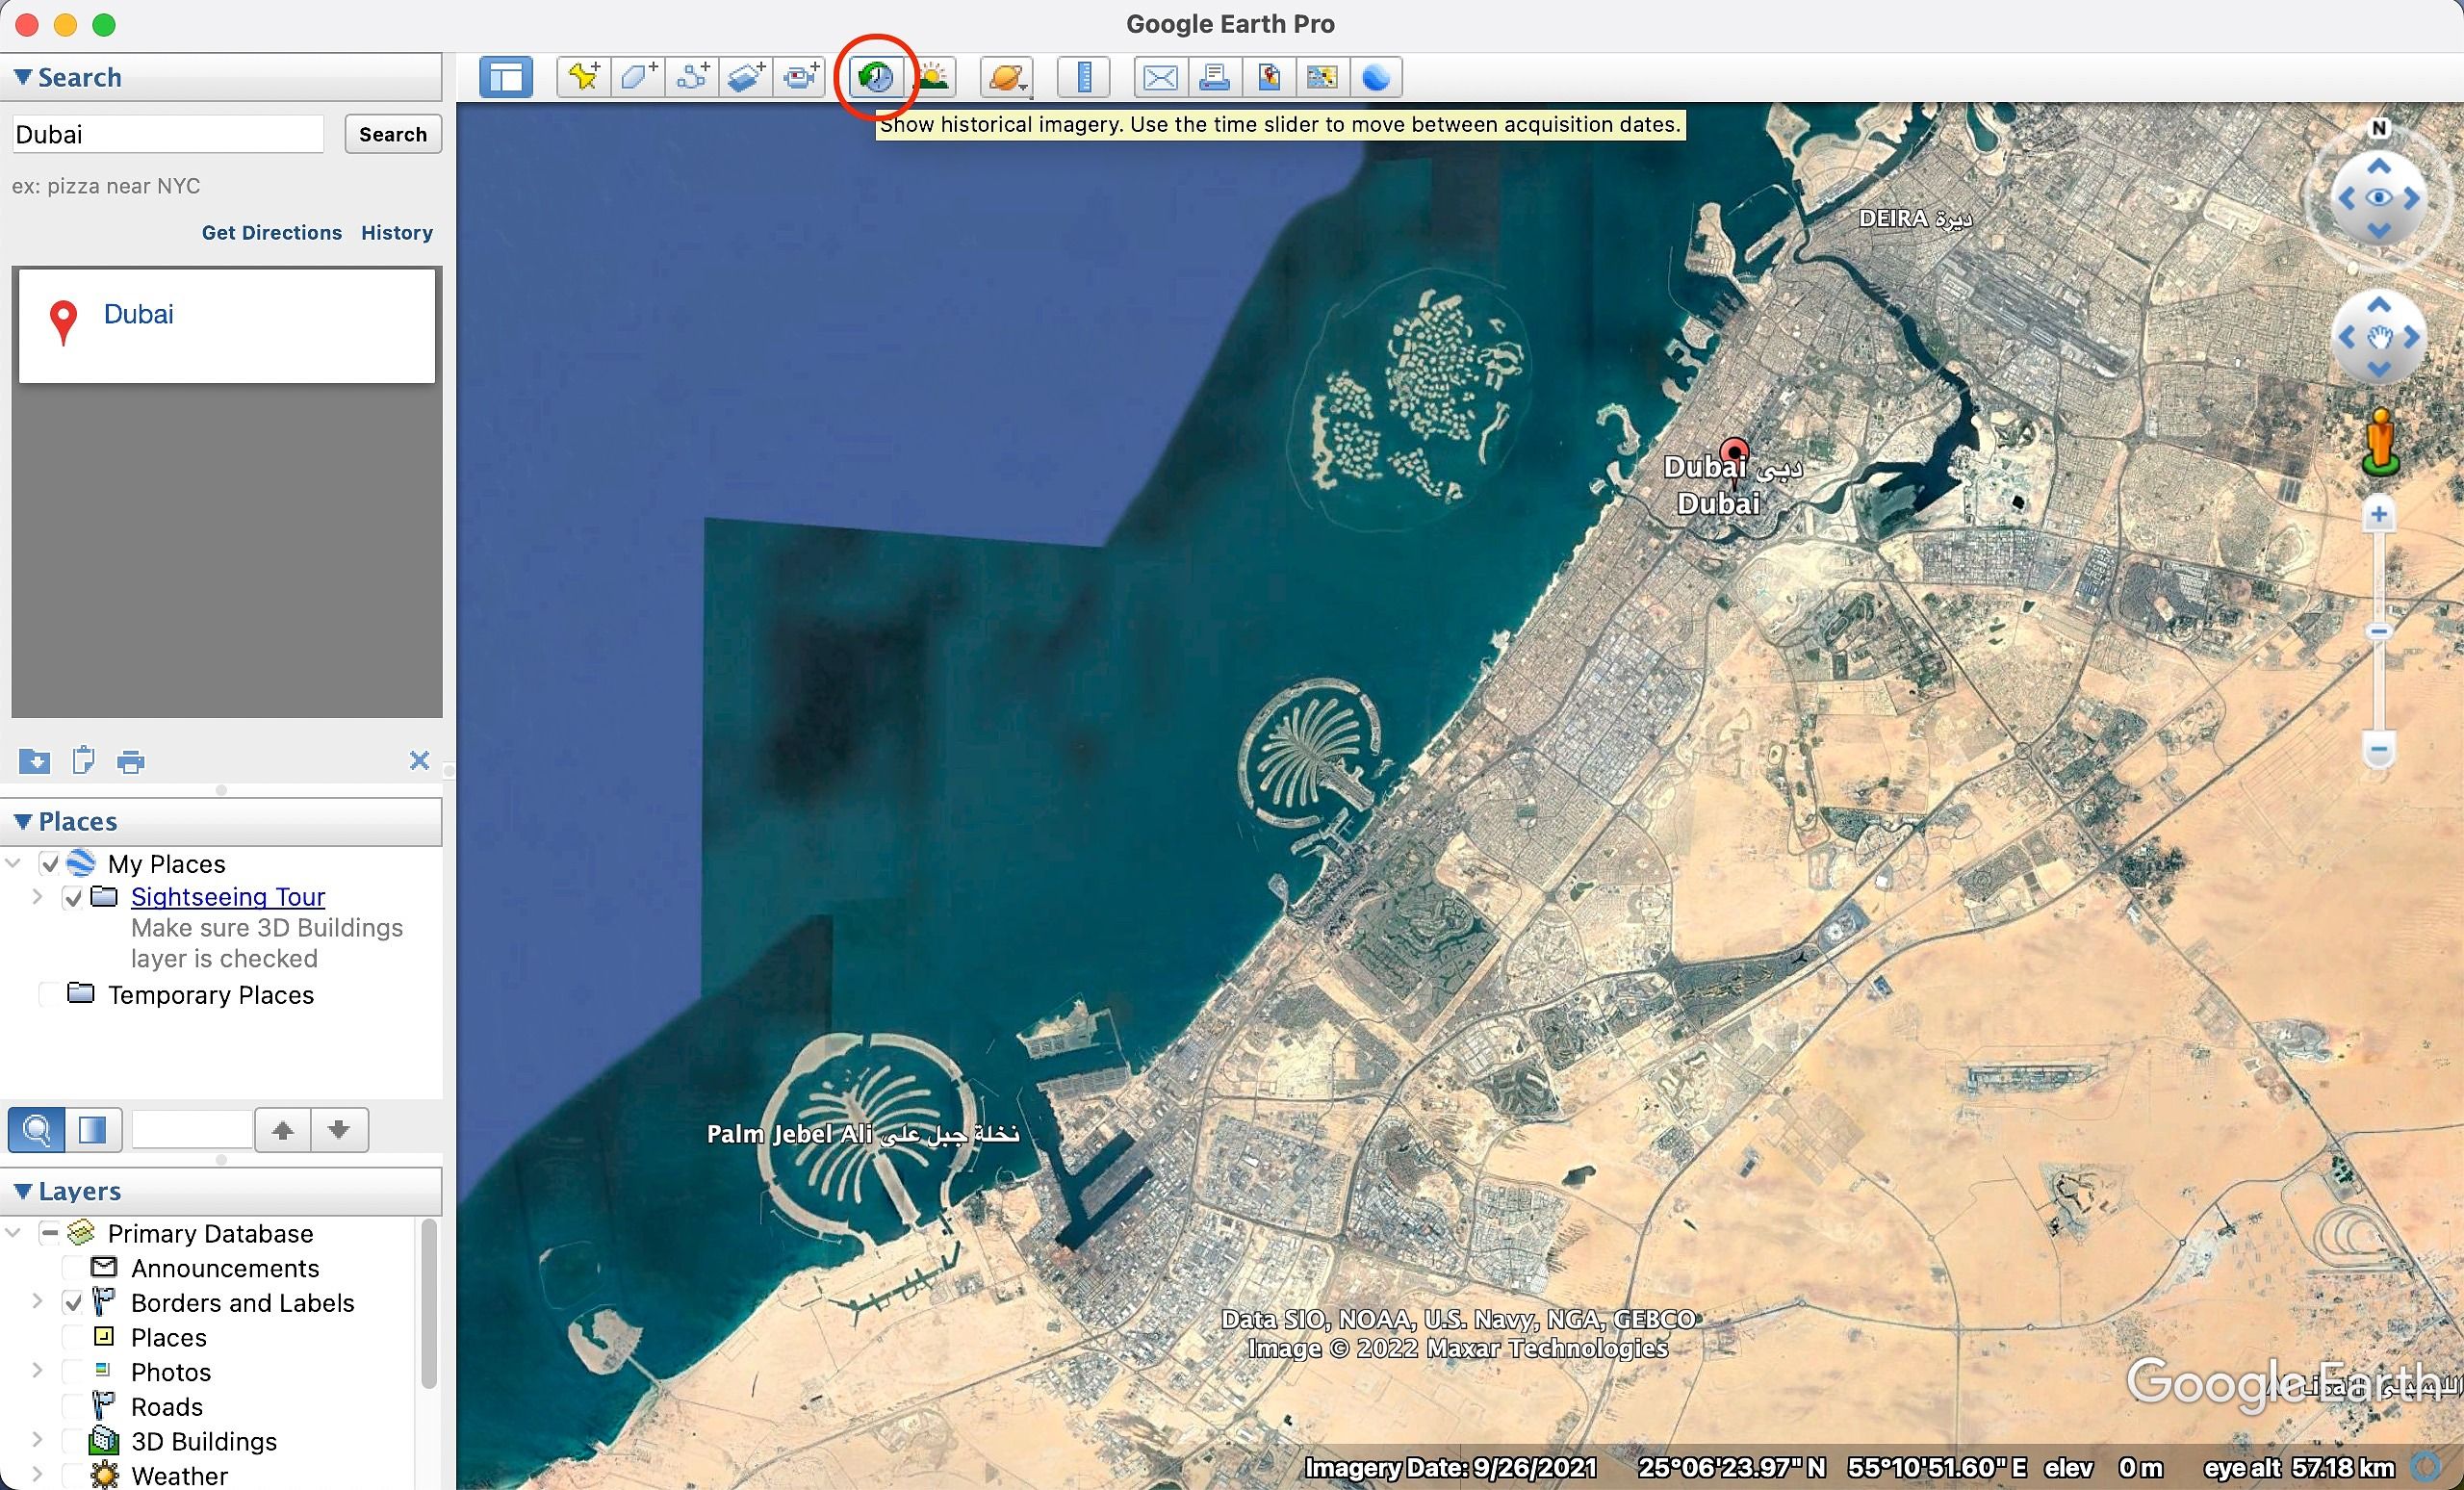
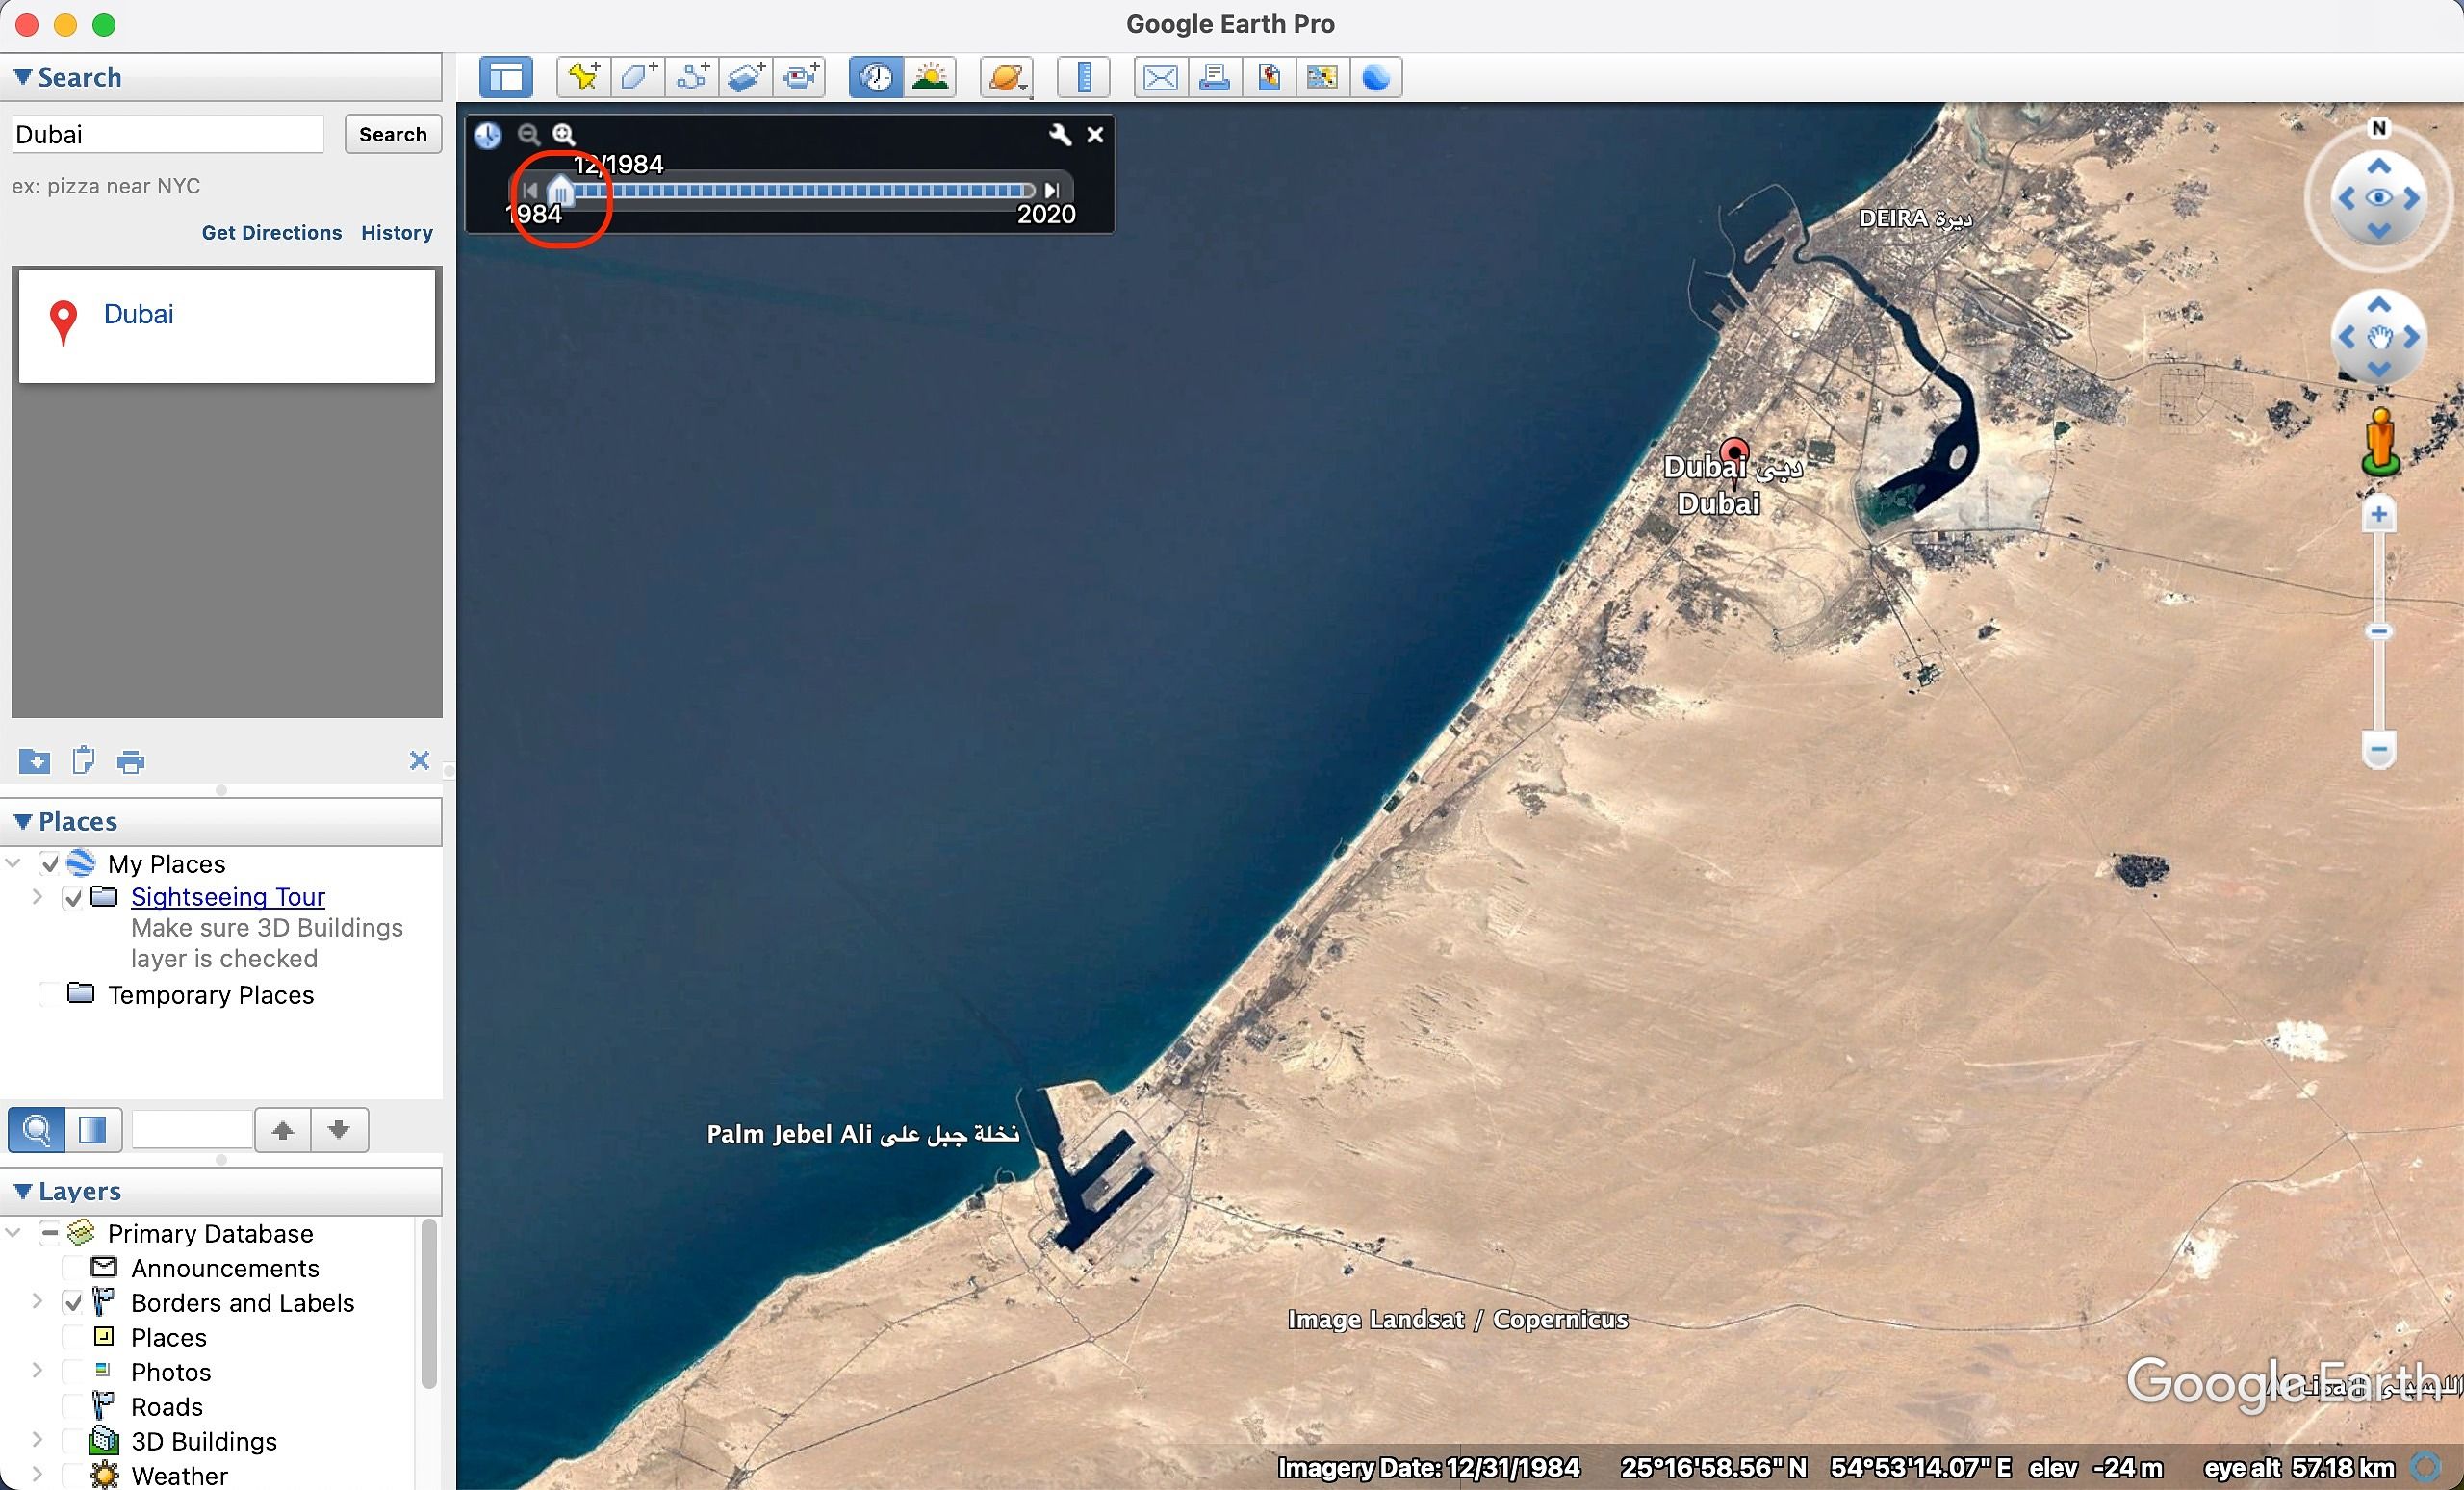
In the example screenshots above, the aerial photos of Dubai’s dramatically changing coastline are from 1984. It can date as far back as the 1930s in some places. Due to limited technology, those earlier images may not be as sharp and clear as modern satellite imagery. And there’s a chance these archival photos of a location are only available for a small portion of a town, requiring you to zoom in further for a better look.
How to use Timelapse on Google Earth for web
Timelapse on Google Earth is a dramatized version of its historical imagery tool, with high-quality satellite images handpicked for specific locations. To give you a tour through these stories, Google Earth curates them under themes, such as shrinking ice caps or growing urban sprawl.
With more animations, an automatic time slider, and the accompanying contextual information, Timelapse fits in more with the modern era. And you don’t need to download an app as it can all be done from the web.
To access the Timelapse feature on Google Earth for the web, check out these steps:
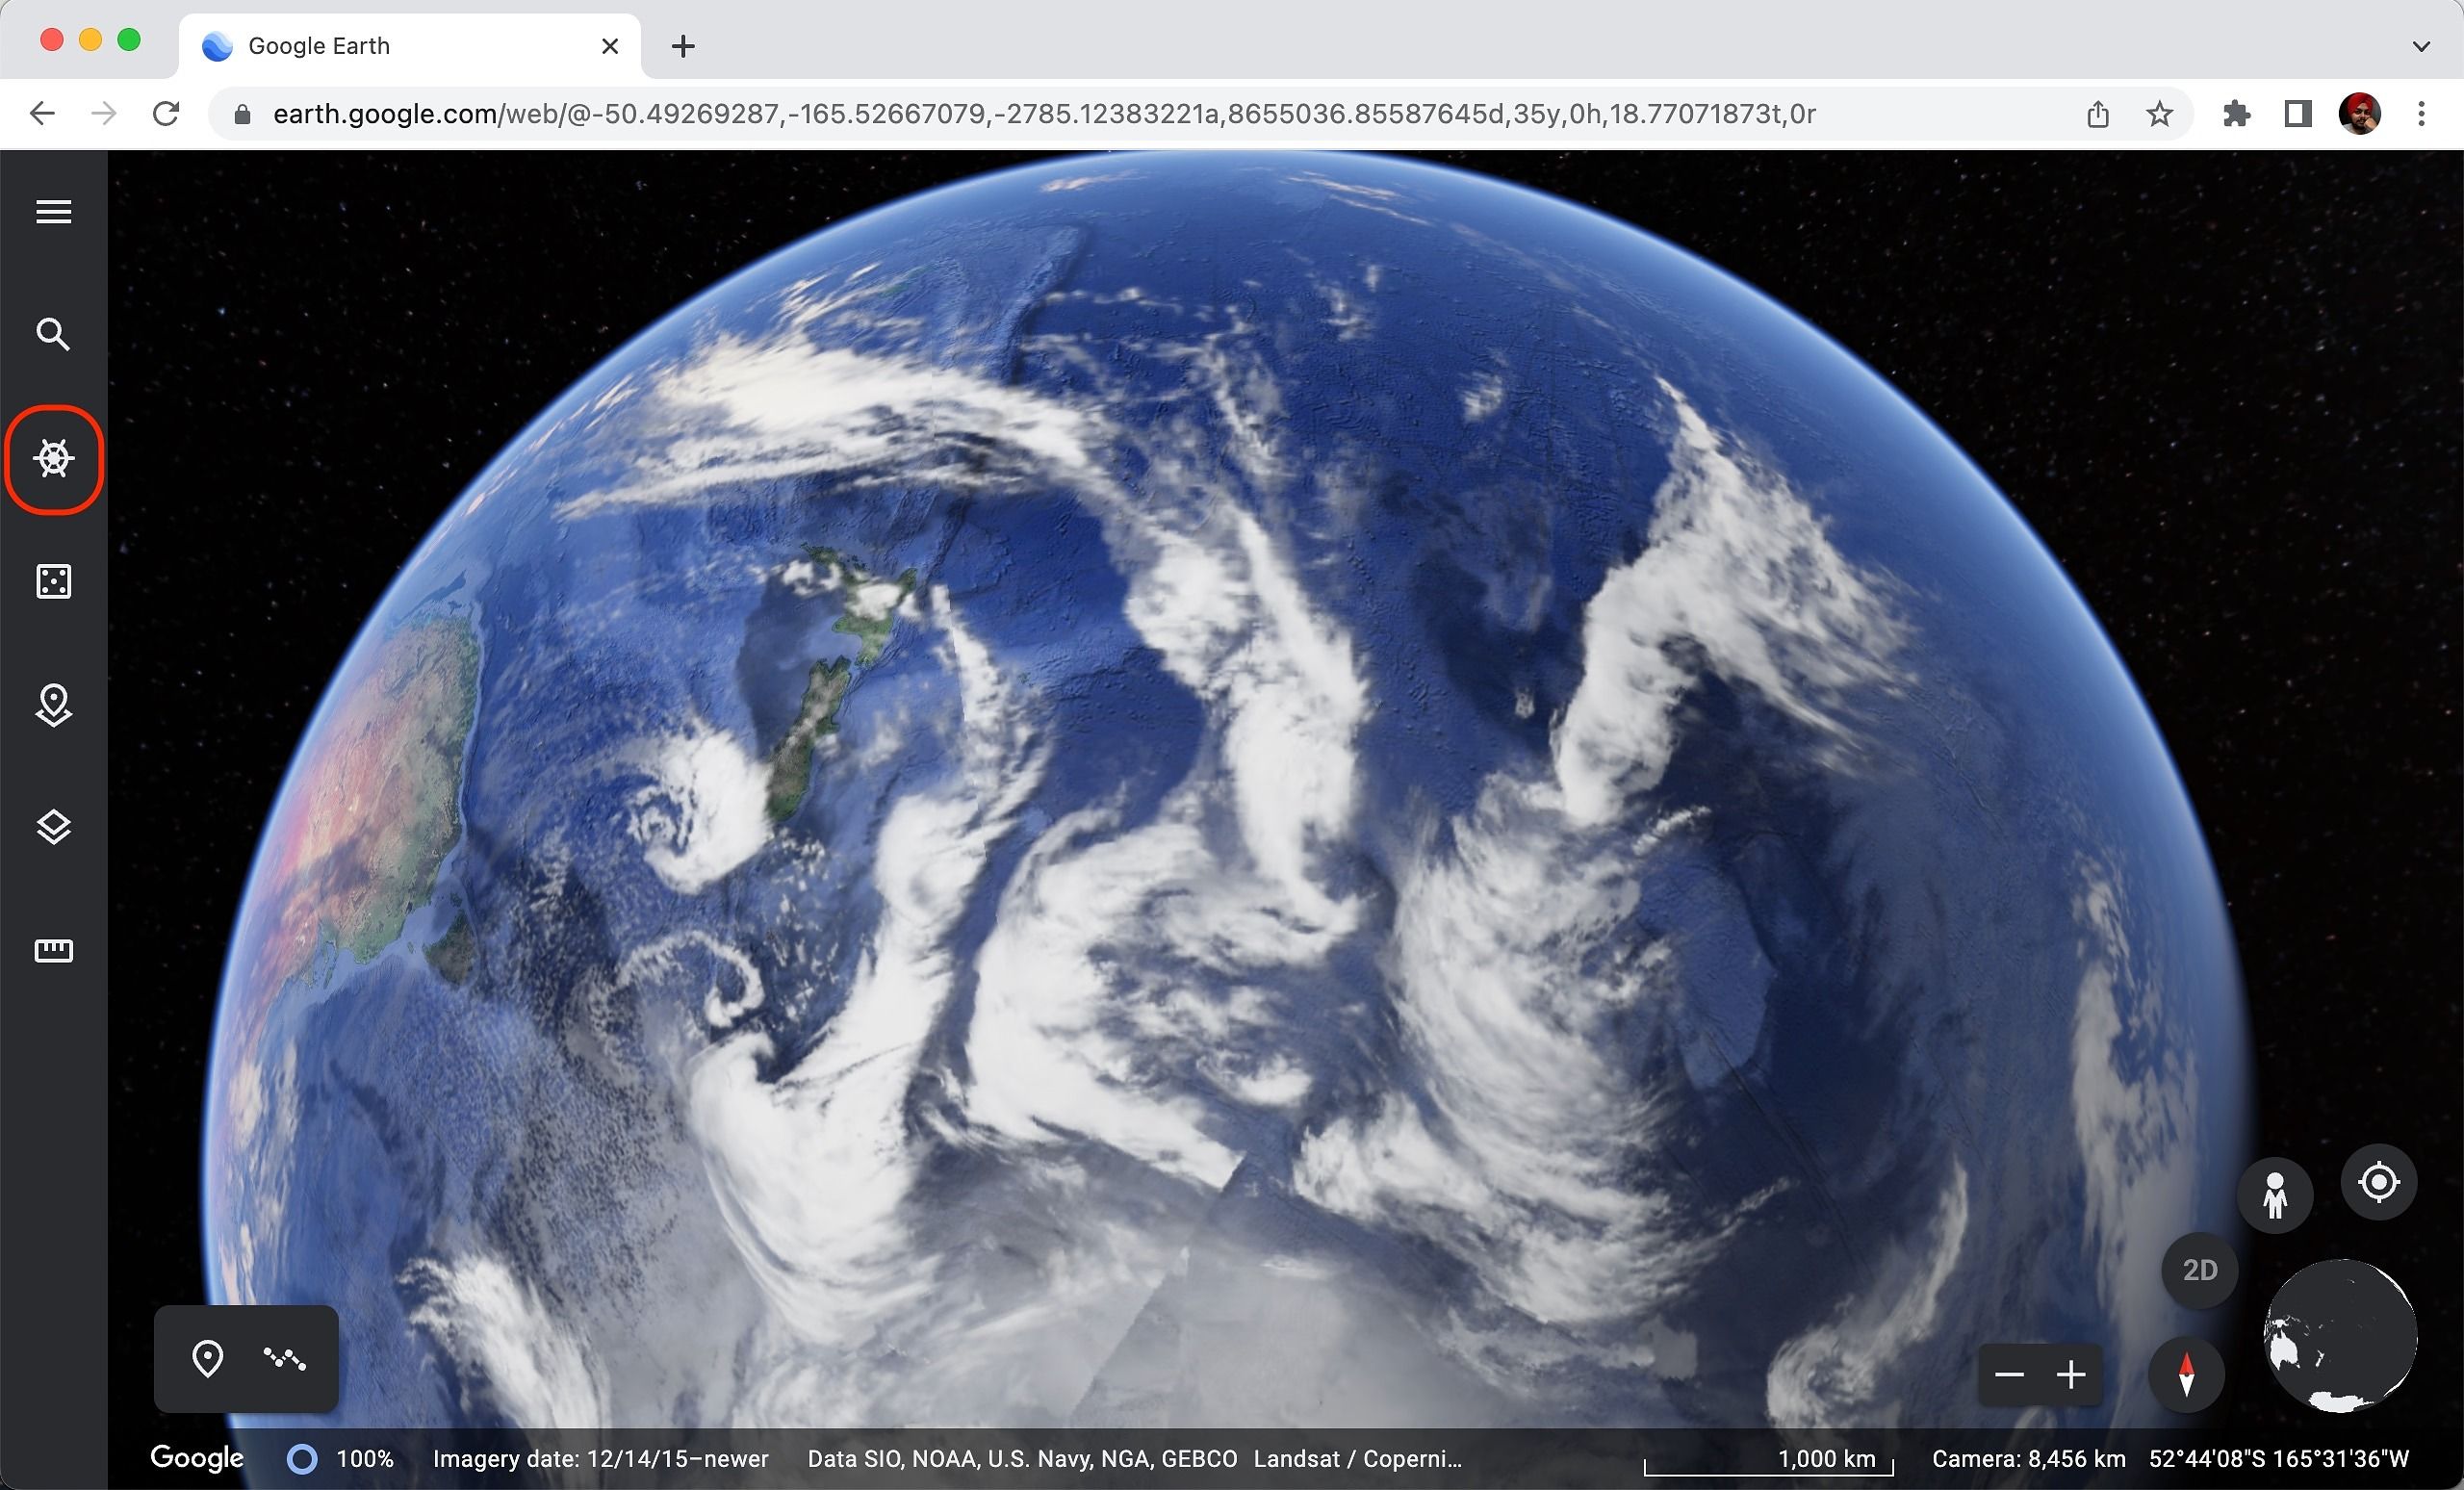
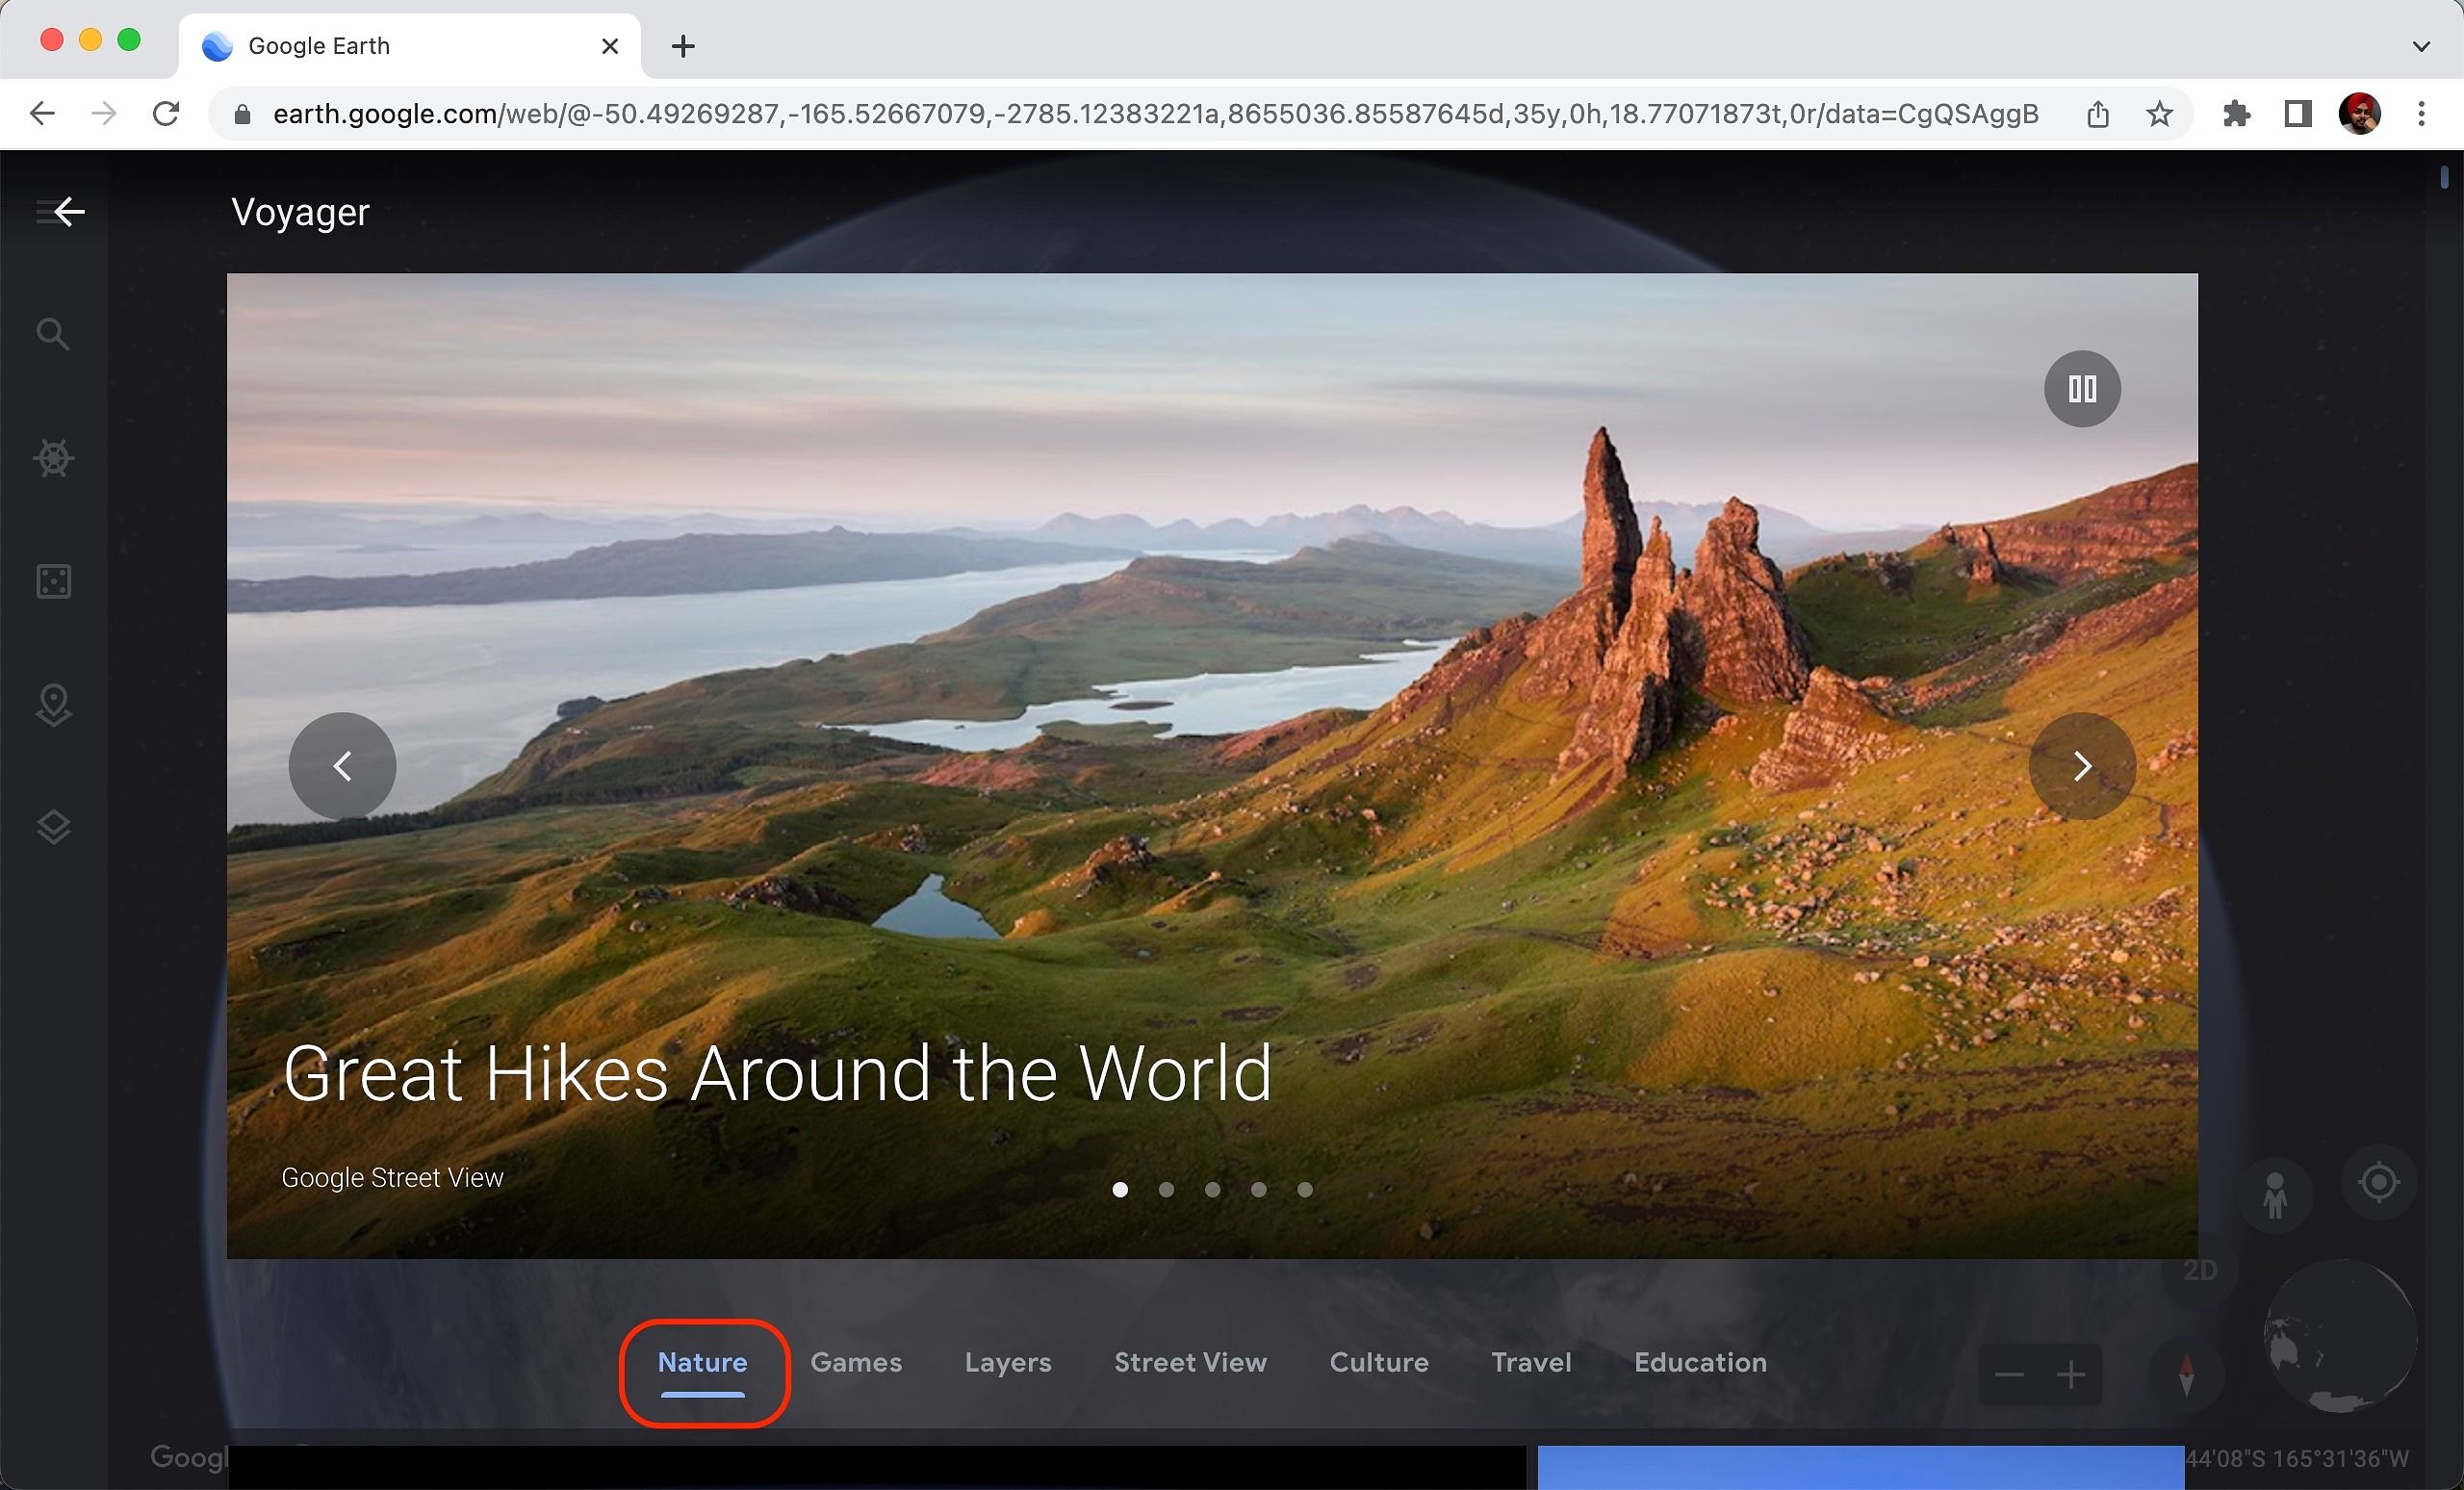
- Open the Google Earth website and go to Voyager using the helm icon on the left sidebar.
- Select Nature.
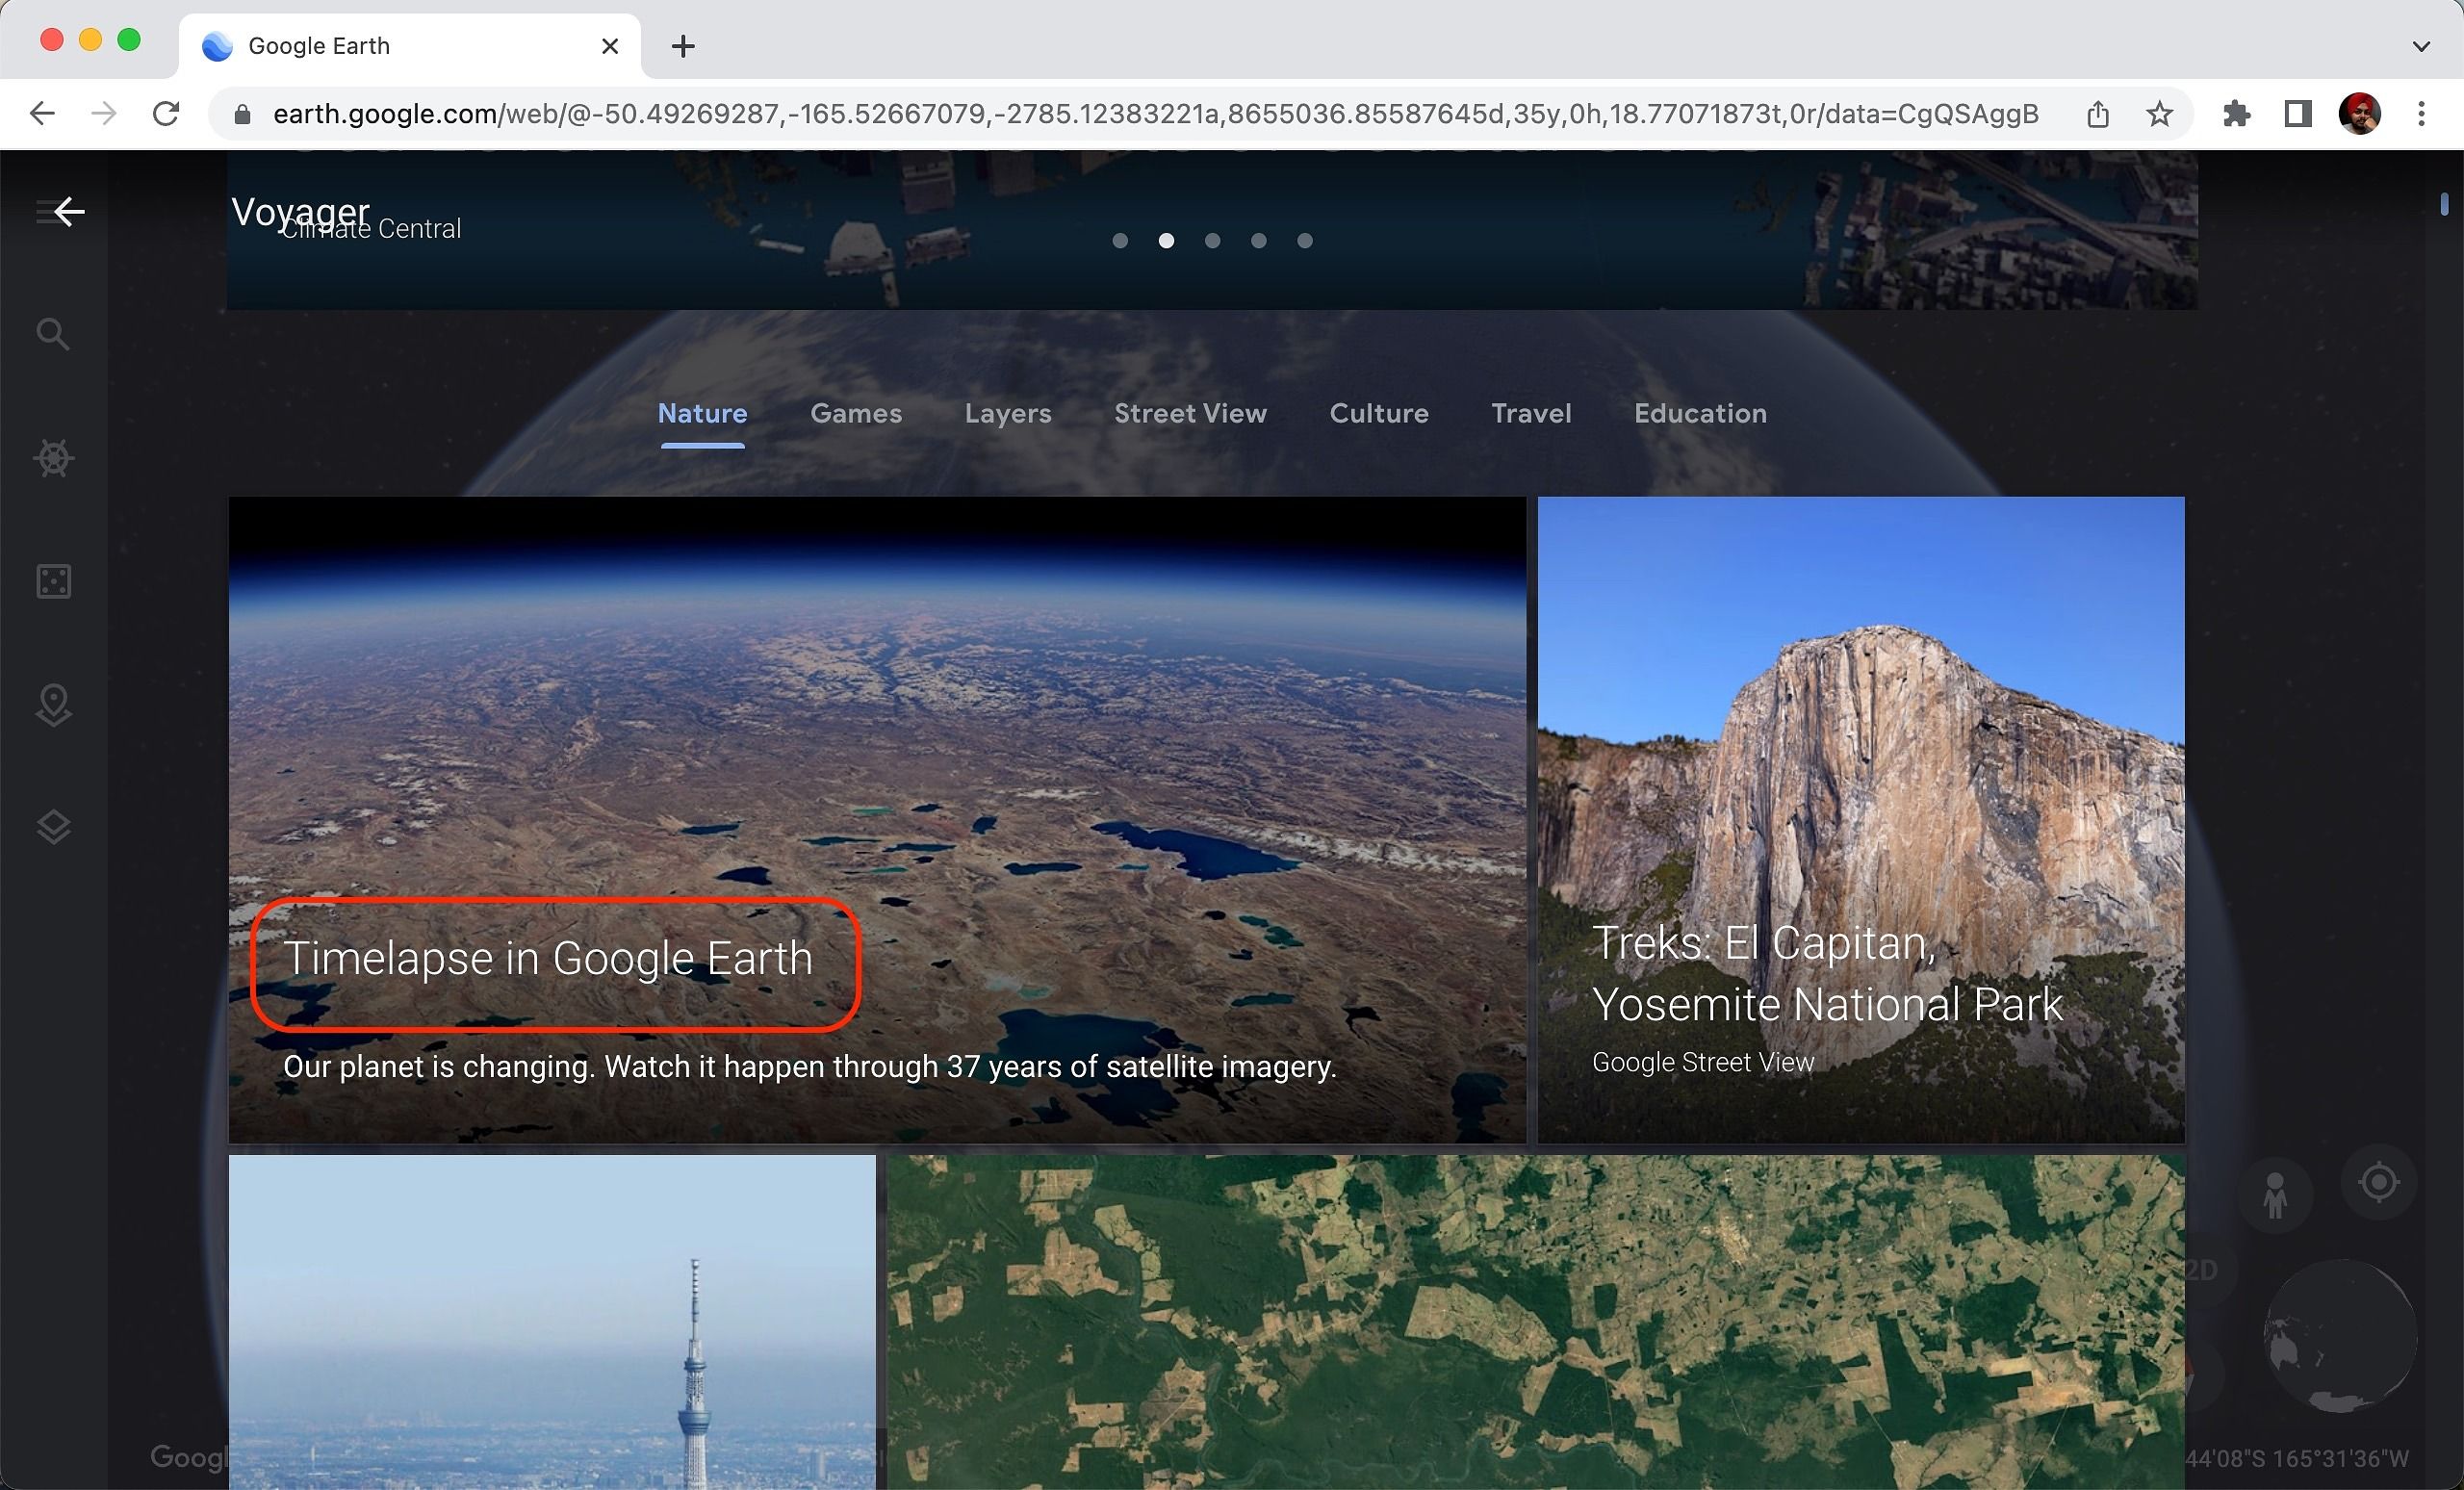
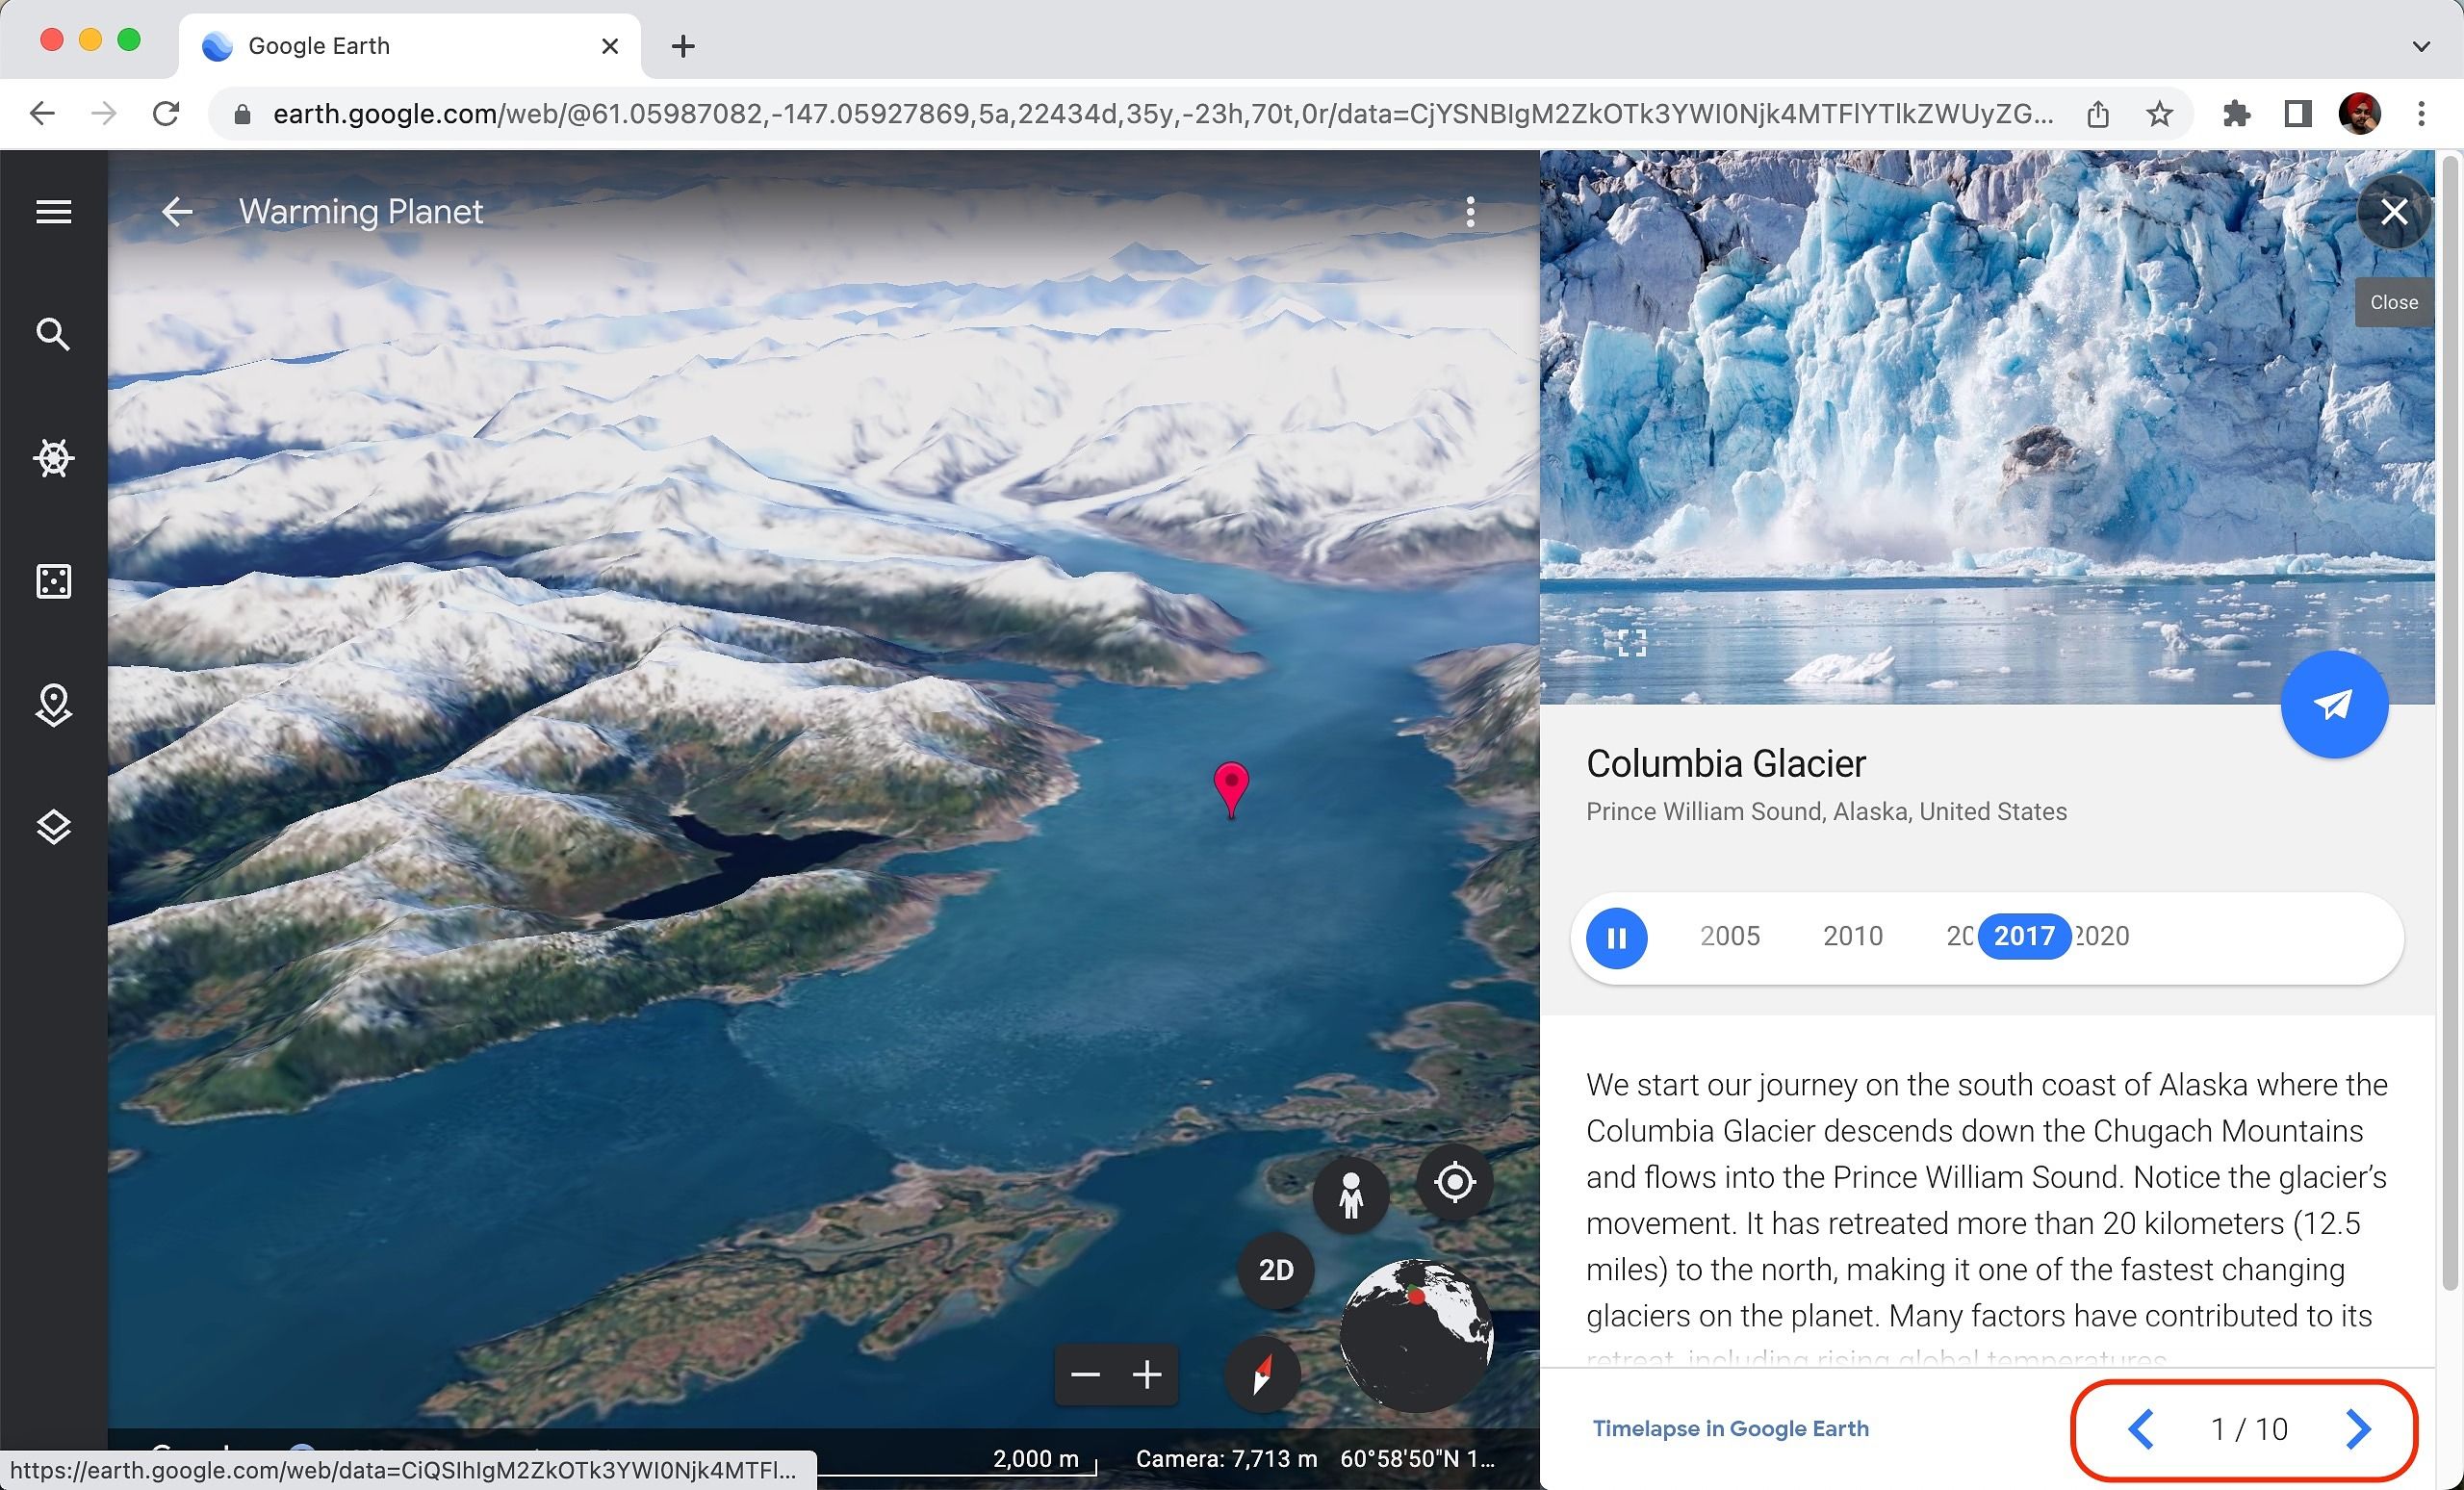
- Scroll down and select Timelapse in Google Earth. It takes you to one of the preset places and starts the animated time-lapse mode.
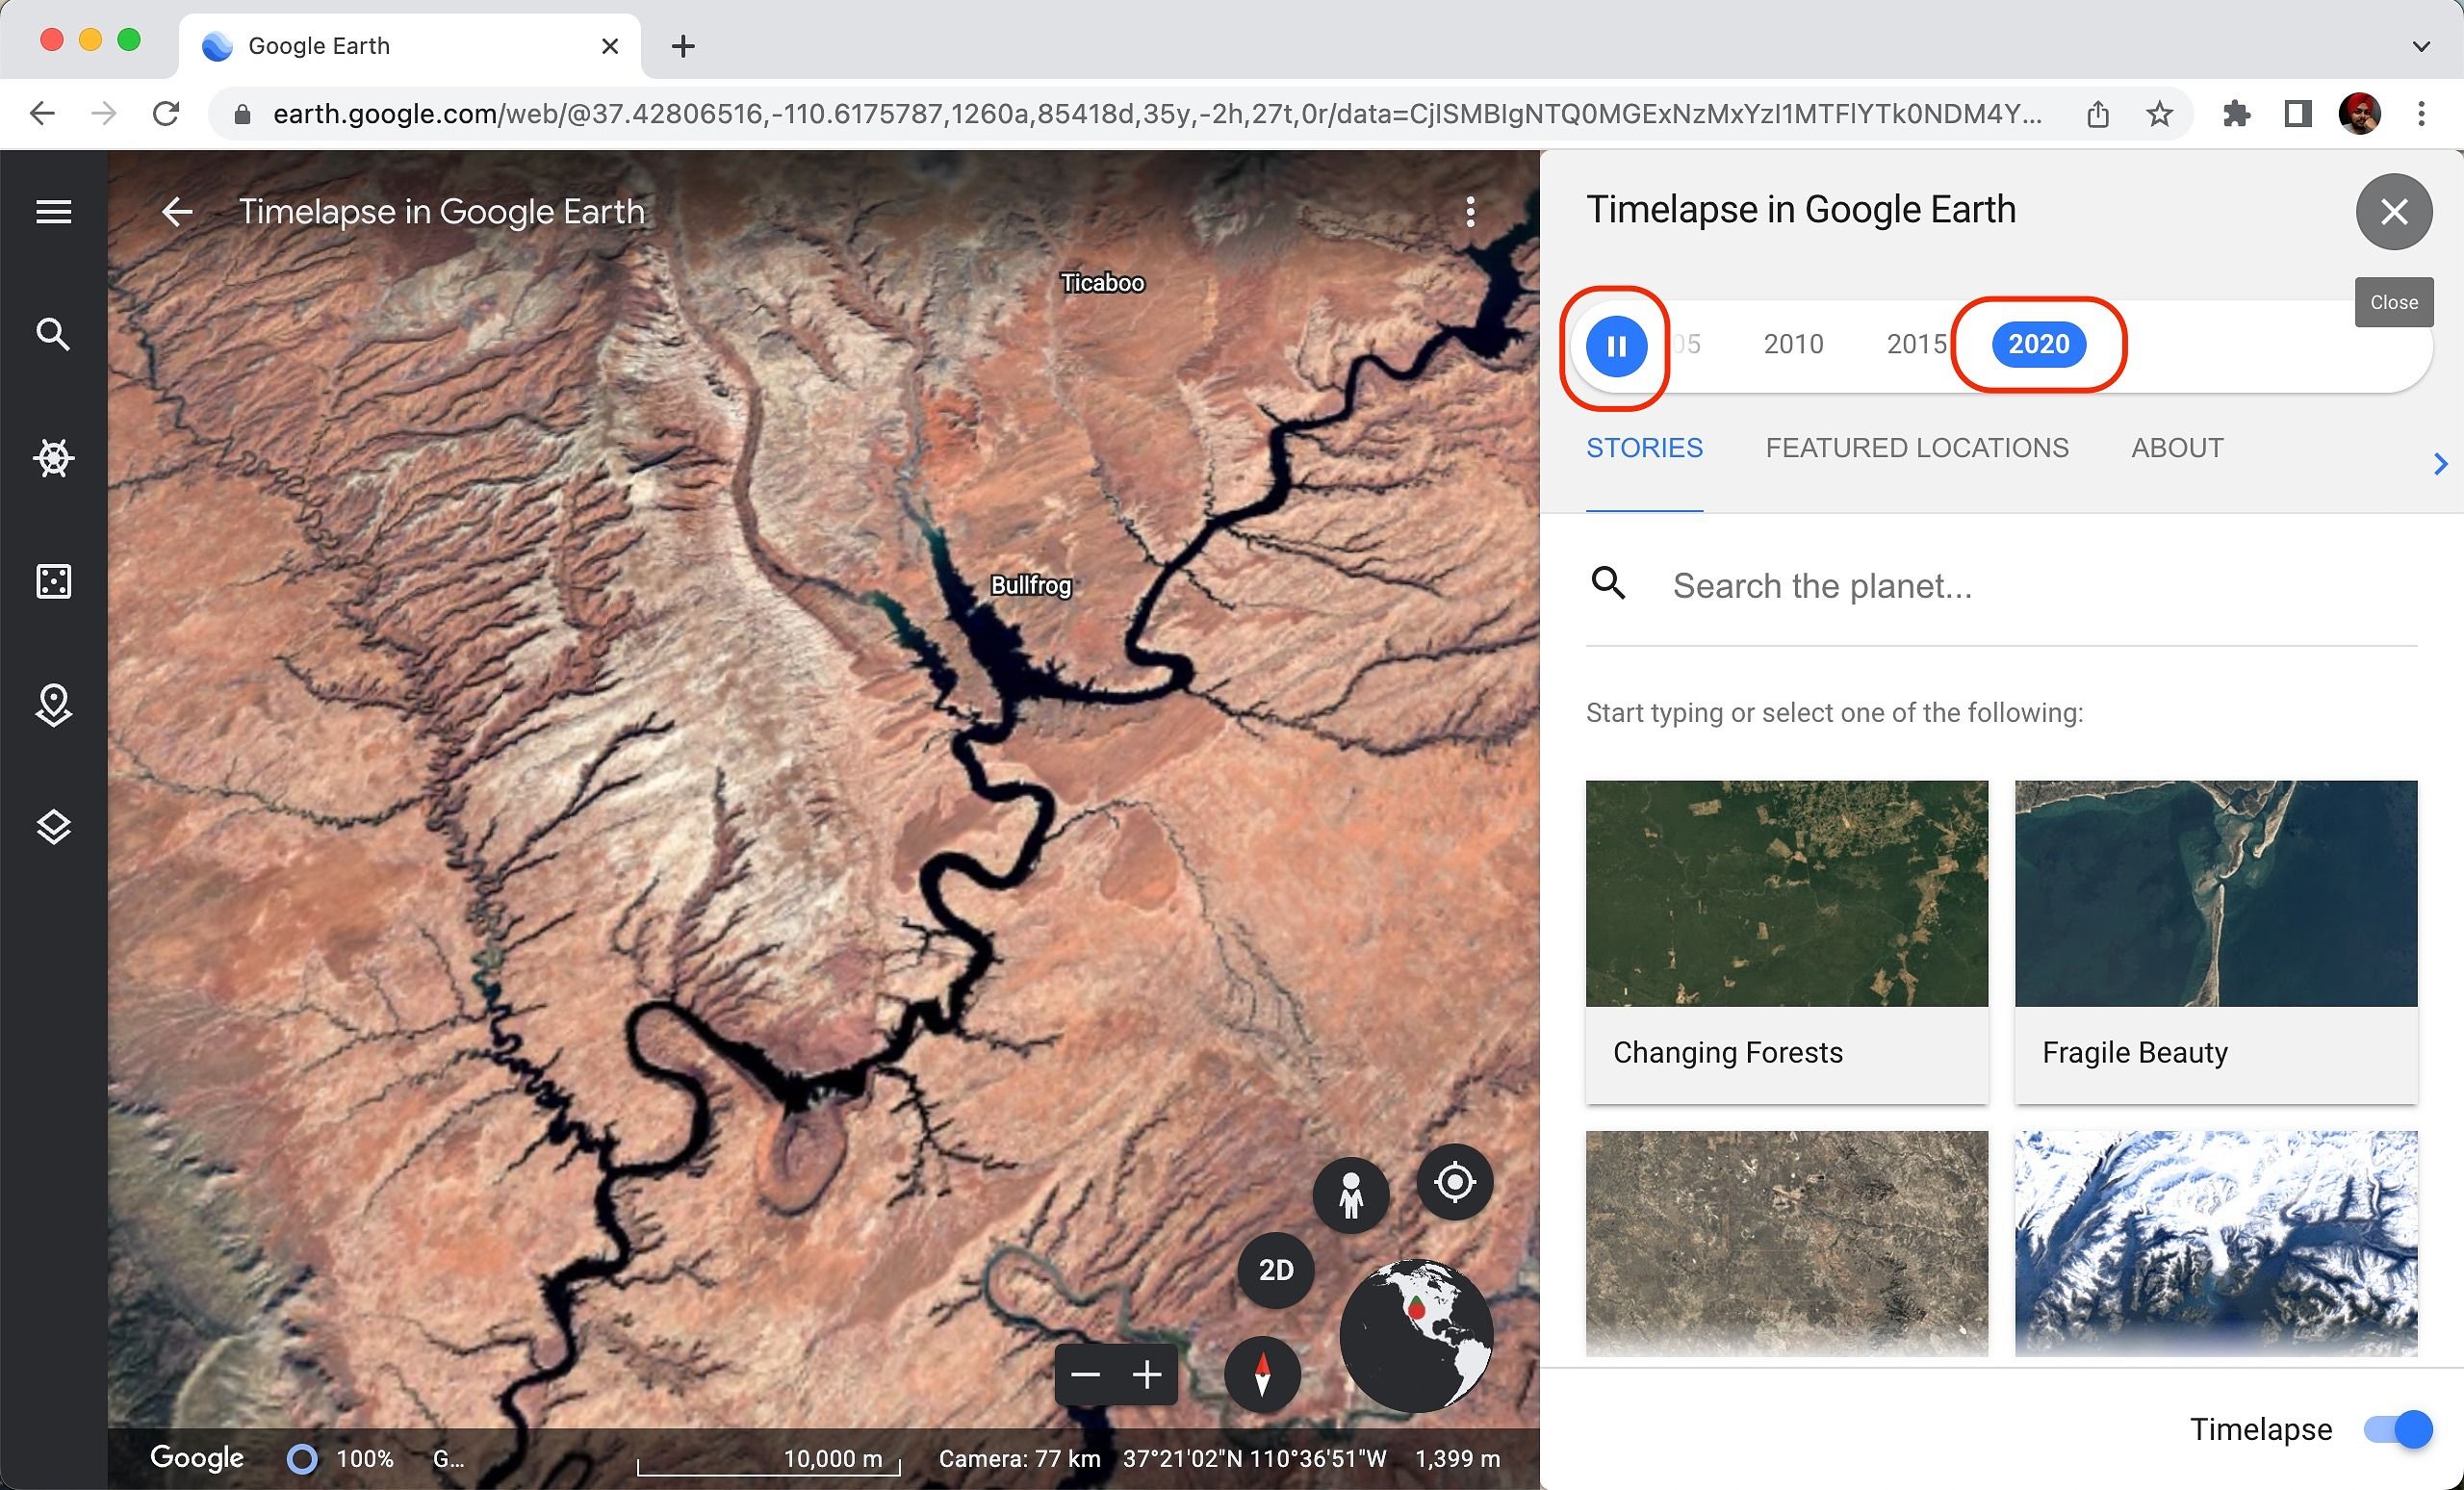
- Go to the right pane to pause the timelapse animation. Use the year selector to jump between times manually.
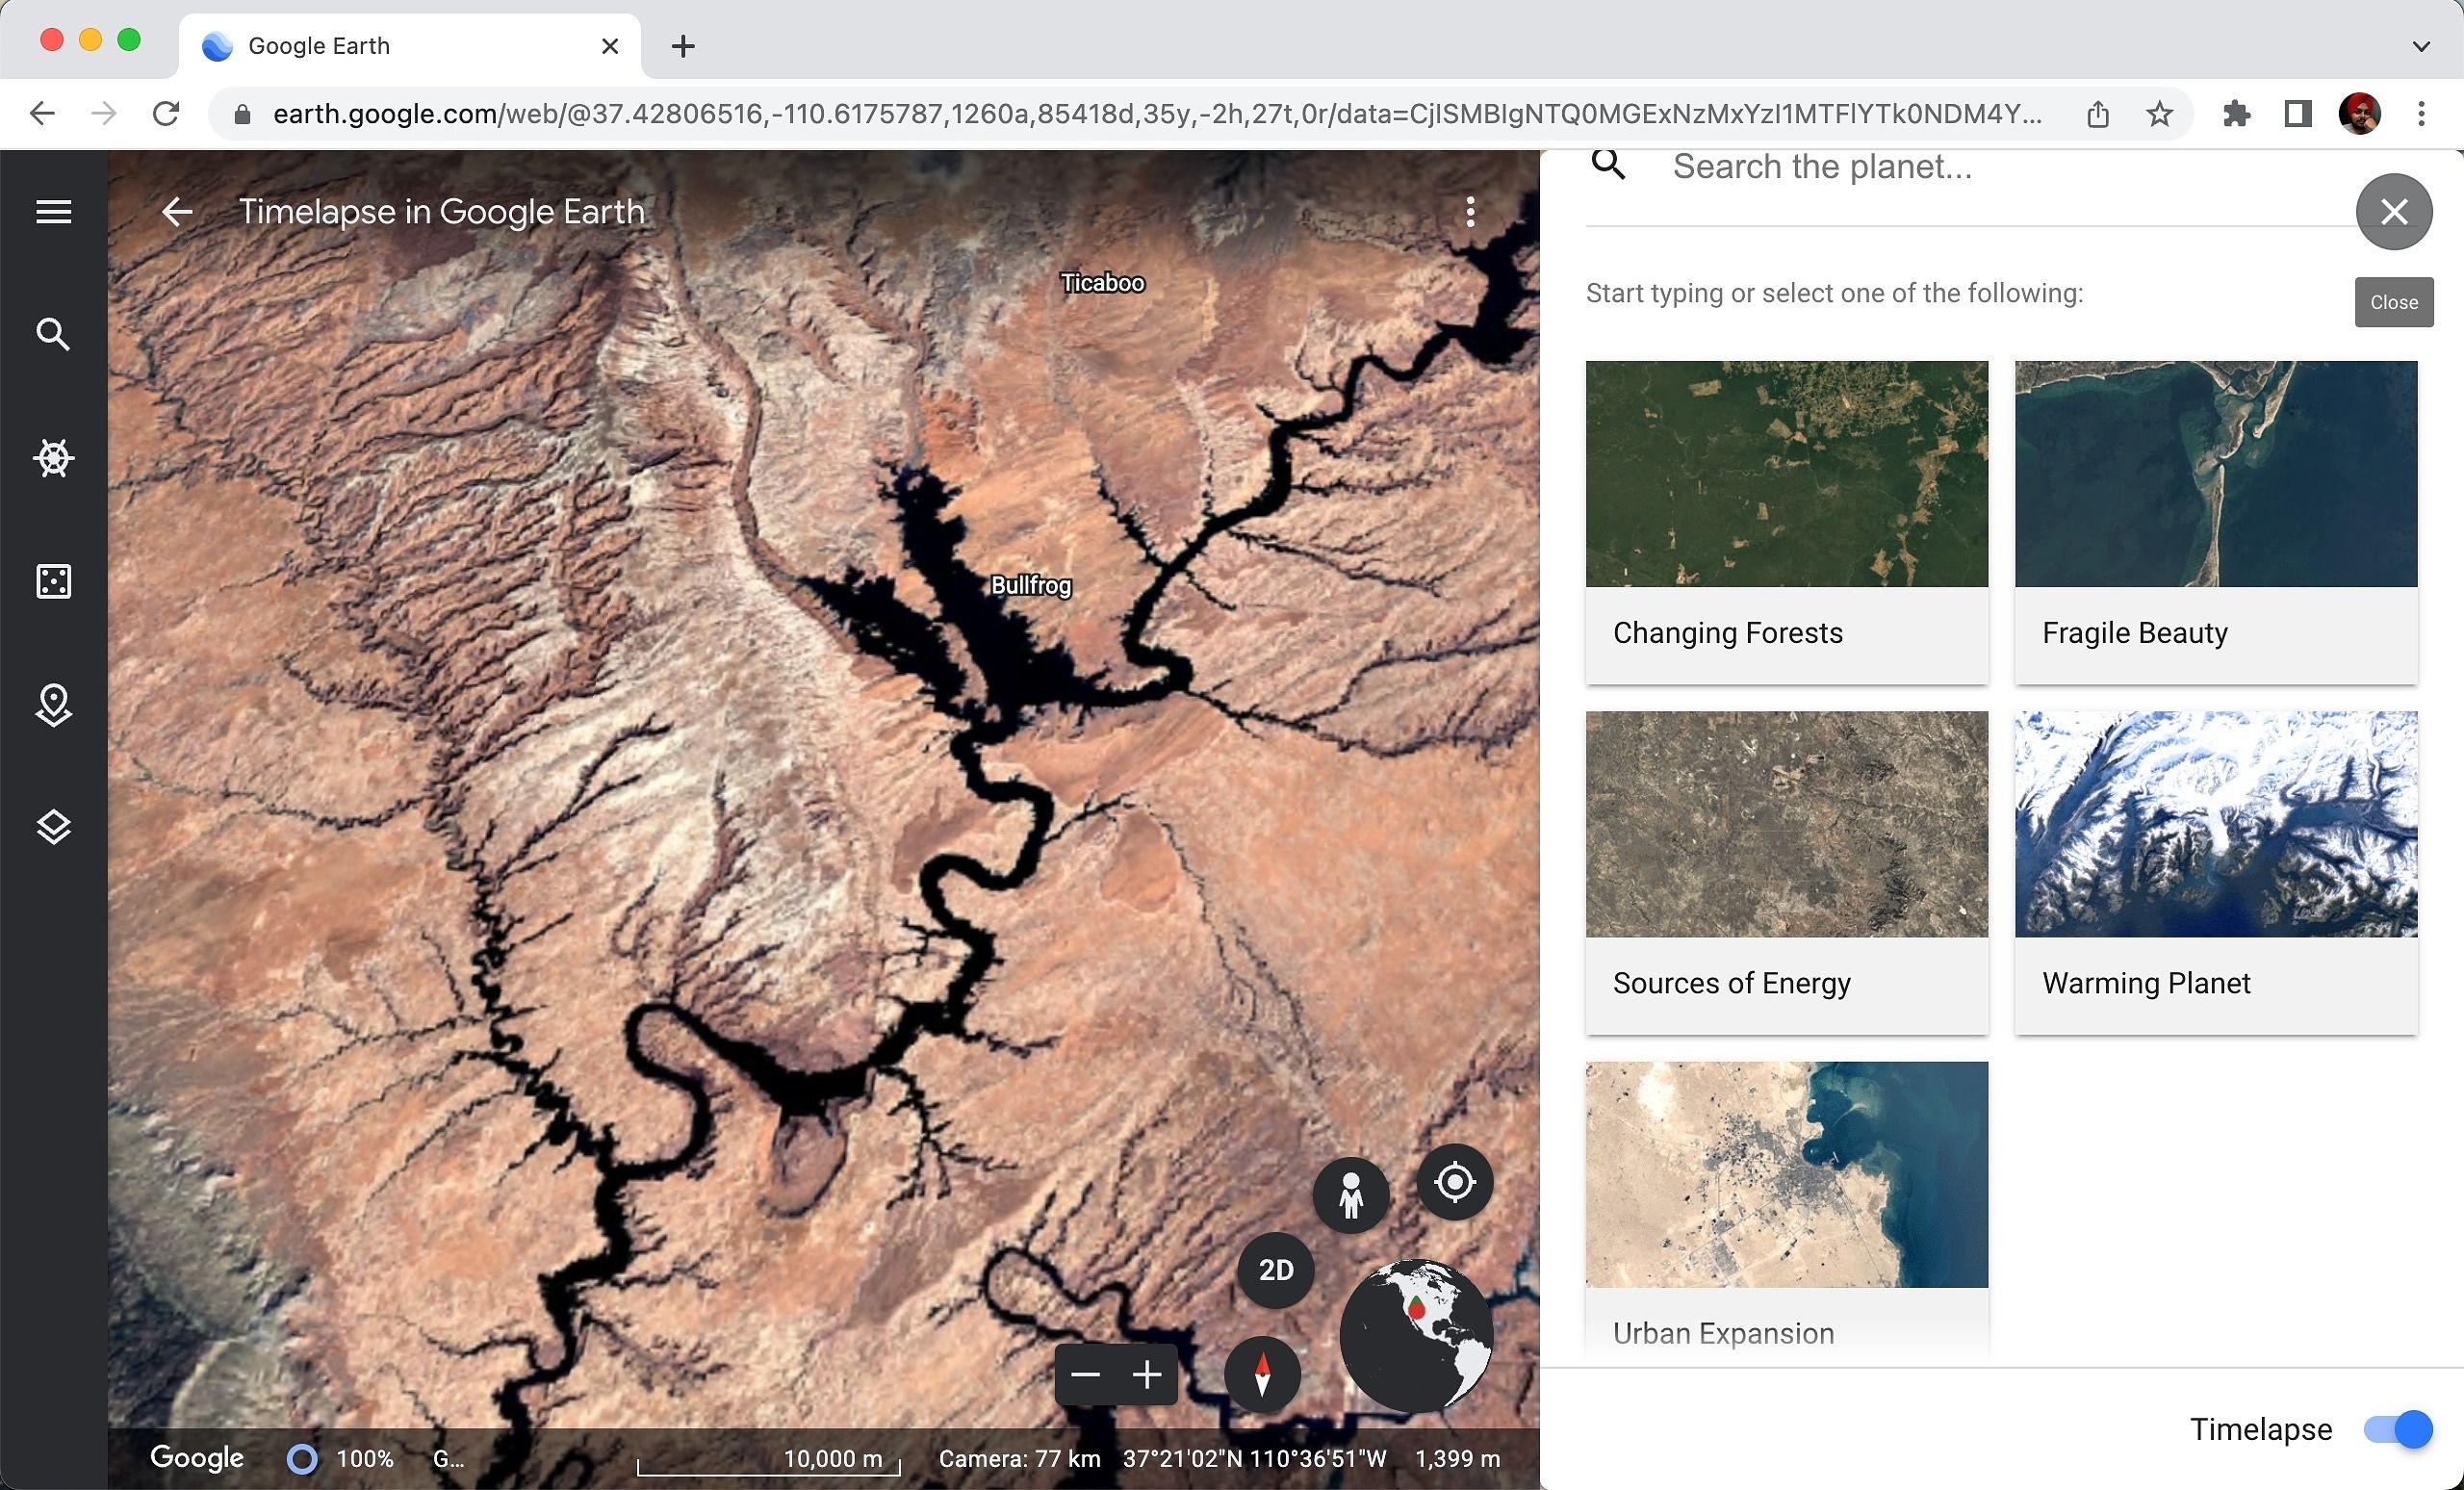
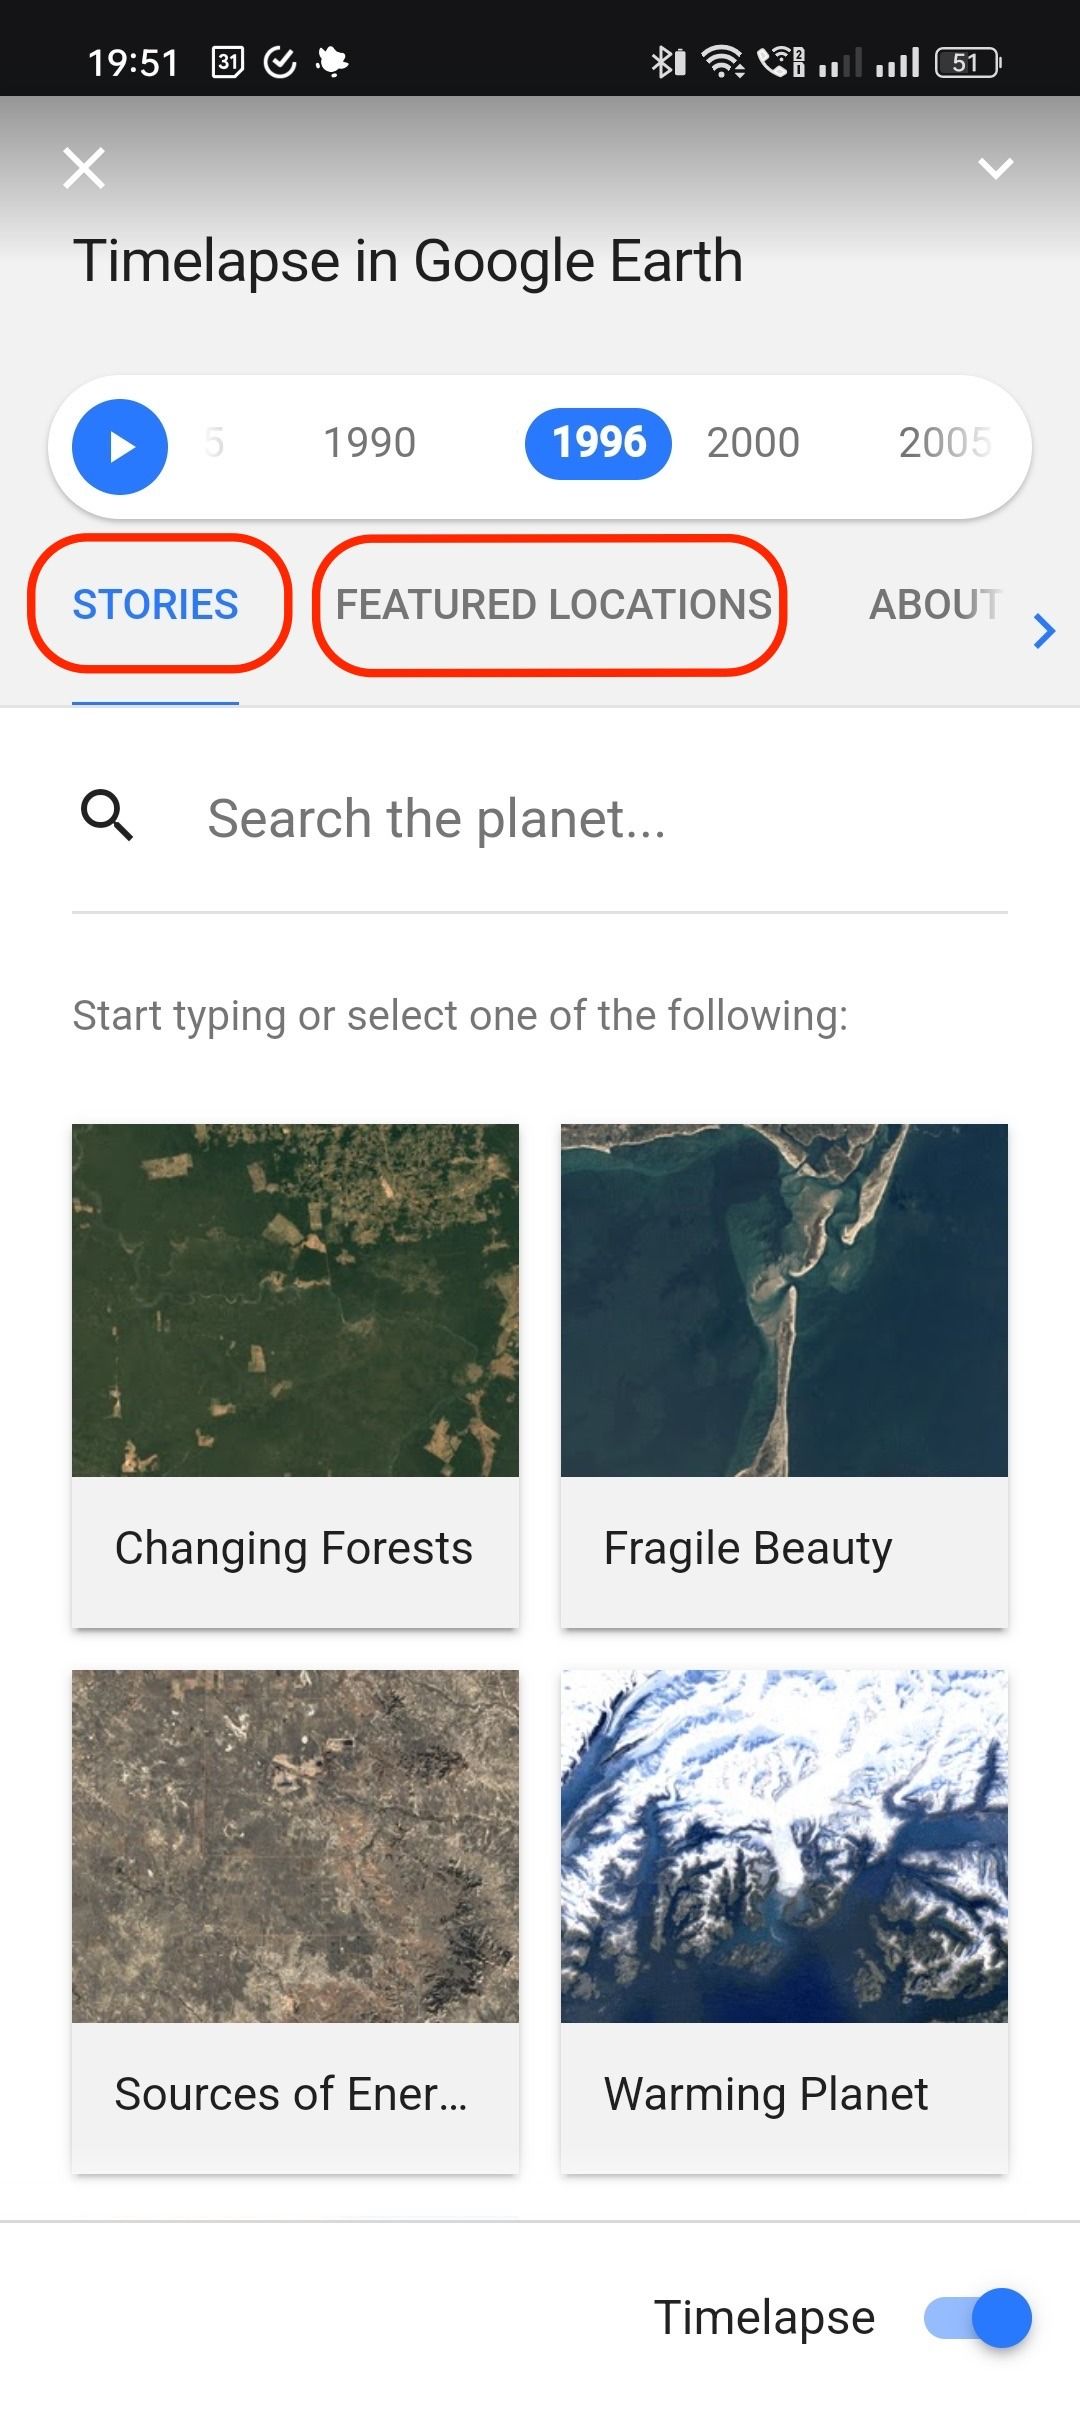
- Below the time bar, you’ll see a section that lists Stories with five themes, each with over a half dozen places you can visit virtually. Select one of them to get started.
- Use the arrows on the right pane to scroll through the stories individually on the next screen.
The Timelapse feature for Google Earth isn’t available for all locations. Some may give you a simple photograph, while others only provide information about the geography.
You can also access a more extensive collection of Timelapses dating back to 1984 in the Featured Locations section next to Stories. This selection ranges from deforestation and mining to natural disasters and infrastructure.

If the Google Earth website doesn’t open or work as intended, use Google Chrome as your desktop web browser. Doing so provides the best possible experience when interacting with the Google Earth web app.
How to use Google Earth’s Timelapse on the mobile app
The Timelapse feature is also available on the Google Earth app for Android smartphones. If you don’t have access to a computer or want to view them from anywhere, you can check out Timelines on the go at any given time.
To view Timelapses on the Android version of Google Earth, do the following:
- Download and install Google Earth from the Google Play Store.
- Open the app to the main screen.
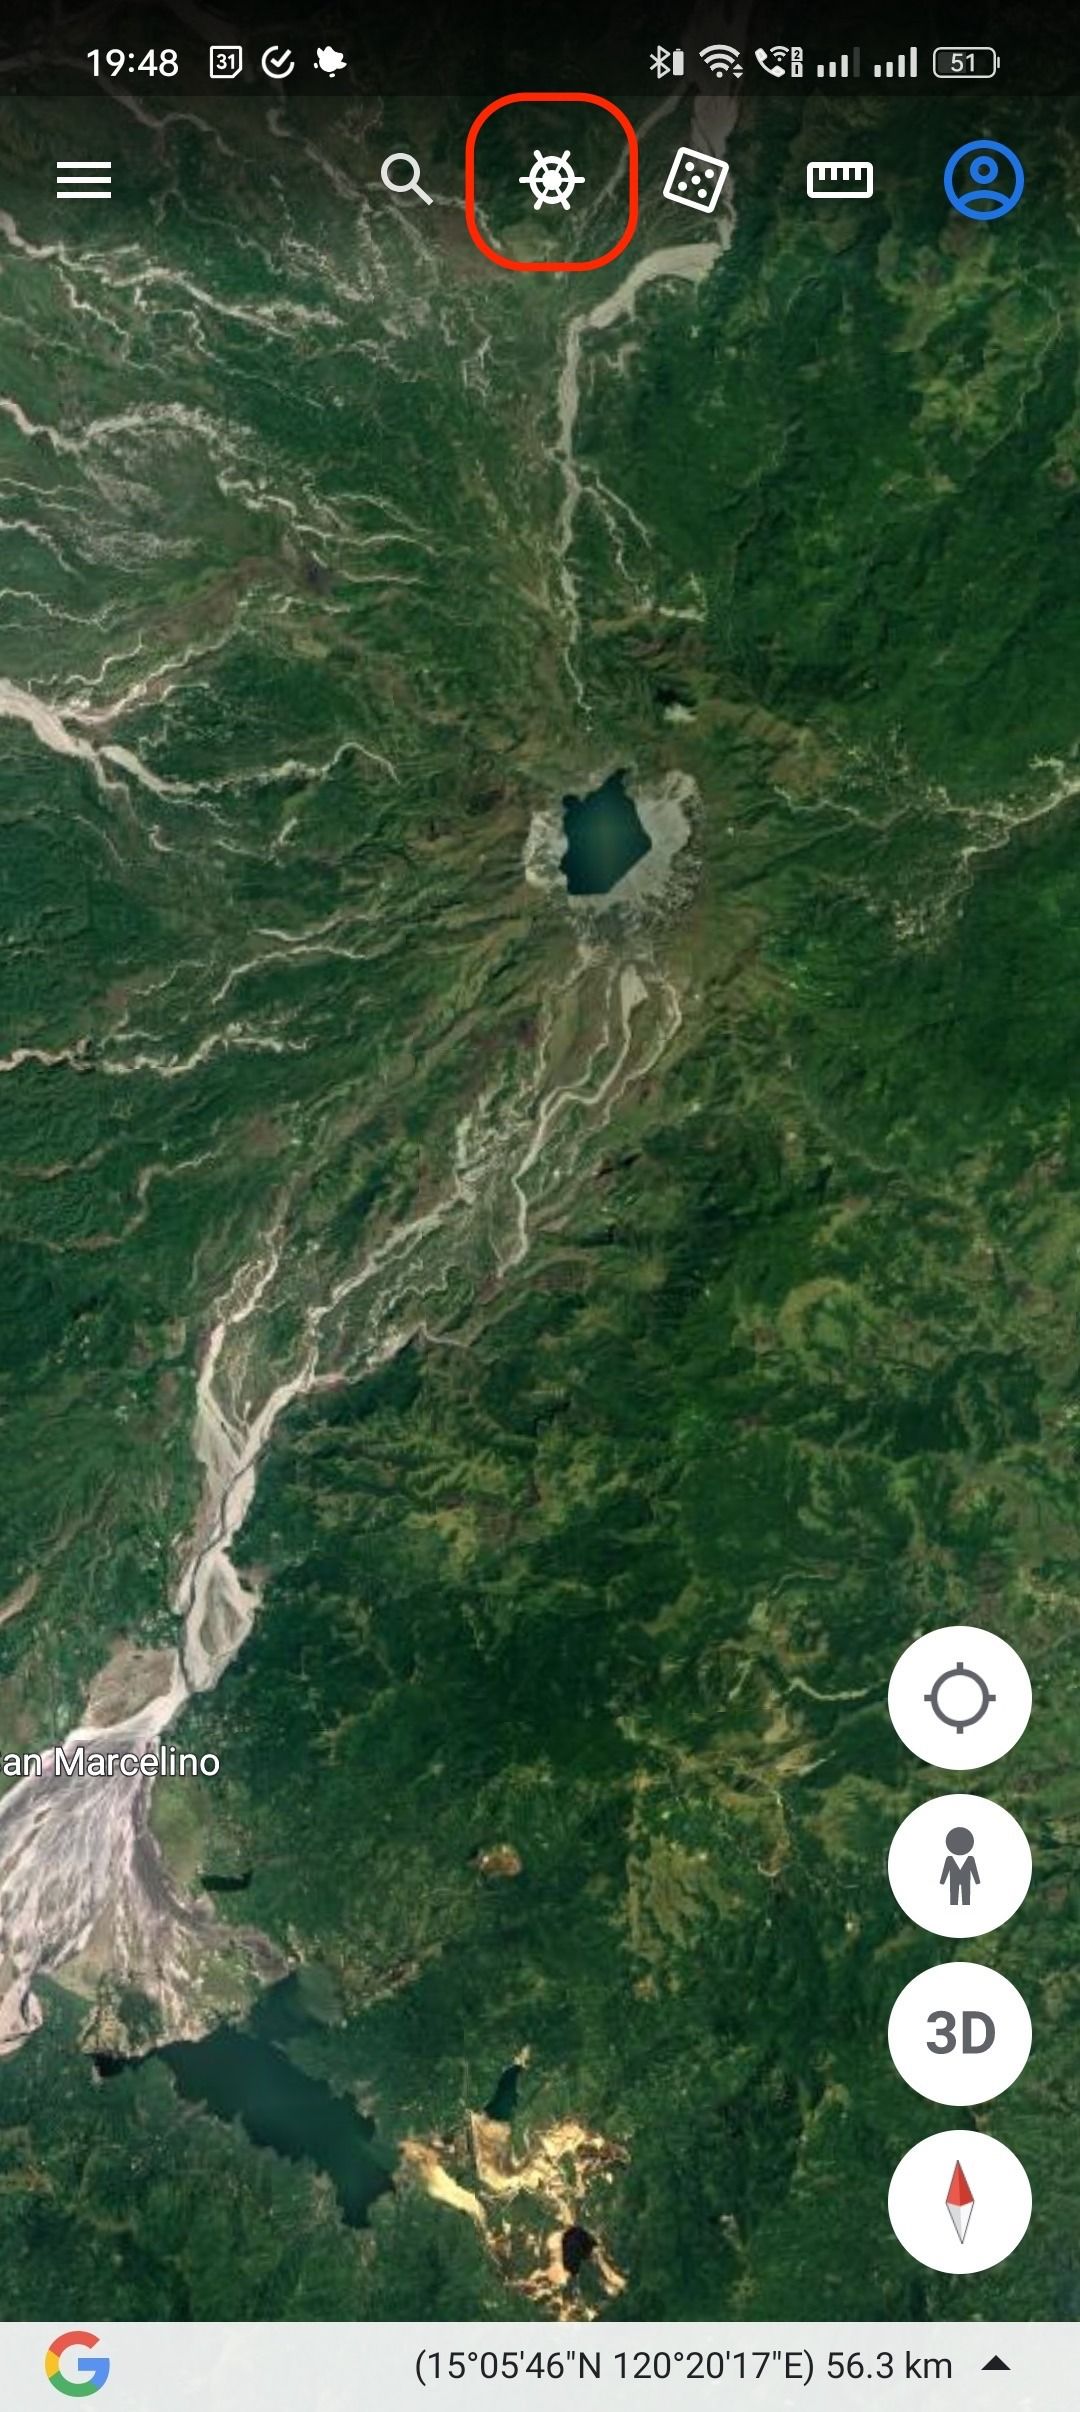
- Tap the helm icon at the top of the screen to enter Voyager mode.
- From here, the process is almost identical to the web version of Google Earth. You can select a location from the curated list and follow along with a special guided tour.

Since the historical imagery tool isn’t available on the mobile app, Timelapse is the only way to dive into the archival shots. Google makes Timelapse a fun experience to give you a handpicked tour of the places that have seen the most noticeable changes. And given it’s a curated trip, the images are always top quality, without any inconsistencies.
How to go back in time on Google Maps for the web
While the historical imagery tool on Google Earth is capable, Google Maps has a few tricks up its sleeve. Google has been recording our streets for over a decade, giving it enough data to show us how a place has changed on the ground. You can read our dedicated post to learn how to access Street View in Google Maps and go through the steps below to go back in time.
To go back in time on Google Maps for the web, check out these steps:
- Open Google Maps in your preferred browser on the desktop.
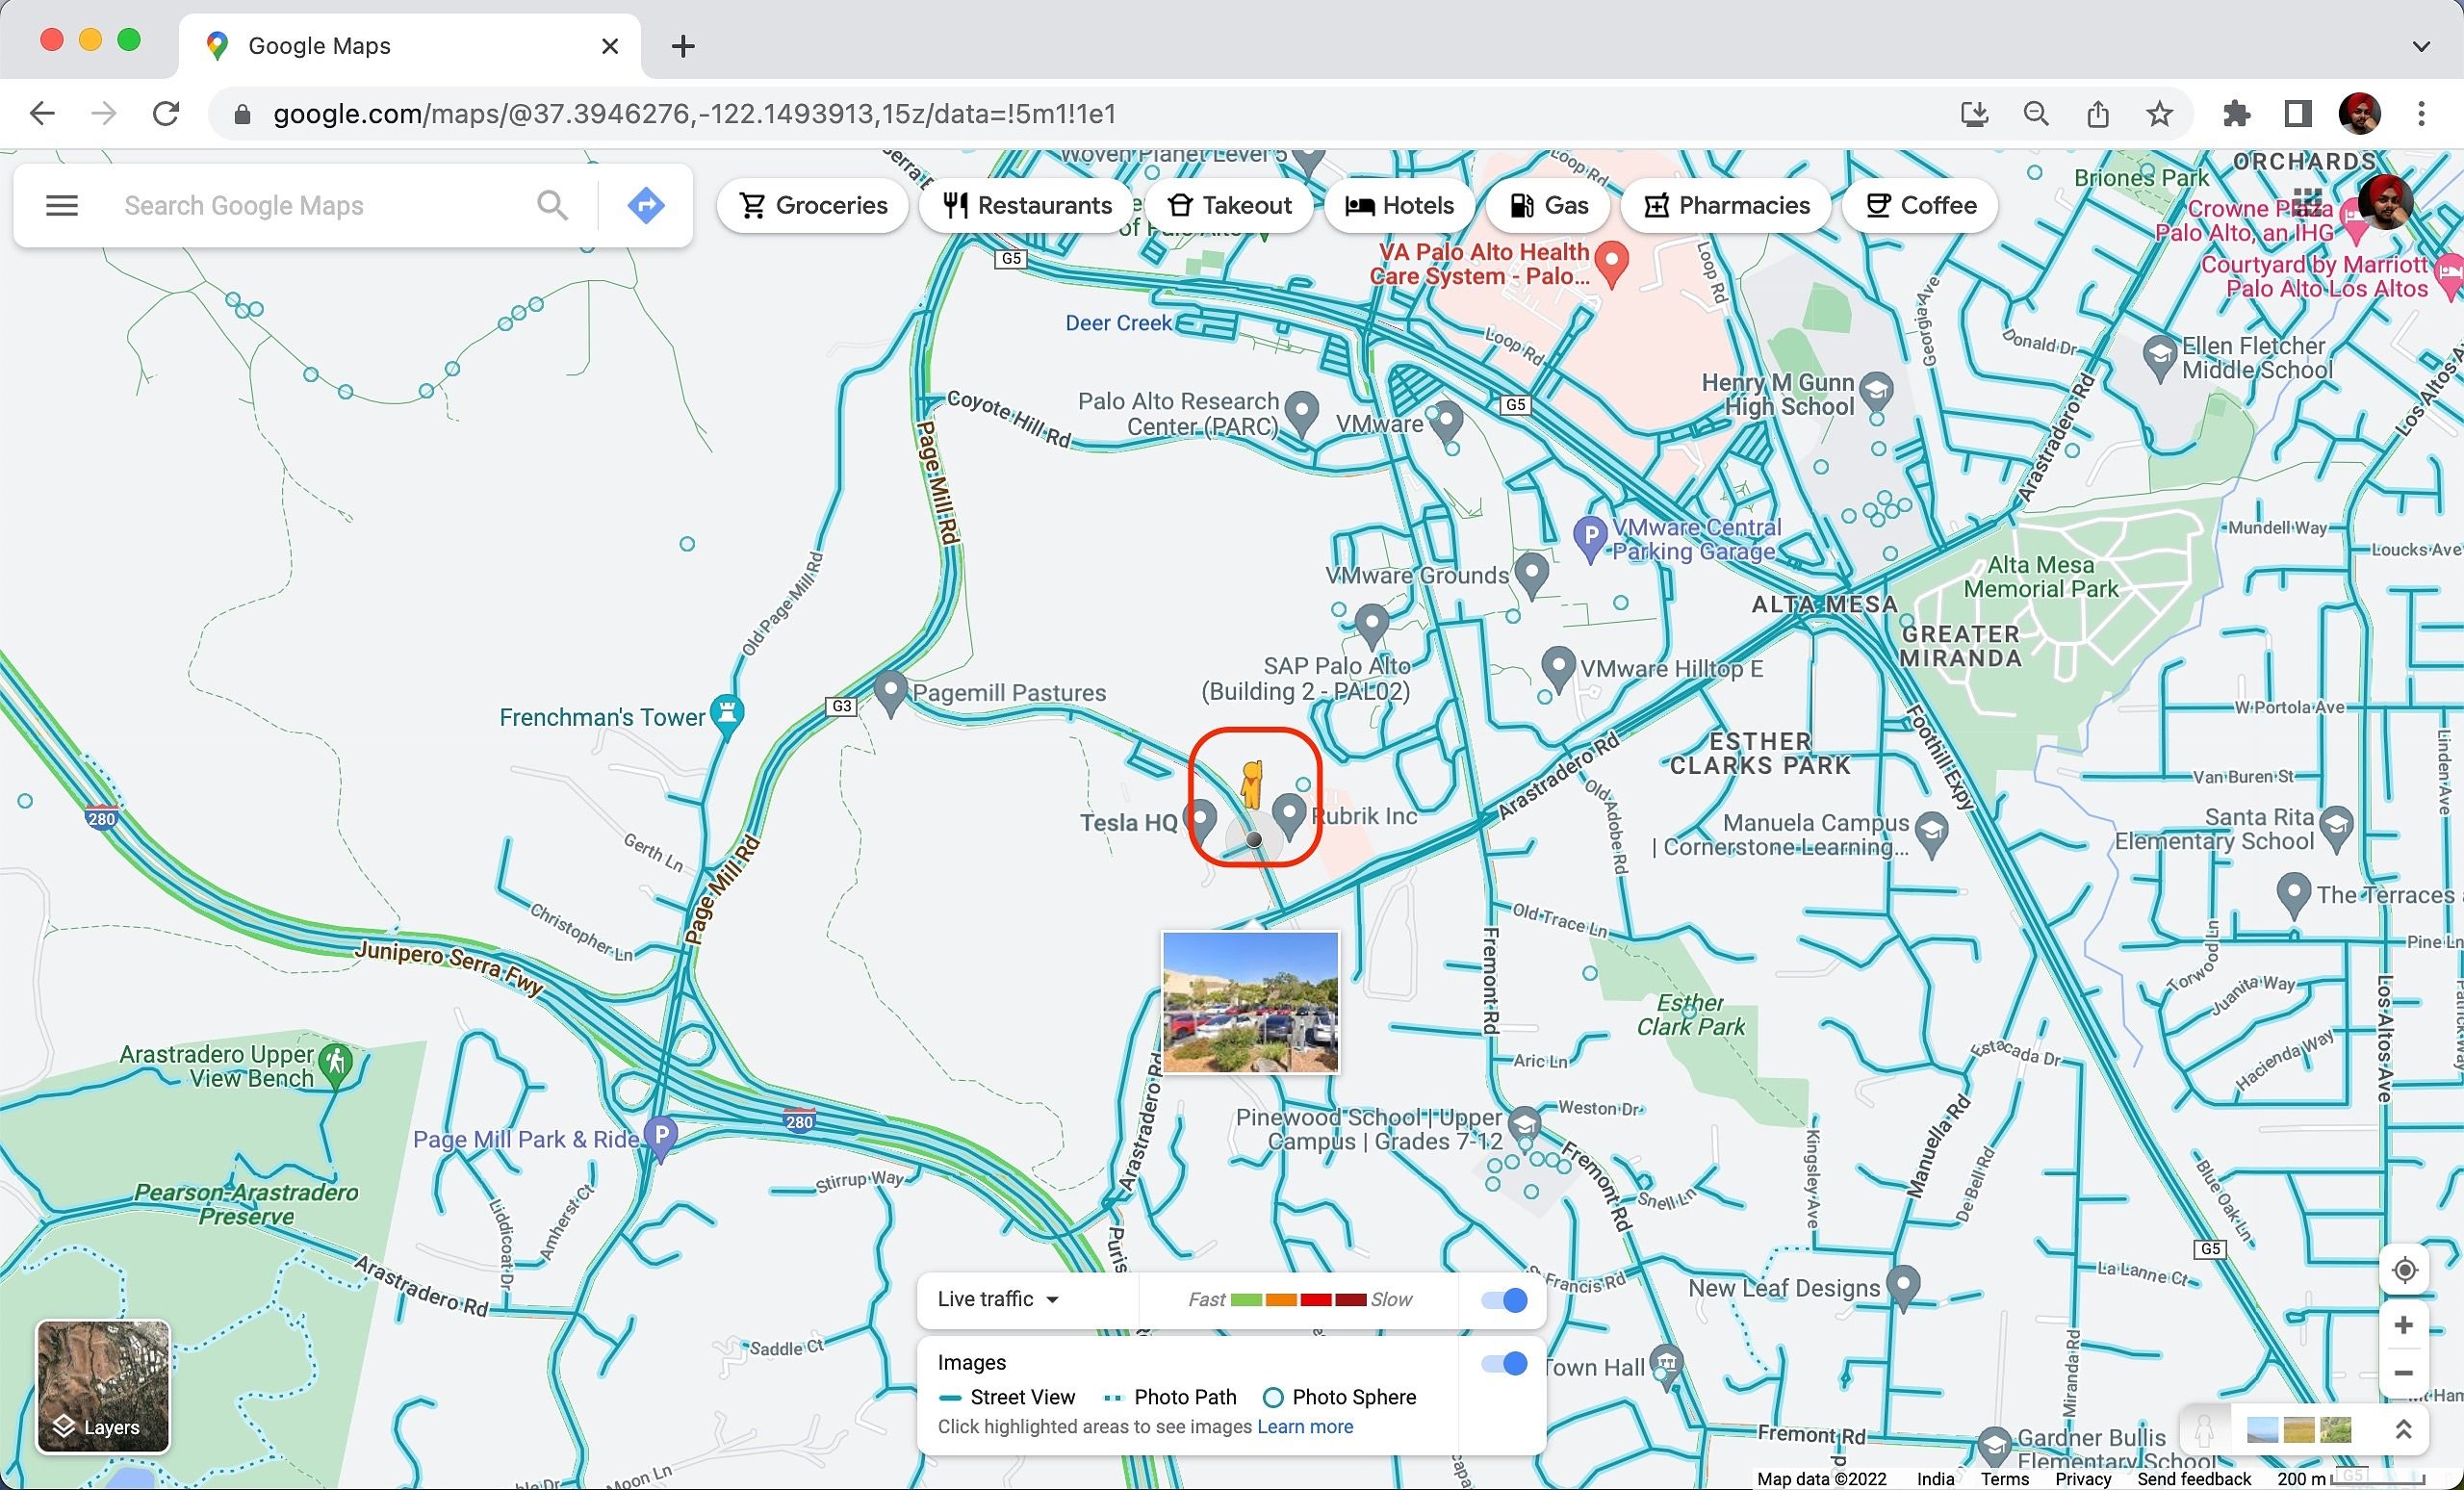
- Drop the yellow Street View guy (Pegman) on a road where street view is available.
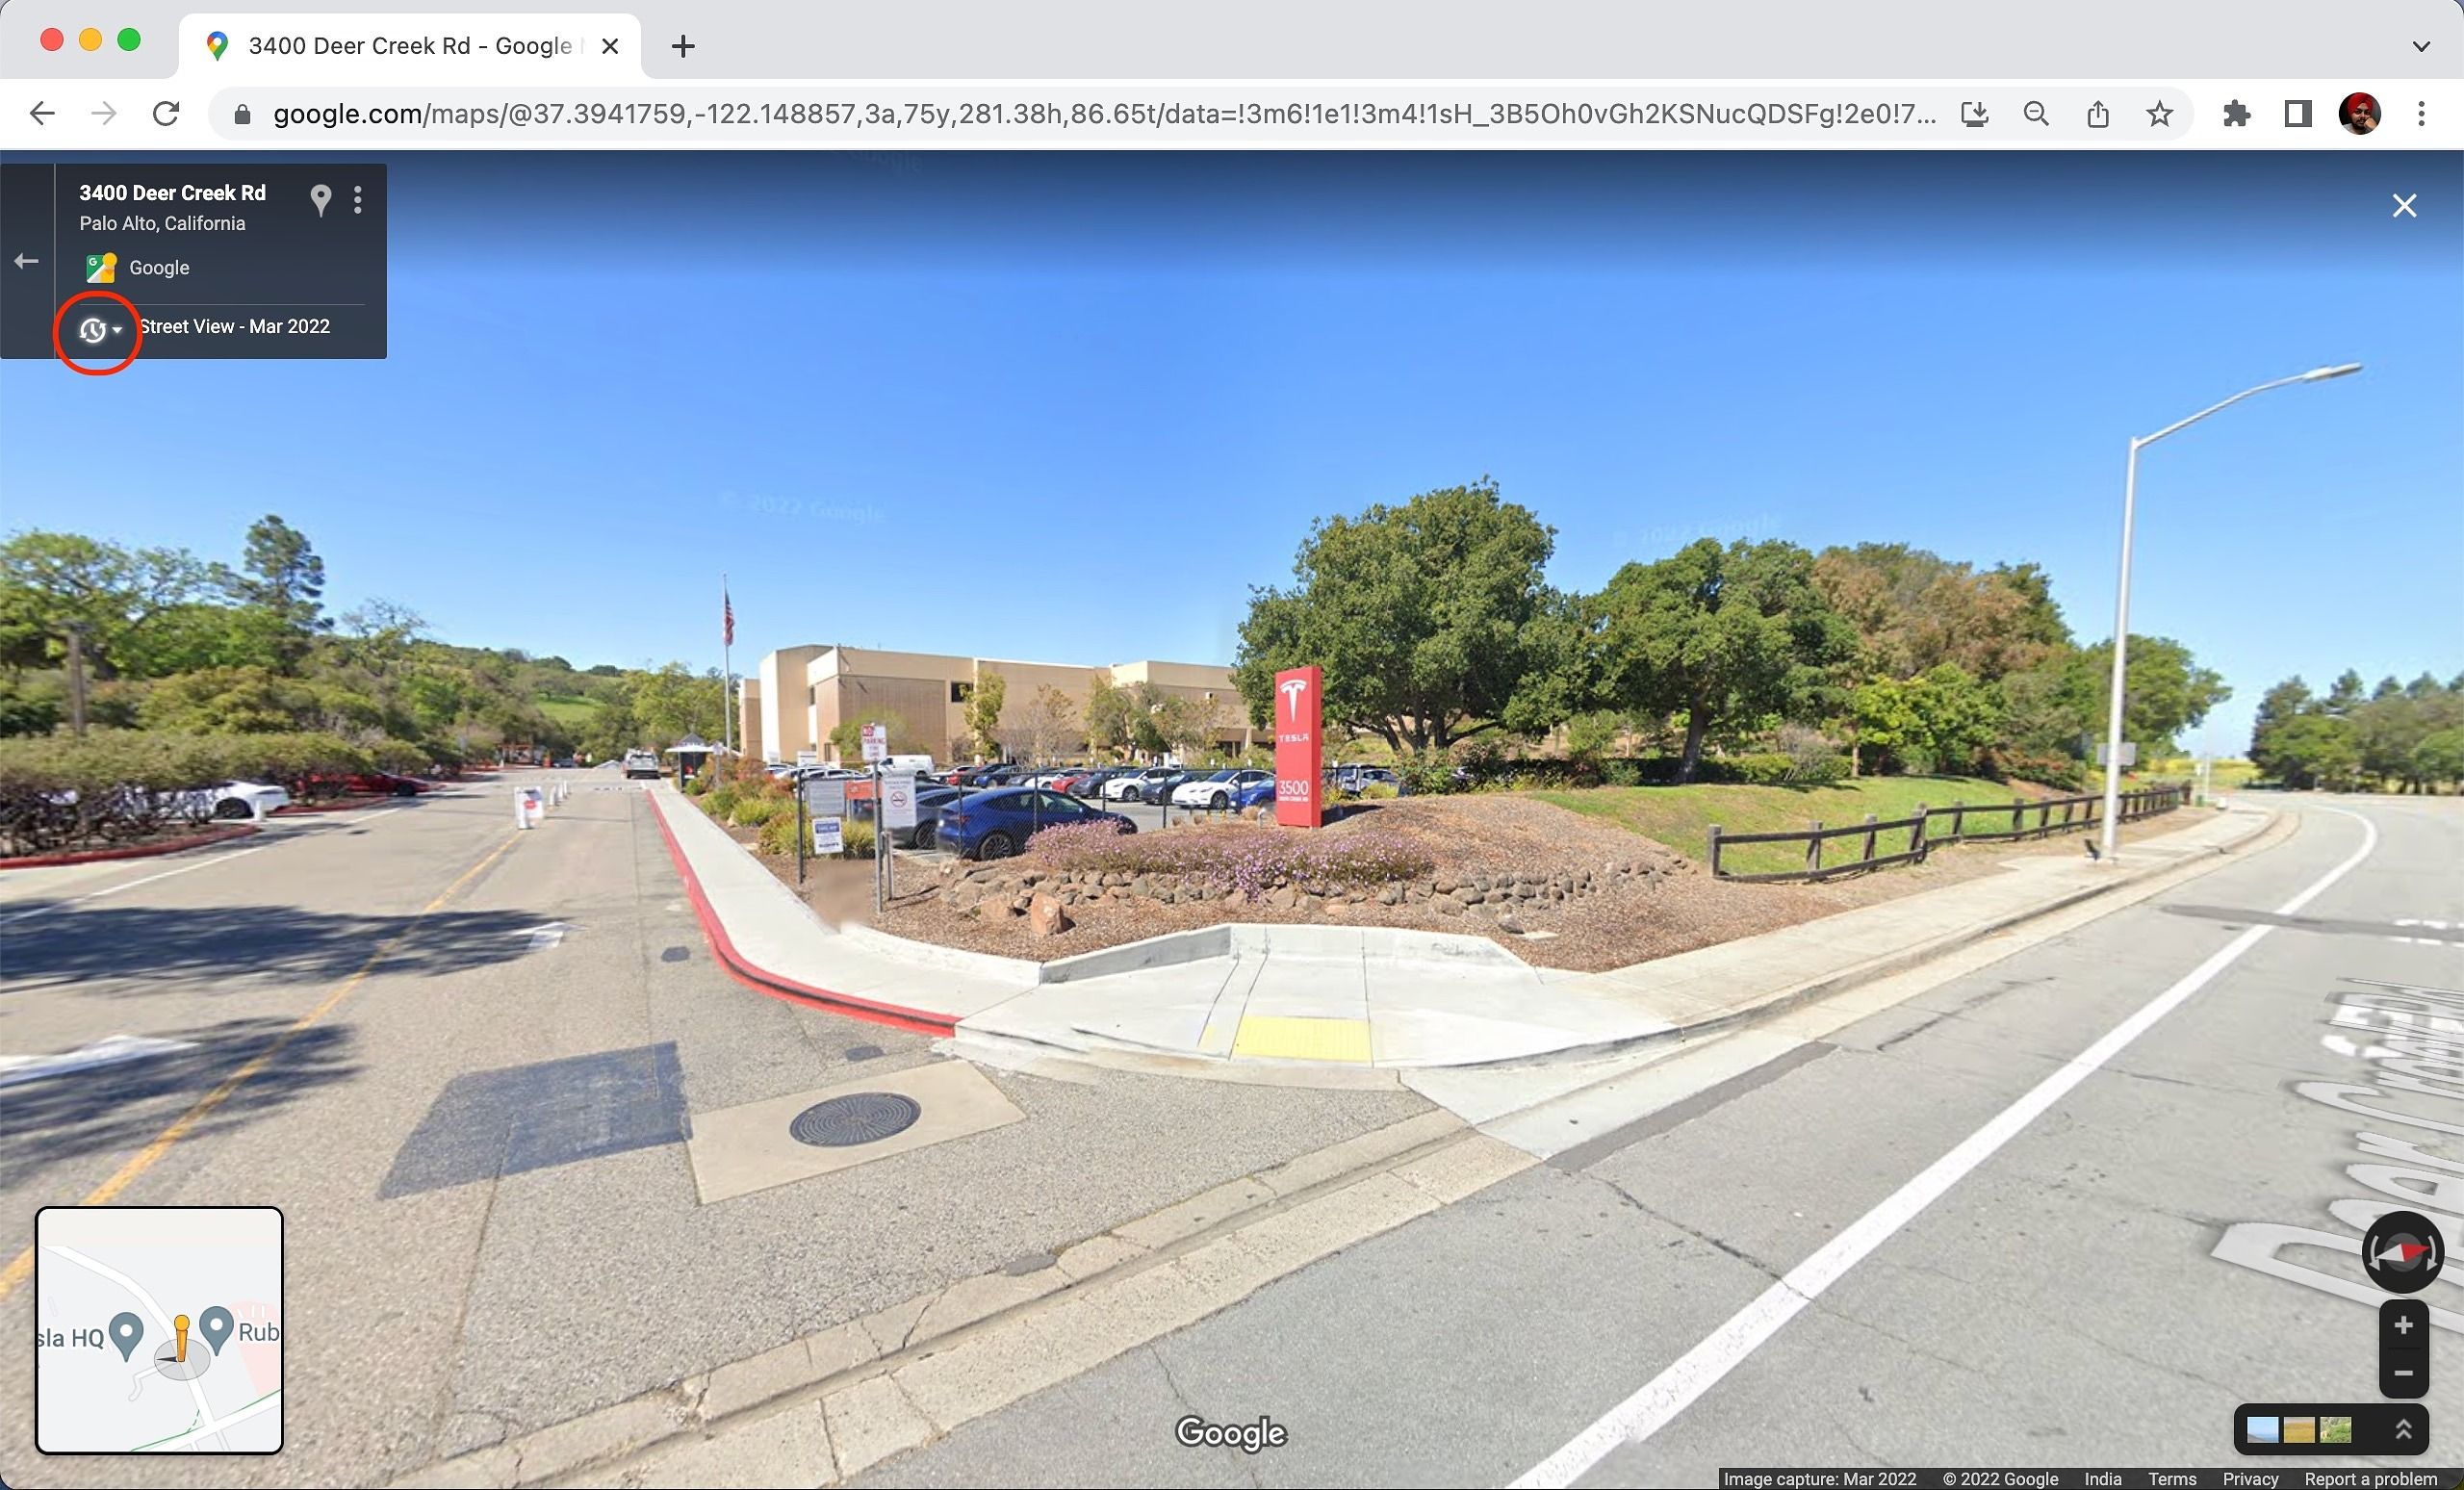
- Click the clock icon in the upper-left corner where the street name is displayed.
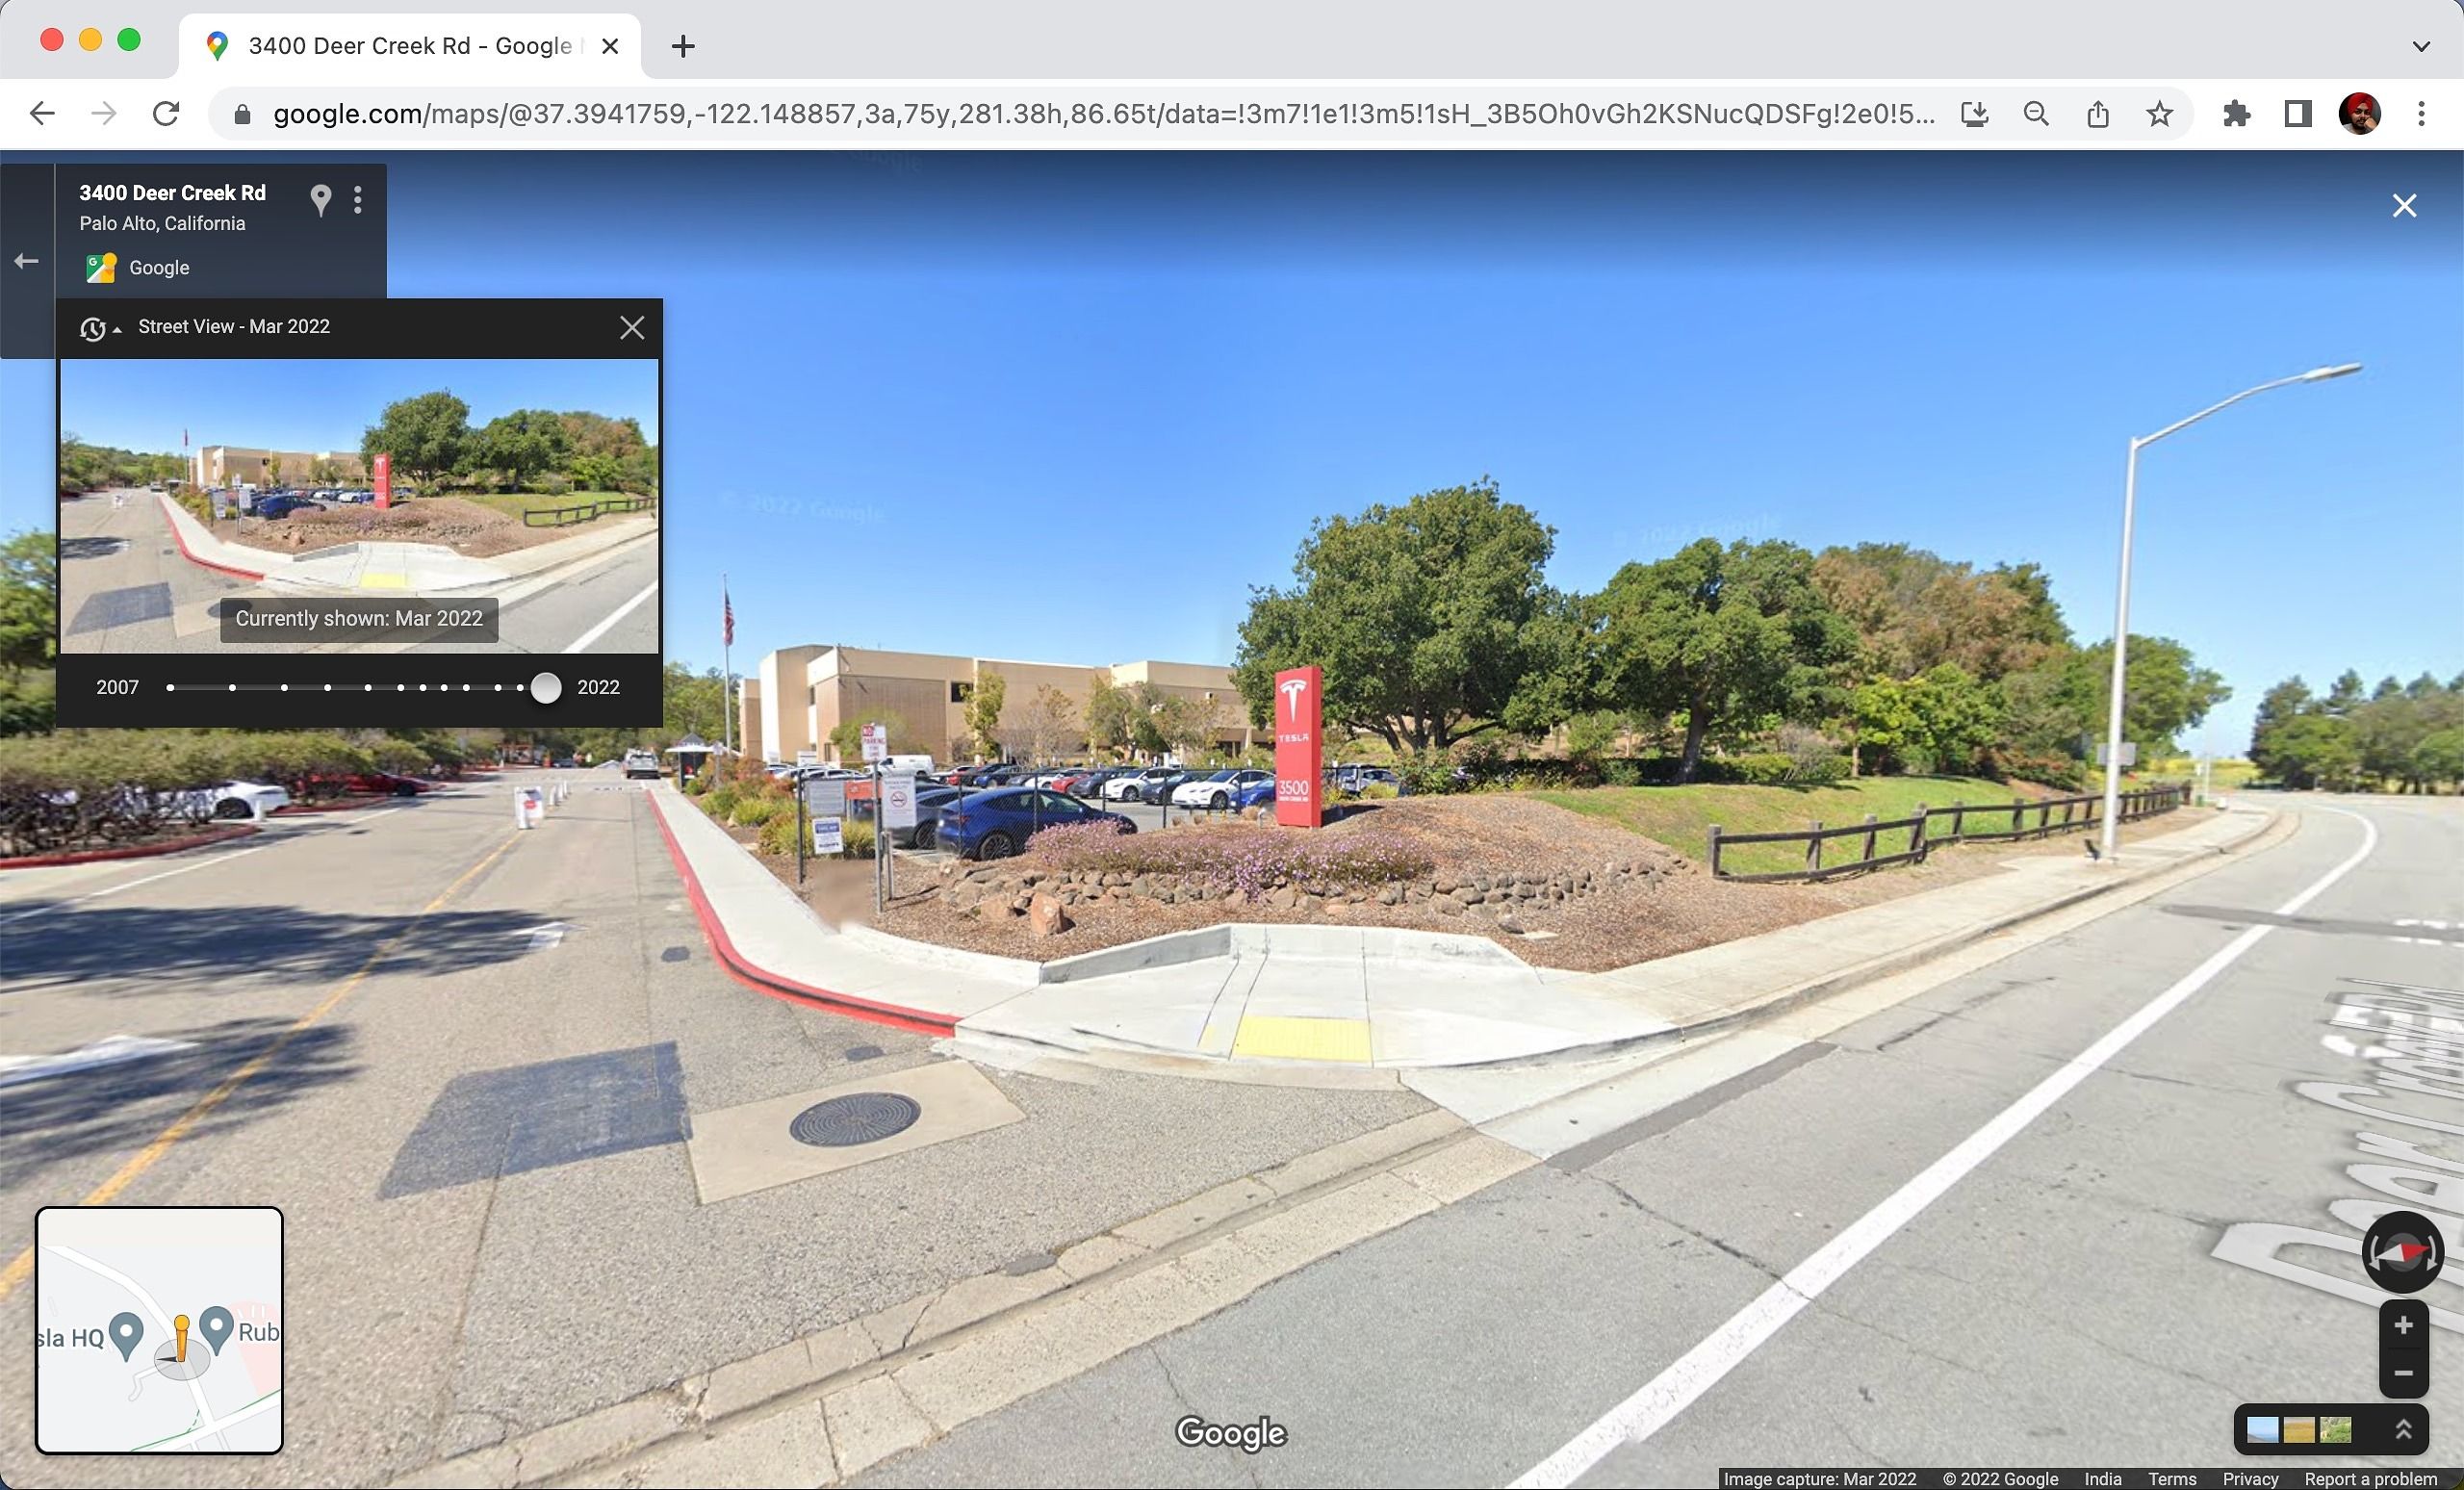
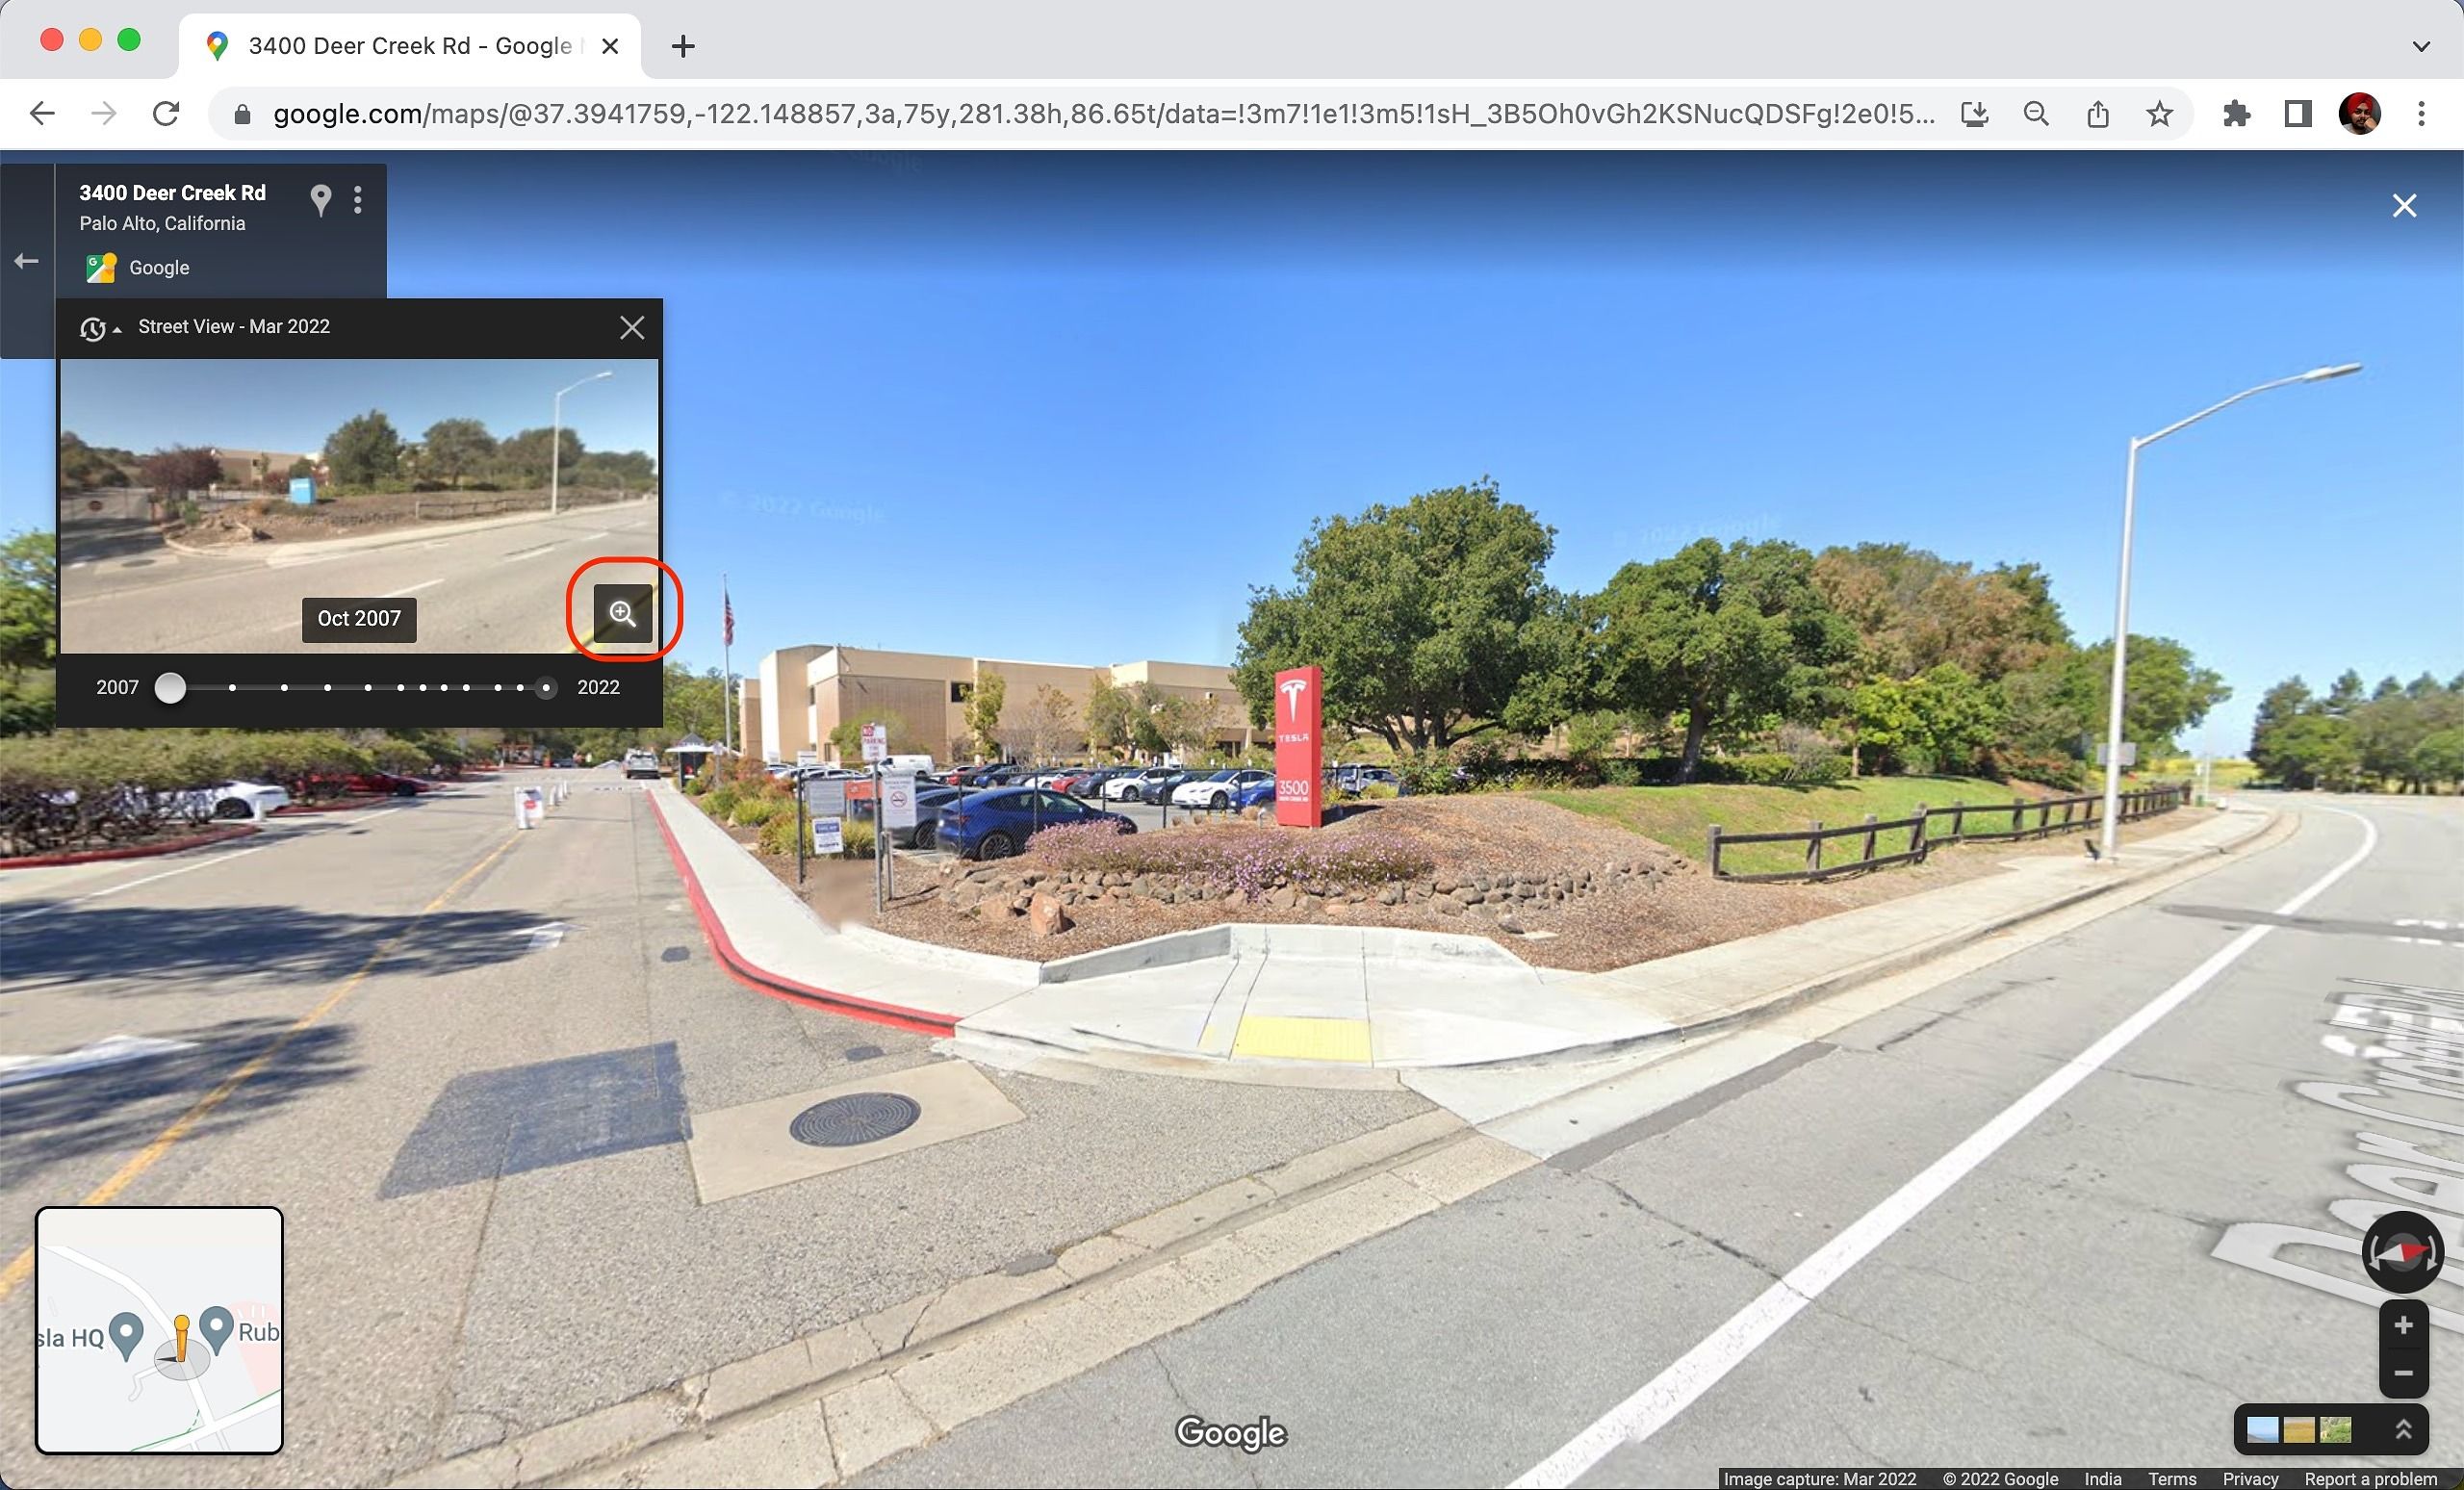
- This shows a small preview of the exact location from the year selected on the slider bar. Select a year that you want to compare with the current view.
- Use the zoom button to display the image on the main screen for a better view.
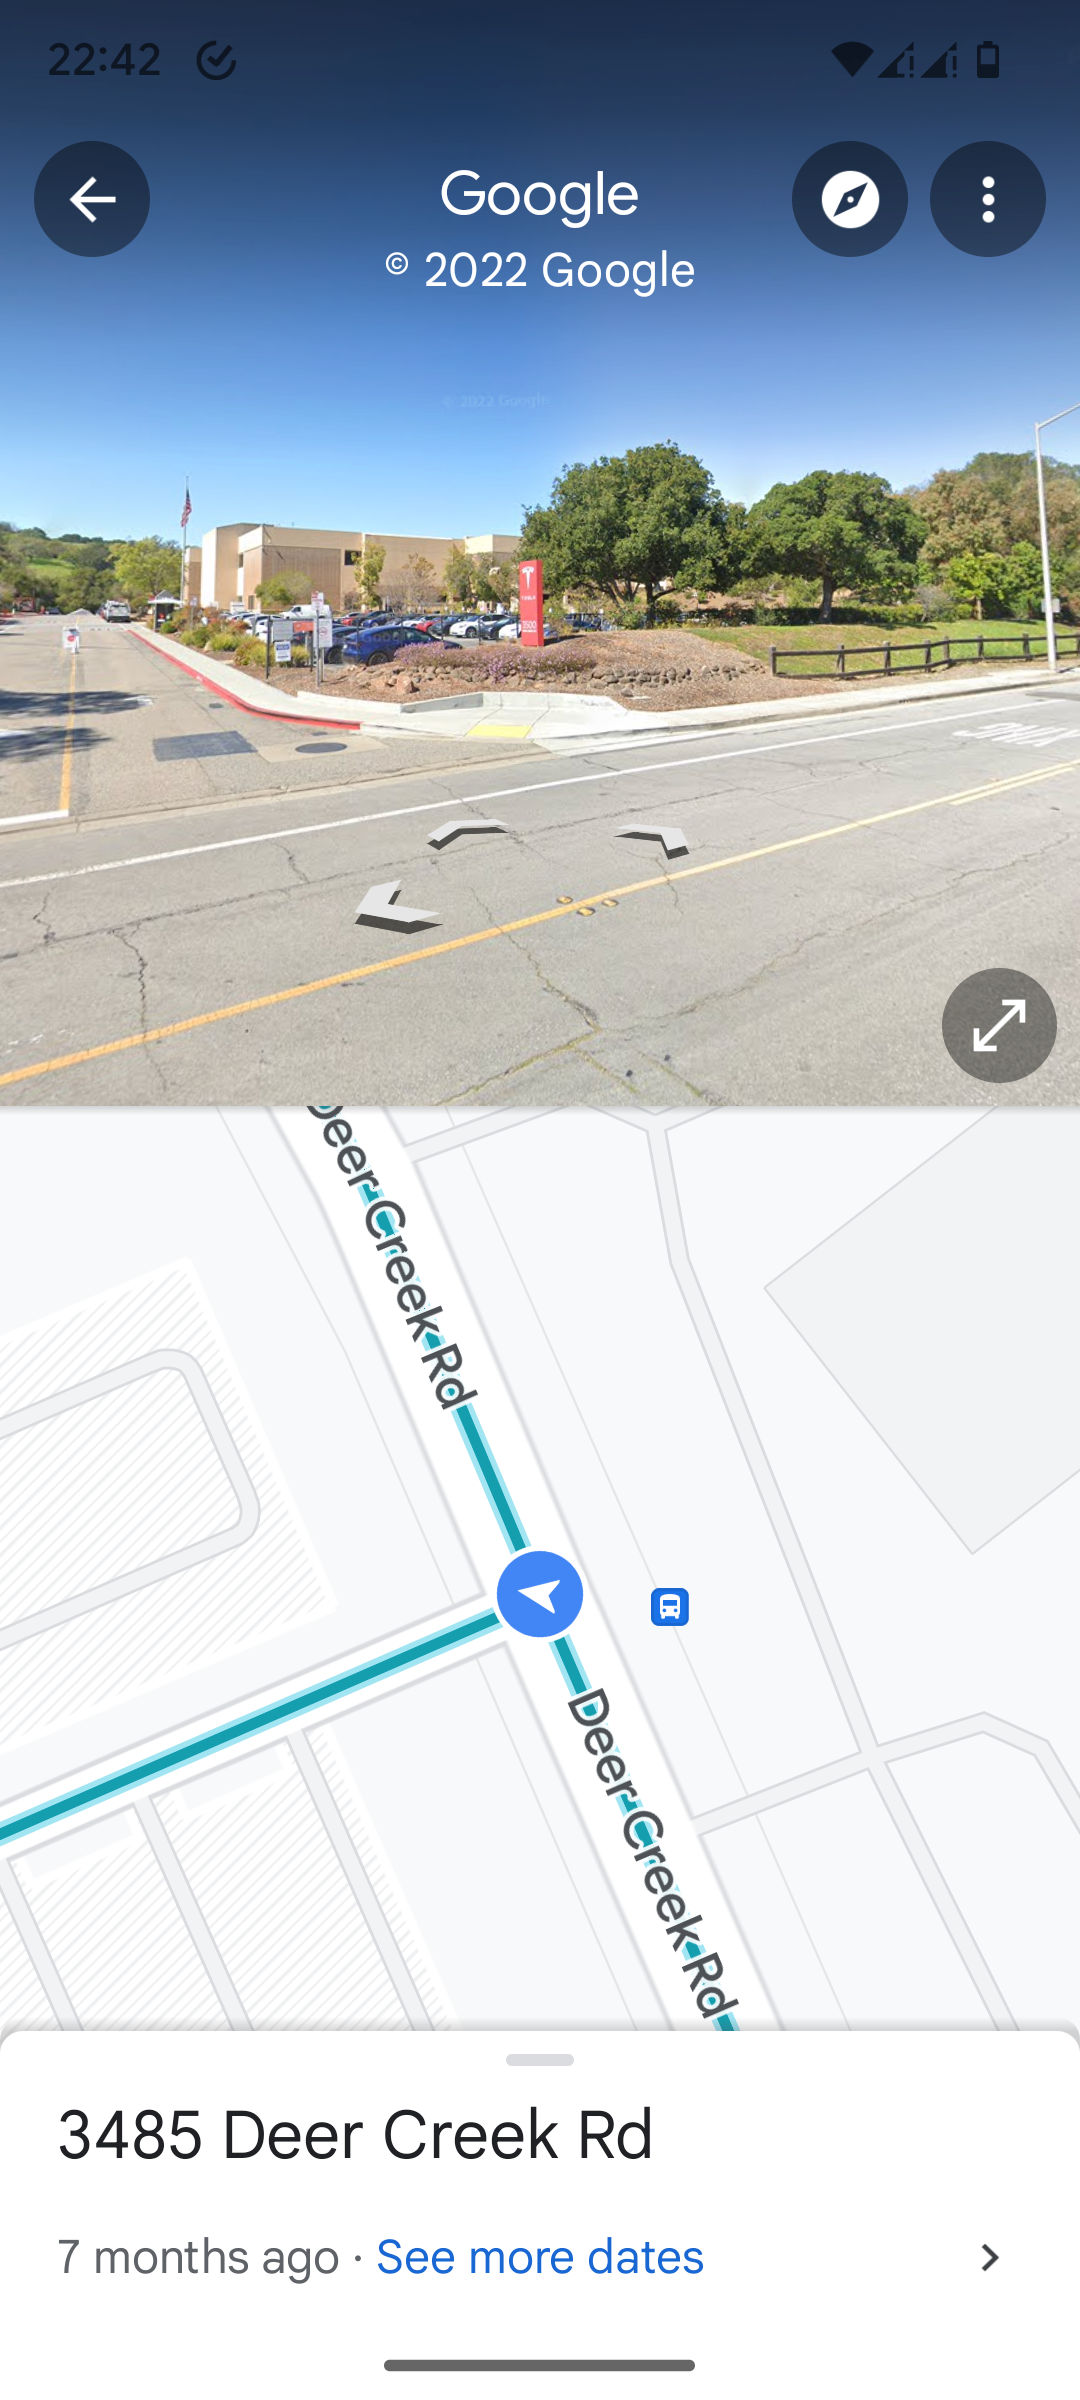
How to go back in time on Google Maps for Android
Like on desktop, the Google Maps app on Android has a timeline feature that allows you to go back in time as far as the street view imagery of that location is available. Since this feature is accessible on your phone, going back in time using Google Maps becomes easier.
To find the Street View timeline for Google Maps on Android, do this:
- Open Google Maps.
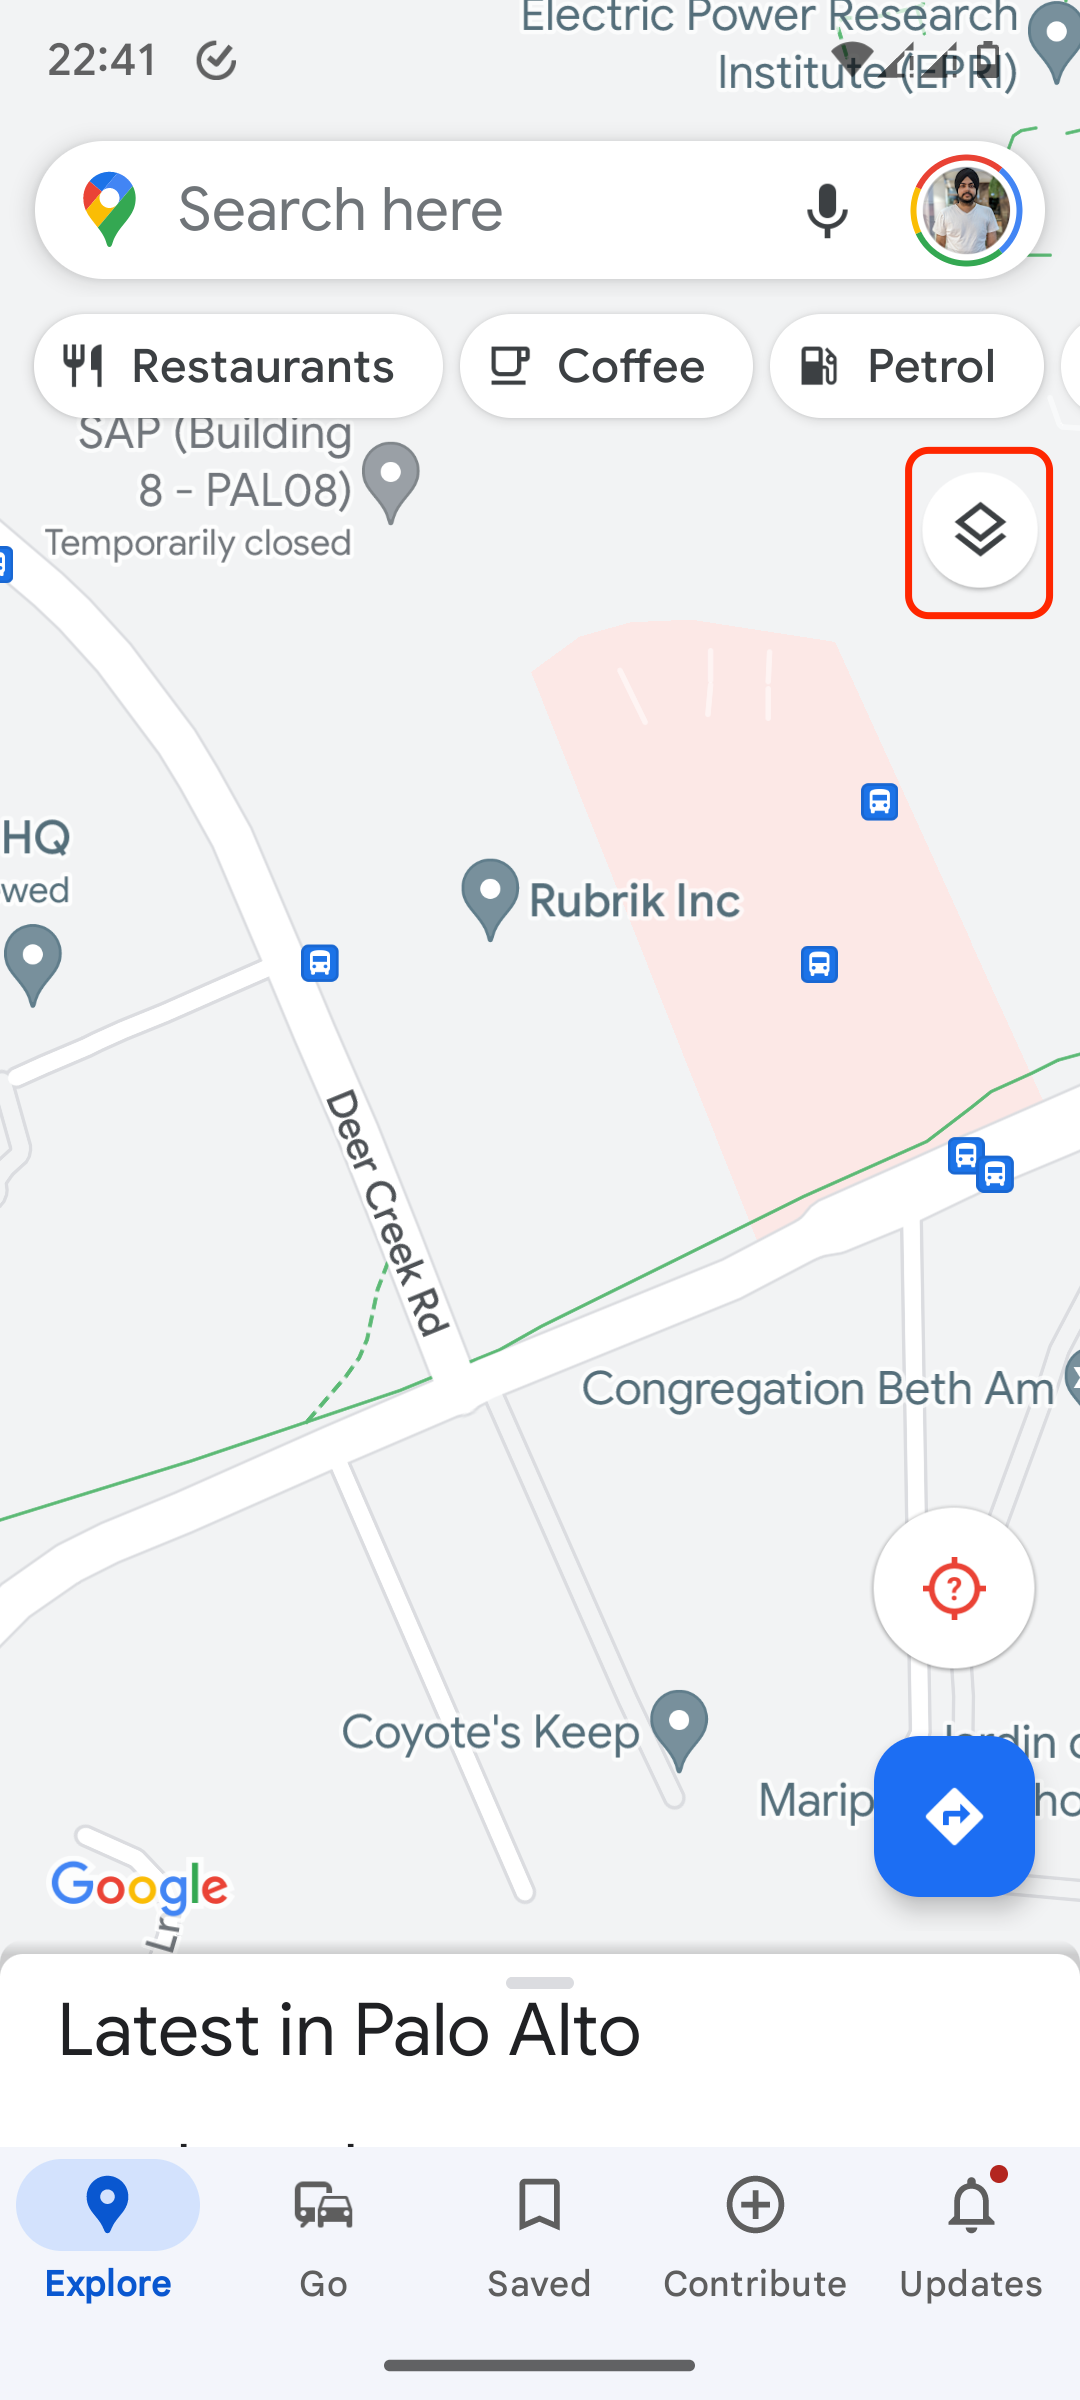
- Tap Layers and turn on Street View if it isn’t already.
- Go to the previous screen and zoom into where you want to see the historical imagery. Then, tap the road that has a street view available.
- You’ll see a split screen, with the street view at the top and the corresponding map view at the bottom.
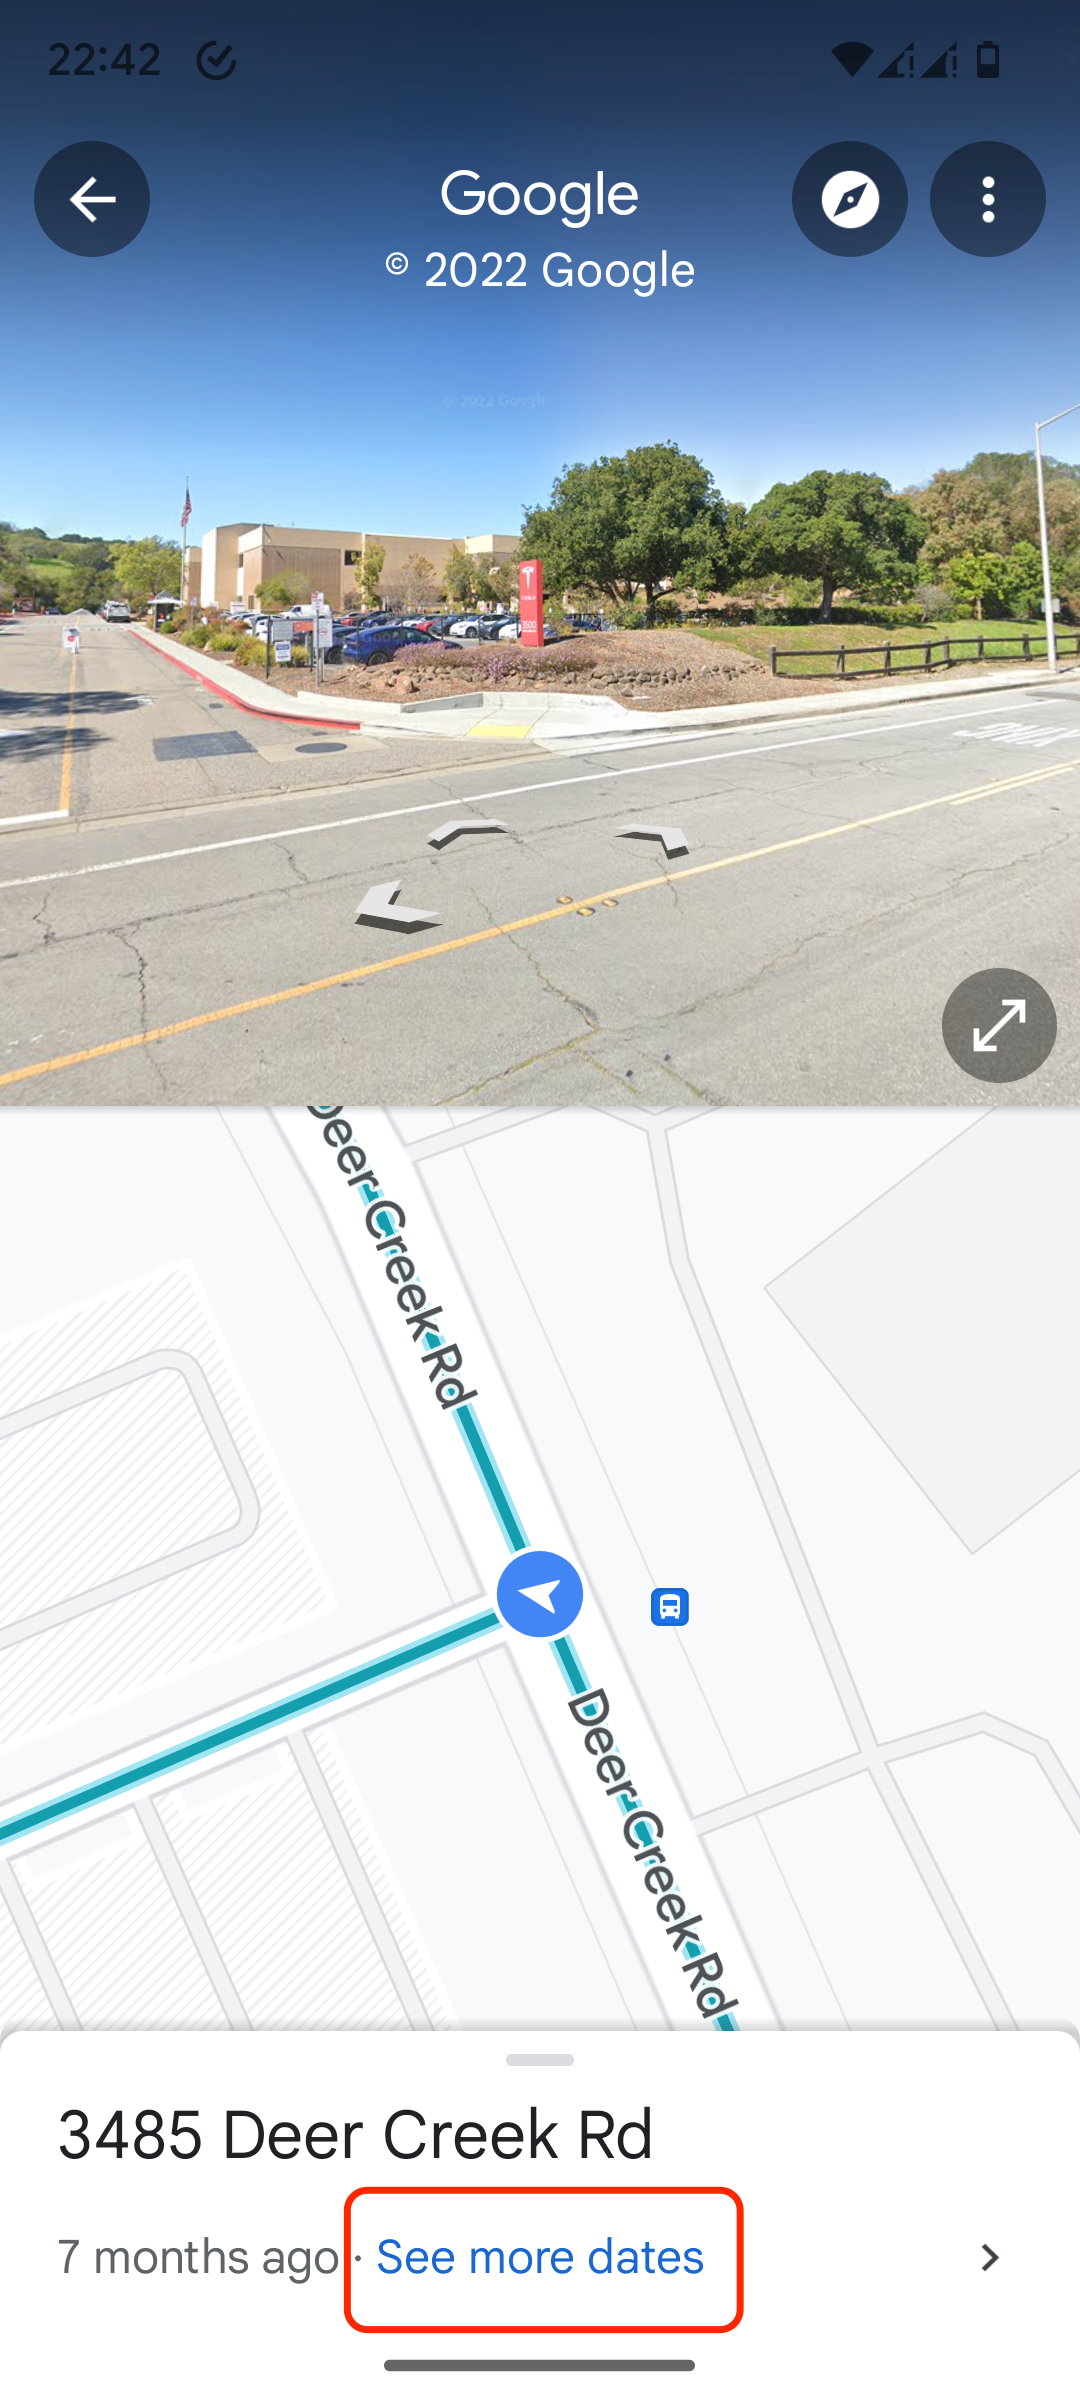
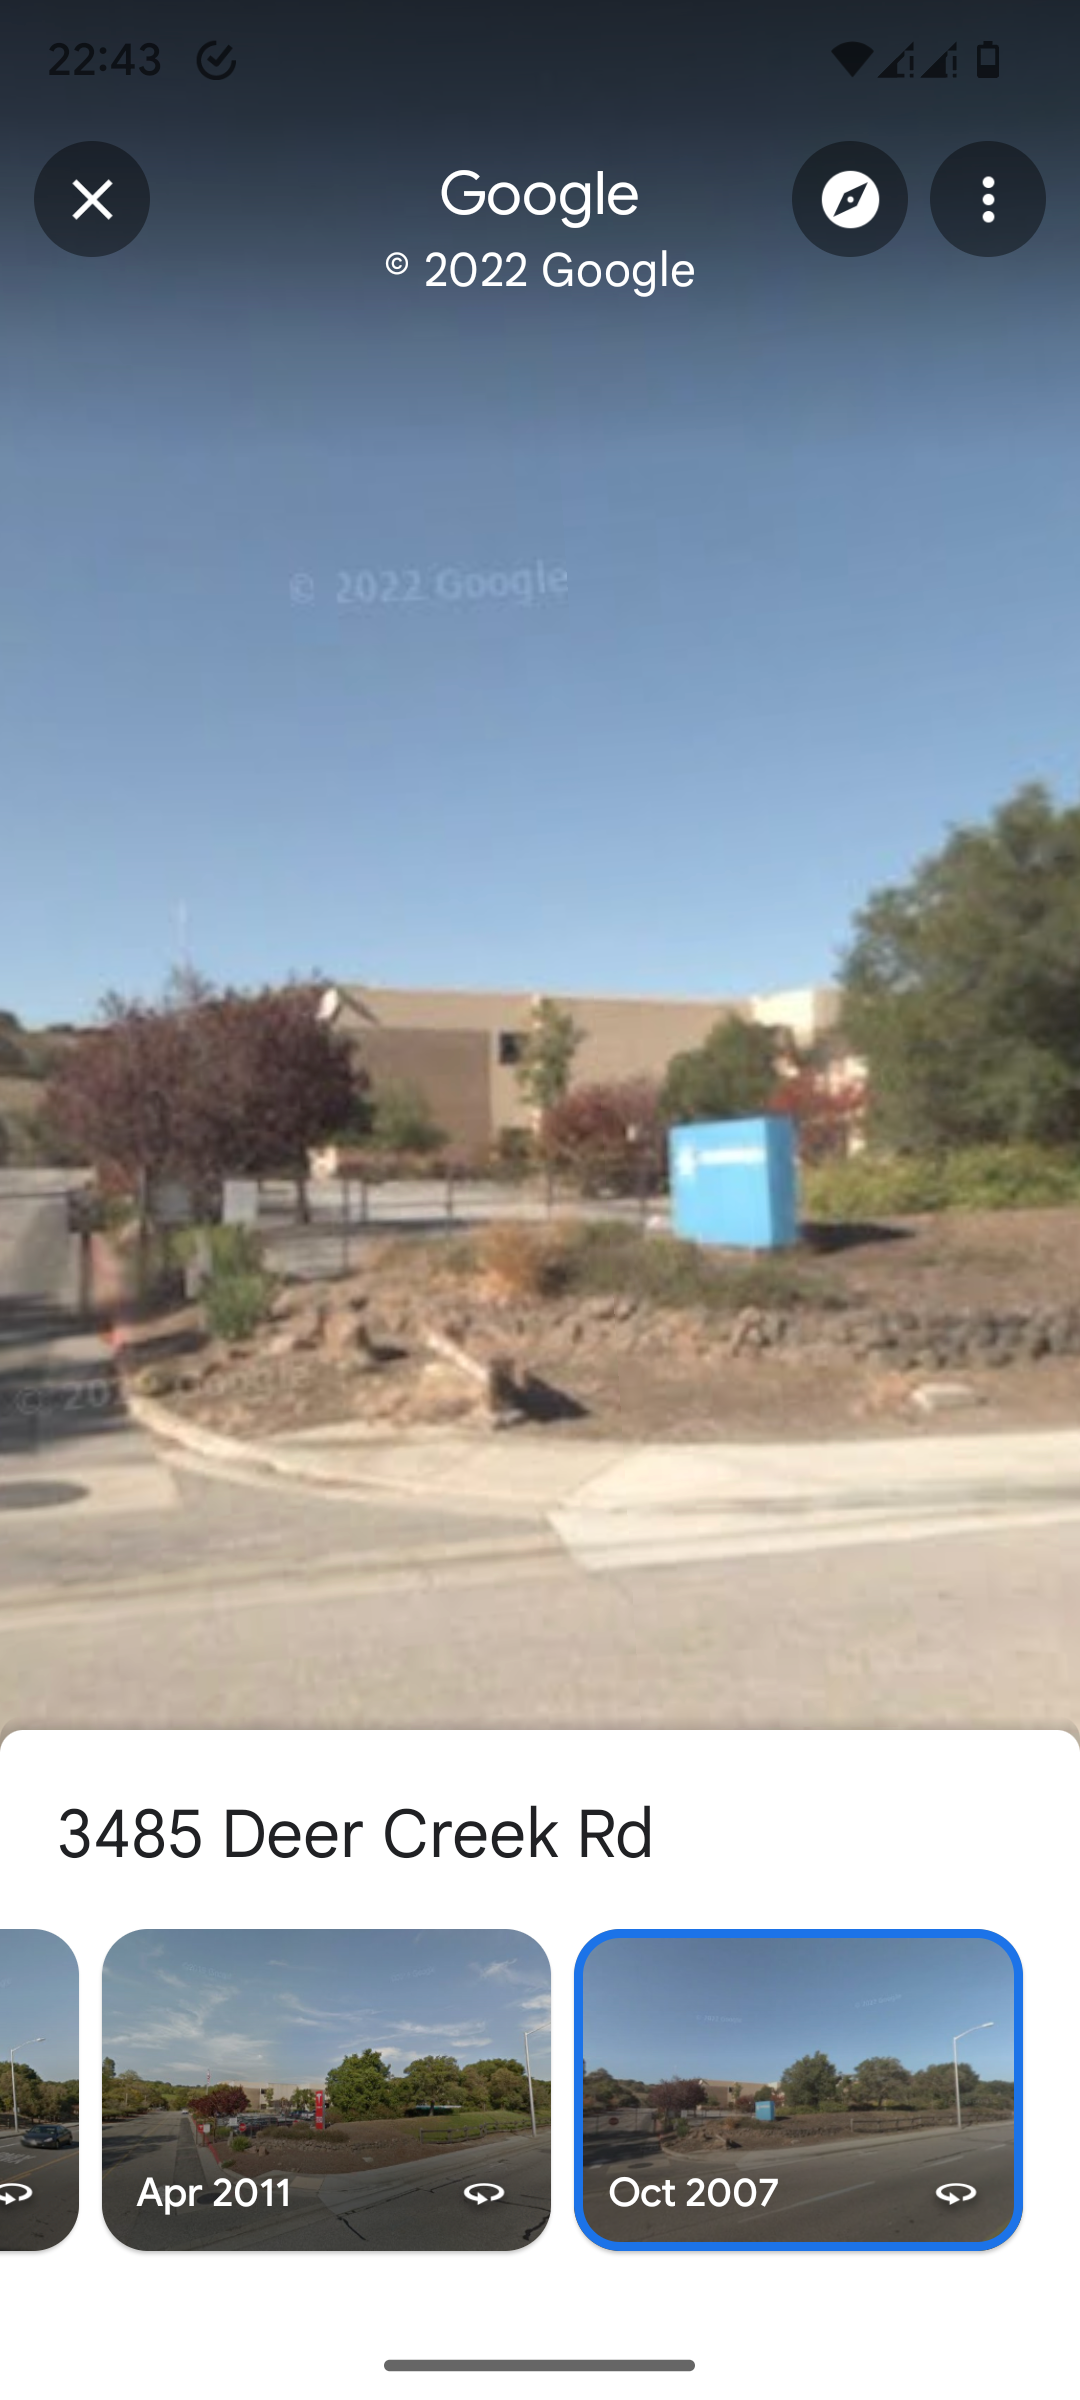
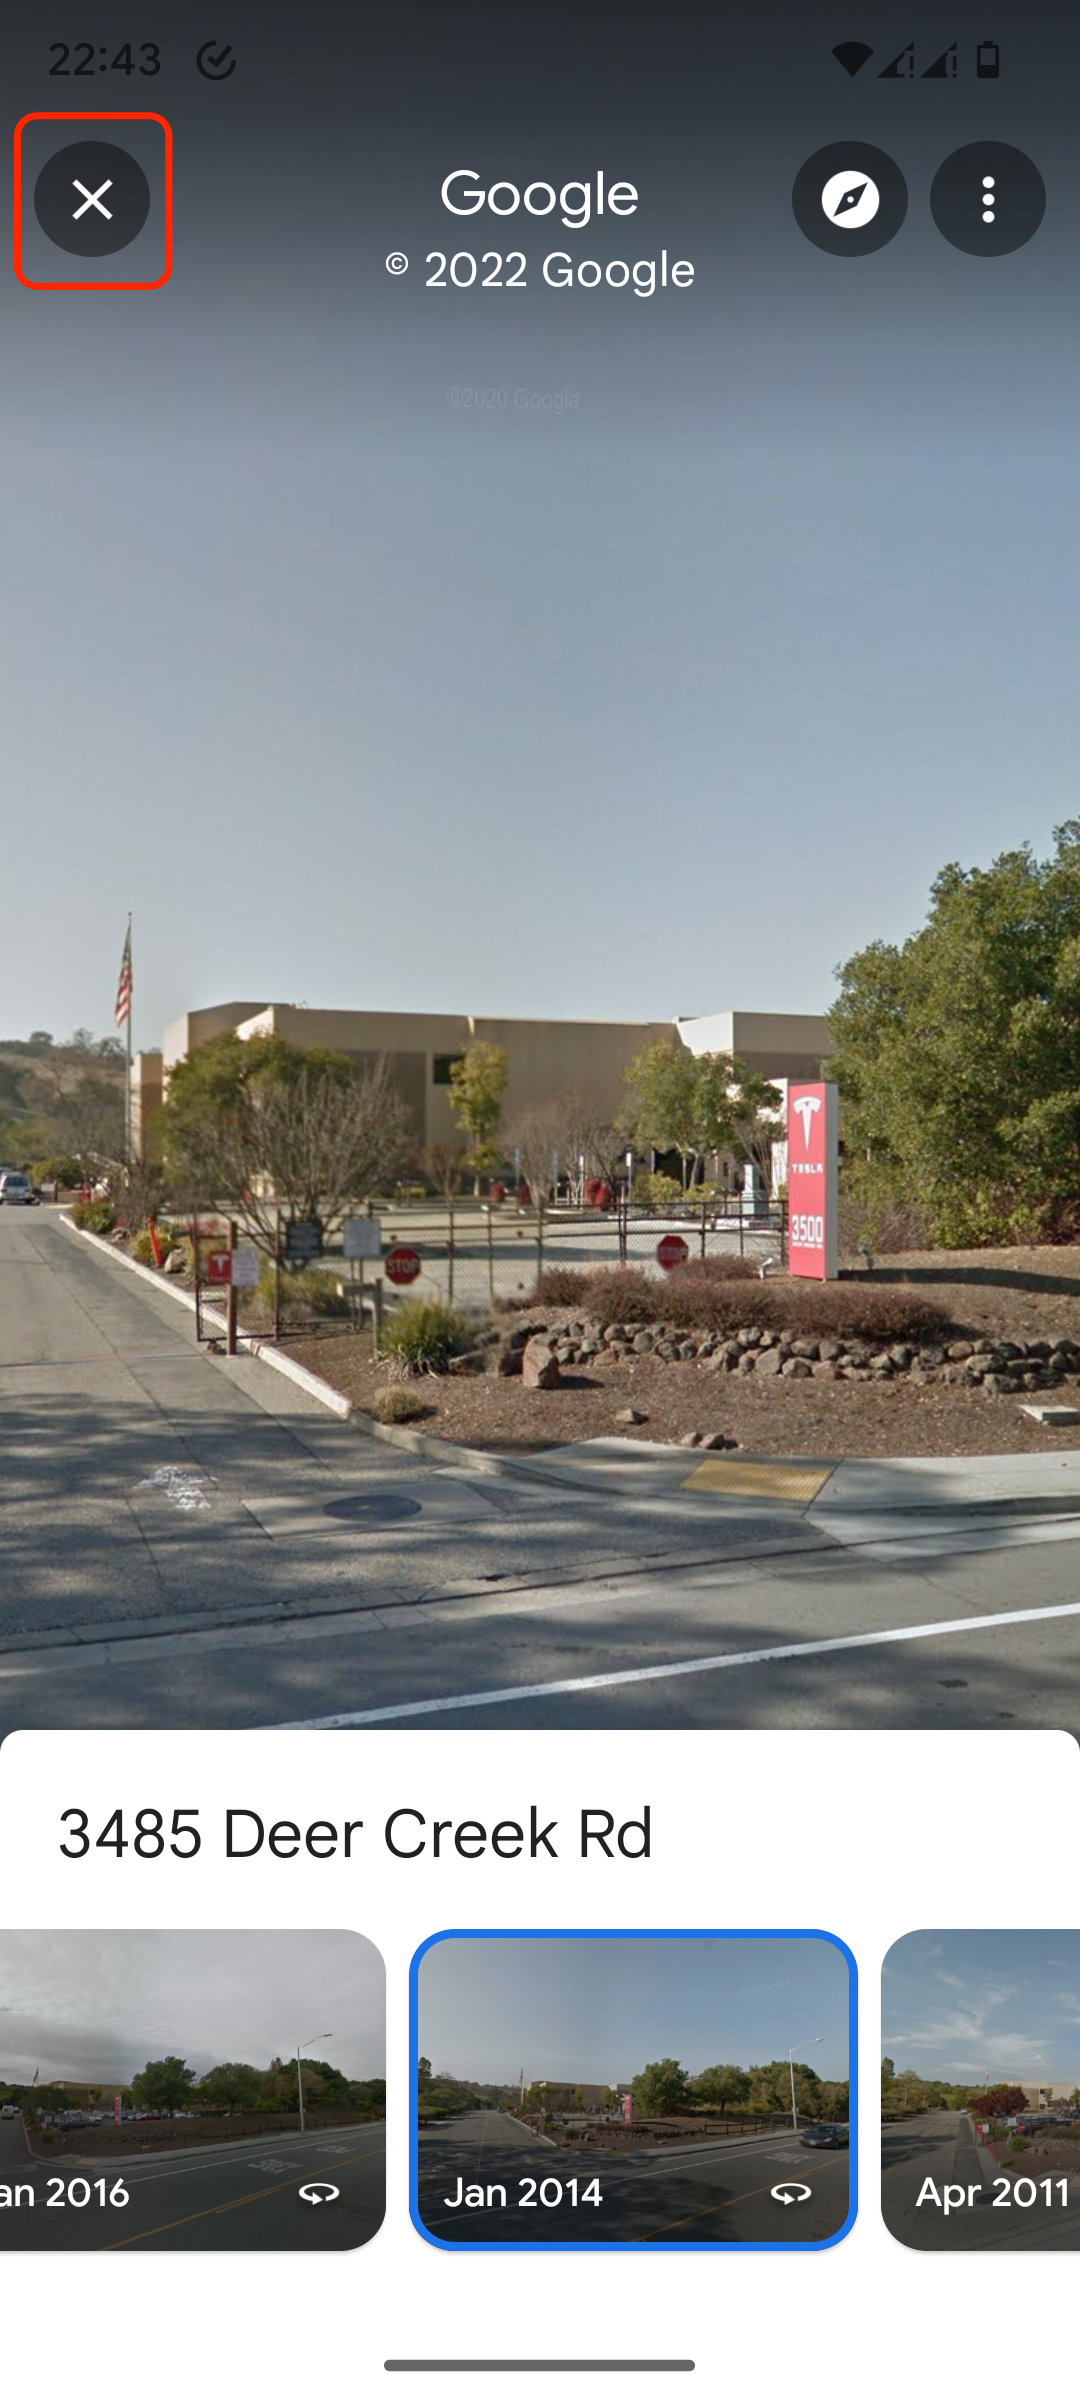
- Look under the street name at the bottom to see when the latest street view images were taken. On the right, tap See more dates.
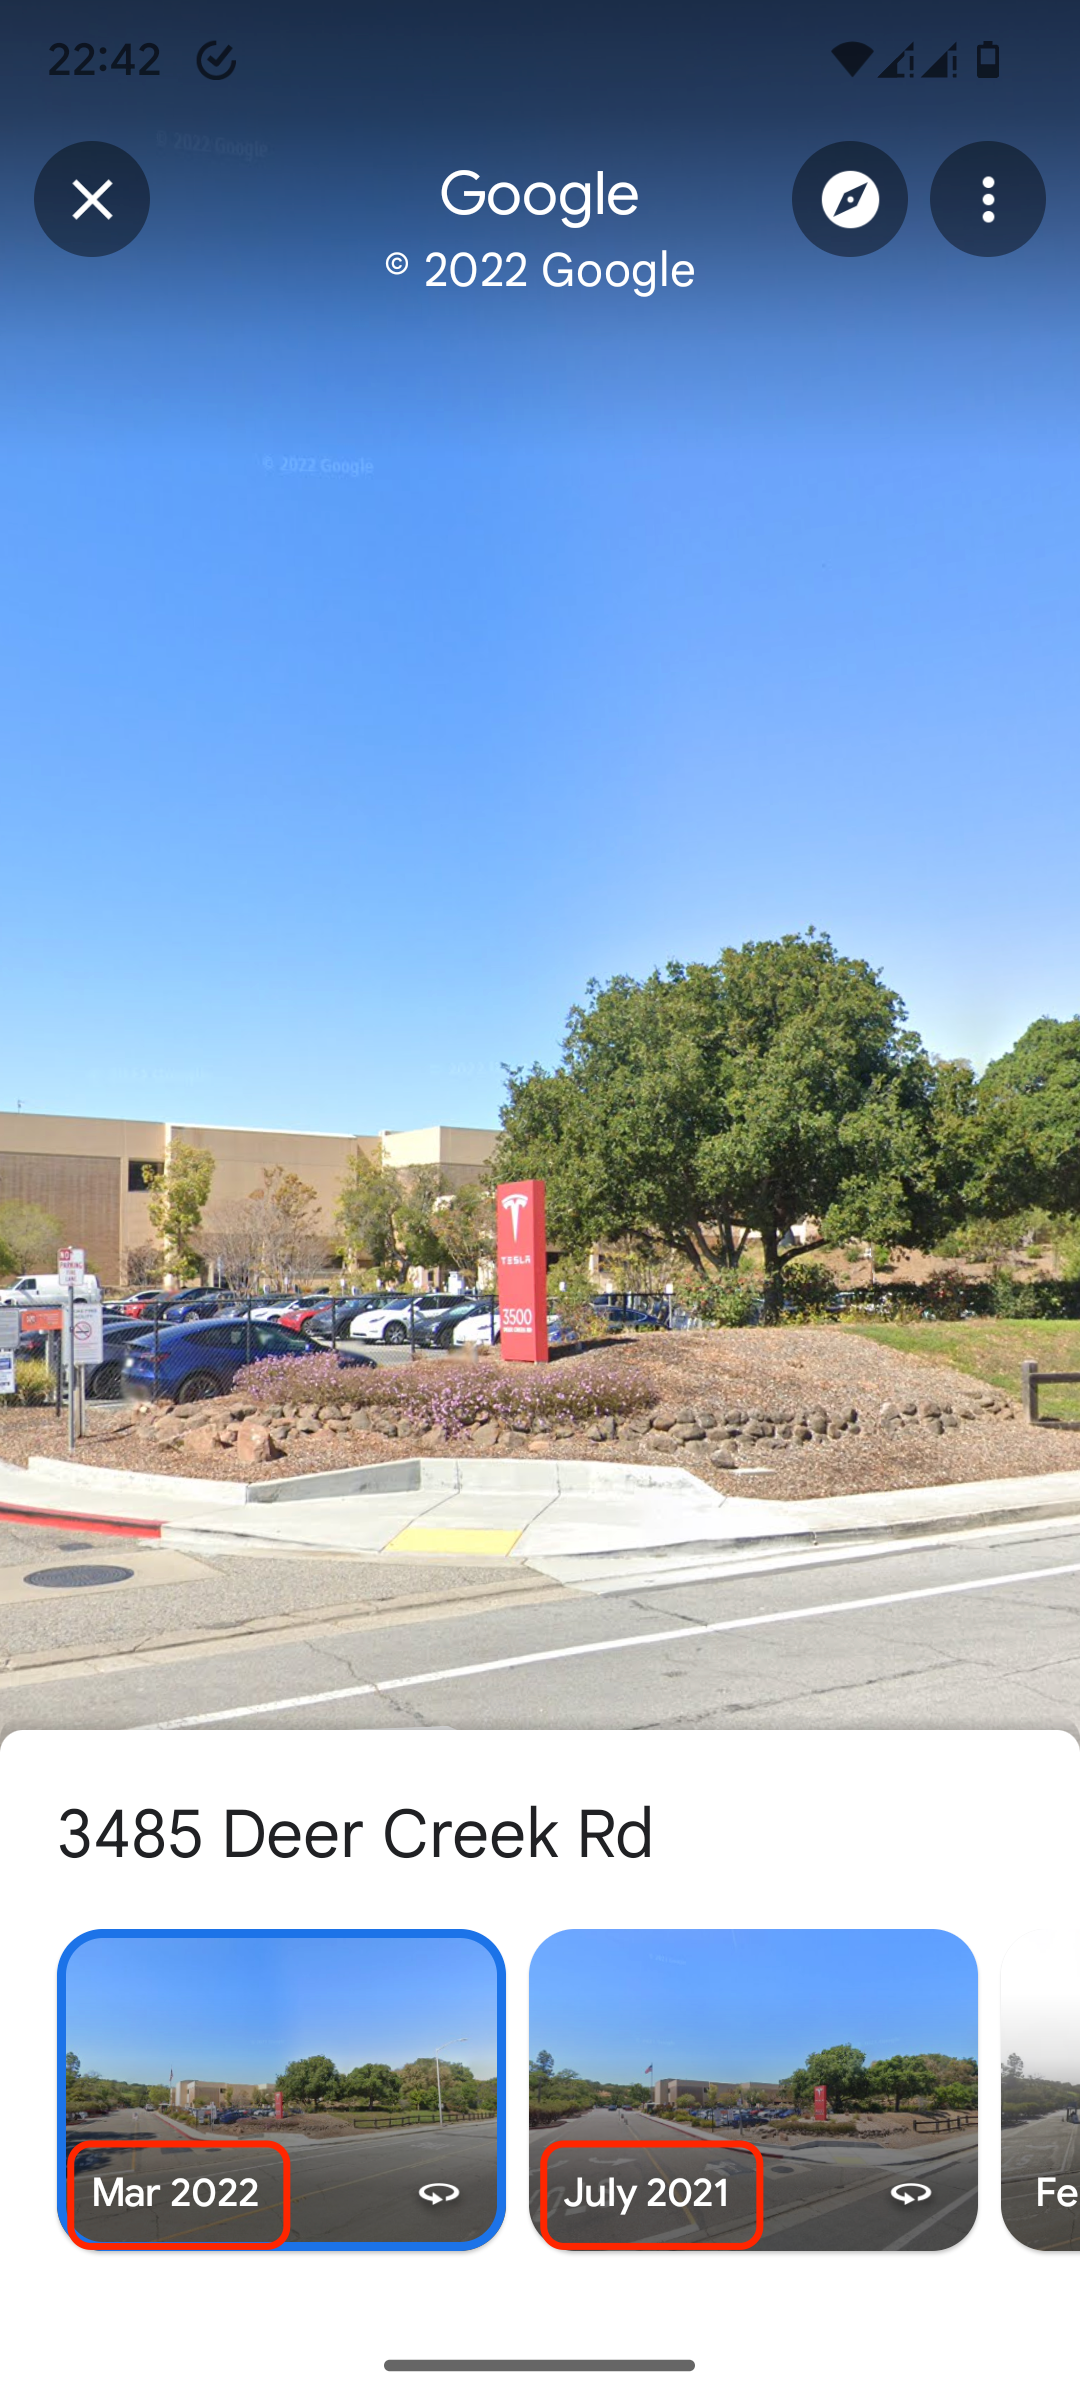
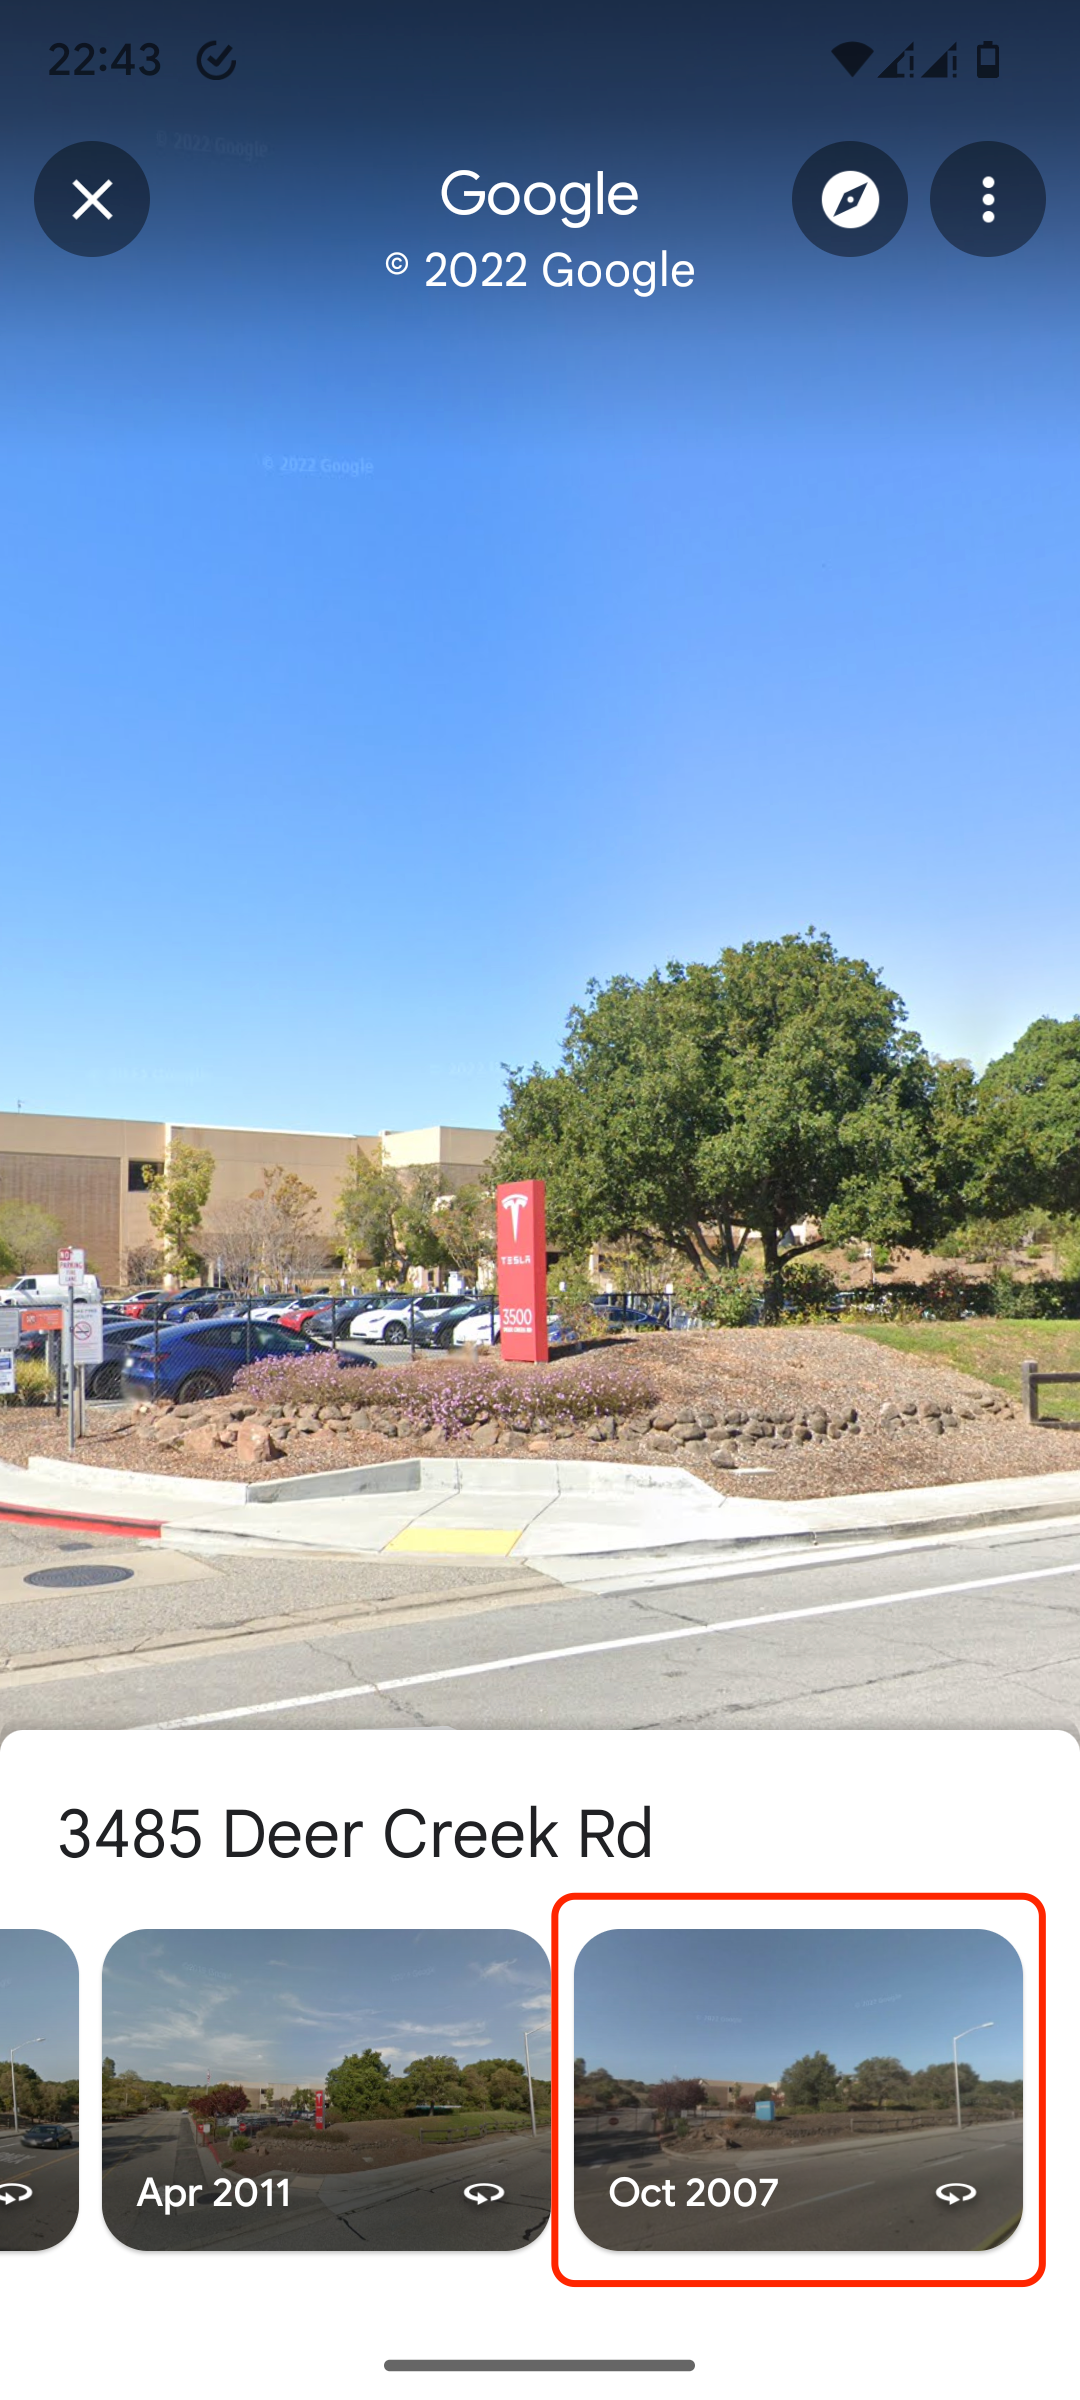
- You’ll see a timeline of older images of that location with date stamps. Scroll to the right to find the oldest one.
- Tap a date stamp to see that year’s street view shots. You can similarly jump to other months and years.
- Use the close button to return to the previous screen, showing the current view.


Explore the planet (and beyond) with a bird’s-eye view
Going back in time in Google Earth could make you feel nostalgic about how your hometown has changed or help you understand a geographical aspect of a historical place. In either case, it’s fun and enlightening. When you want to go beyond Earth, use the Google Maps space tool to memorize the names of hundreds of lunar craters or gaze at little-known dwarf planets not too far from Earth.
Once you are back to using Google Maps for driving directions down here on the ground, try out some of Maps’ hidden features that are as impressive as Jupiter’s moons, if not more.
Xem chi tiết và đăng kýXem chi tiết và đăng ký
 [ad_1] 4")
Khám phá thêm từ Phụ Kiện Đỉnh
Đăng ký để nhận các bài đăng mới nhất được gửi đến email của bạn.