Review sản phẩm
Những Mẹo Và Thủ Thuật Hàng Đầu Trên Google Docs Bạn Nên Thử Ngay Hôm Nay

Th5
Những Mẹo Và Thủ Thuật Hàng Đầu Trên Google Docs Bạn Nên Thử Ngay Hôm Nay
Trong thời đại công nghệ hiện nay, Google Docs đã trở thành một công cụ không thể thiếu cho việc soạn thảo văn bản, hợp tác nhóm và quản lý tài liệu trực tuyến. Với những tính năng tiện ích và dễ sử dụng, Google Docs giúp người dùng tiết kiệm thời gian và nâng cao hiệu suất làm việc. Dưới đây là những mẹo và thủ thuật hàng đầu trên Google Docs mà bạn nên thử ngay hôm nay để tận dụng tối đa công cụ này.
### 1. Sử Dụng Phím Tắt Để Tăng Tốc Độ Làm Việc
Phím tắt là một trong những cách hiệu quả nhất để tiết kiệm thời gian khi làm việc trên Google Docs. Một số phím tắt phổ biến bao gồm:
– Ctrl + C / Ctrl + V: Sao chép và dán văn bản.
– Ctrl + Z: Hoàn tác thao tác trước đó.
– Ctrl + B / Ctrl + I / Ctrl + U: In đậm, in nghiêng và gạch chân văn bản.
– Ctrl + K: Chèn liên kết.
### 2. Tạo Và Quản Lý Mục Lục Tự Động
Google Docs cho phép bạn tạo mục lục tự động dựa trên các tiêu đề và phụ đề trong tài liệu. Để thực hiện, bạn chỉ cần chọn “Chèn” > “Mục lục” và chọn kiểu mục lục phù hợp. Mục lục sẽ tự động cập nhật khi bạn thay đổi nội dung.
### 3. Sử Dụng Tính Năng “Đề Xuất” Để Hợp Tác Hiệu Quả
Khi làm việc nhóm, tính năng “Đề xuất” cho phép bạn đưa ra các gợi ý thay đổi mà không trực tiếp chỉnh sửa văn bản. Để sử dụng, chọn “Chế độ chỉnh sửa” > “Đề xuất” và bắt đầu đưa ra các gợi ý của mình.
### 4. Tìm Kiếm Và Thay Thế Văn Bản Nhanh Chóng
Nếu bạn cần thay thế một từ hoặc cụm từ trong toàn bộ tài liệu, hãy sử dụng tính năng “Tìm và thay thế”. Nhấn Ctrl + H, nhập từ cần tìm và từ thay thế, sau đó chọn “Thay thế tất cả”.
### 5. Sử Dụng Add-Ons Để Mở Rộng Tính Năng
Google Docs hỗ trợ nhiều add-ons giúp mở rộng tính năng của công cụ. Bạn có thể cài đặt các add-ons như Grammarly để kiểm tra ngữ pháp, hoặc DocuSign để ký tài liệu điện tử.
### 6. Lưu Trữ Và Chia Sẻ Tài Liệu Dễ Dàng
Google Docs cho phép bạn lưu trữ tài liệu trên Google Drive và chia sẻ với người khác một cách dễ dàng. Bạn có thể thiết lập quyền truy cập để người khác chỉ xem, bình luận hoặc chỉnh sửa tài liệu.
### 7. Sử Dụng Tính Năng Dịch Tự Động
Google Docs tích hợp tính năng dịch tự động, giúp bạn chuyển đổi văn bản sang nhiều ngôn ngữ khác nhau. Để sử dụng, chọn “Công cụ” > “Dịch tài liệu” và chọn ngôn ngữ mong muốn.
### 8. Tạo Biểu Mẫu Và Khảo Sát
Bạn có thể sử dụng Google Docs để tạo biểu mẫu và khảo sát trực tuyến. Chọn “Tệp” > “Mới” > “Biểu mẫu” và bắt đầu thiết kế biểu mẫu của mình.
### 9. Sử Dụng Tính Năng Lịch Sử Phiên Bản
Google Docs lưu trữ lịch sử phiên bản của tài liệu, cho phép bạn xem và khôi phục các phiên bản trước đó. Để truy cập, chọn “Tệp” > “Lịch sử phiên bản” > “Xem lịch sử phiên bản”.
### 10. Tùy Chỉnh Giao Diện Làm Việc
Bạn có thể tùy chỉnh giao diện làm việc trên Google Docs để phù hợp với nhu cầu của mình. Chọn “Tệp” > “Cài đặt” và điều chỉnh các tùy chọn như ngôn ngữ, đơn vị đo lường, và chế độ hiển thị.
Với những mẹo và thủ thuật trên, bạn sẽ có thể tận dụng tối đa các tính năng của Google Docs để nâng cao hiệu suất làm việc và quản lý tài liệu một cách hiệu quả. Hãy thử ngay hôm nay và trải nghiệm sự tiện ích mà Google Docs mang lại!
Mua Ngay Sản Phẩm Tại Việt Nam – QUEEN MOBILE
Nếu bạn đang tìm kiếm các sản phẩm công nghệ chất lượng như điện thoại iPhone, máy tính bảng iPad, đồng hồ thông minh Smartwatch, hãy ghé thăm QUEEN MOBILE. Chúng tôi chuyên cung cấp các sản phẩm chính hãng với giá cả cạnh tranh và dịch vụ khách hàng tận tâm. Mua ngay tại QUEEN MOBILE để trải nghiệm sự khác biệt!
Giới thiệu The top Google Docs tips and tricks to try today
: The top Google Docs tips and tricks to try today
Hãy viết lại bài viết dài kèm hashtag về việc đánh giá sản phẩm và mua ngay tại Queen Mobile bằng tiếng VIệt: The top Google Docs tips and tricks to try today
Mua ngay sản phẩm tại Việt Nam:
QUEEN MOBILE chuyên cung cấp điện thoại Iphone, máy tính bảng Ipad, đồng hồ Smartwatch và các phụ kiện APPLE và các giải pháp điện tử và nhà thông minh. Queen Mobile rất hân hạnh được phục vụ quý khách….
_____________________________________________________
Mua #Điện_thoại #iphone #ipad #macbook #samsung #xiaomi #poco #oppo #snapdragon giá tốt, hãy ghé [𝑸𝑼𝑬𝑬𝑵 𝑴𝑶𝑩𝑰𝑳𝑬]
✿ 149 Hòa Bình, phường Hiệp Tân, quận Tân Phú, TP HCM
✿ 402B, Hai Bà Trưng, P Tân Định, Q 1, HCM
✿ 287 đường 3/2 P 10, Q 10, HCM
Hotline (miễn phí) 19003190
Thu cũ đổi mới
Rẻ hơn hoàn tiền
Góp 0%
Thời gian làm việc: 9h – 21h.
KẾT LUẬN
Hãy viết đoạn tóm tắt về nội dung bằng tiếng việt kích thích người mua: The top Google Docs tips and tricks to try today
Google Docs is one of the best word processors available. The productivity tool is part of Google Workspace and is available with a free Google account. Google Docs allows you to edit documents online or offline and offers advanced features for seamless collaboration with others. The app supports integration with Gmail, Google Drive, Sheets, and a growing list of add-ons for enhanced capabilities on your PC, Android phone, or tablet.
Google Docs also allows you to sign documents electronically, add more fonts, and create attractive illustrations without leaving the word processor. To help you take advantage of this tool, use these Google Docs tips and hacks for a better workflow.
Add more fonts
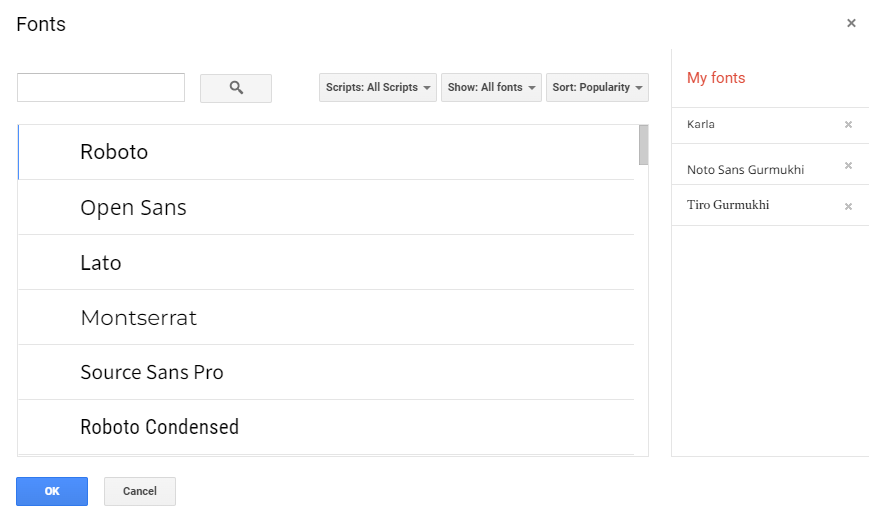
If you’re bored with the Arial and Times New Roman text styles, Google Docs allows you to add more fonts to your document from your browser. By default, 25 fonts are available in the Fonts menu. You can include hundreds of new ones when you tap More fonts from the list.
Google Docs only supports web-based fonts, so you can’t add local or custom fonts to the application. The best you can do is get a supported extension from the Google Workplace Marketplace. The mobile app doesn’t offer the option to add more fonts. Even if you try the process in your browser, the fonts don’t appear in your mobile app. The app also doesn’t have a font add-on you can download.
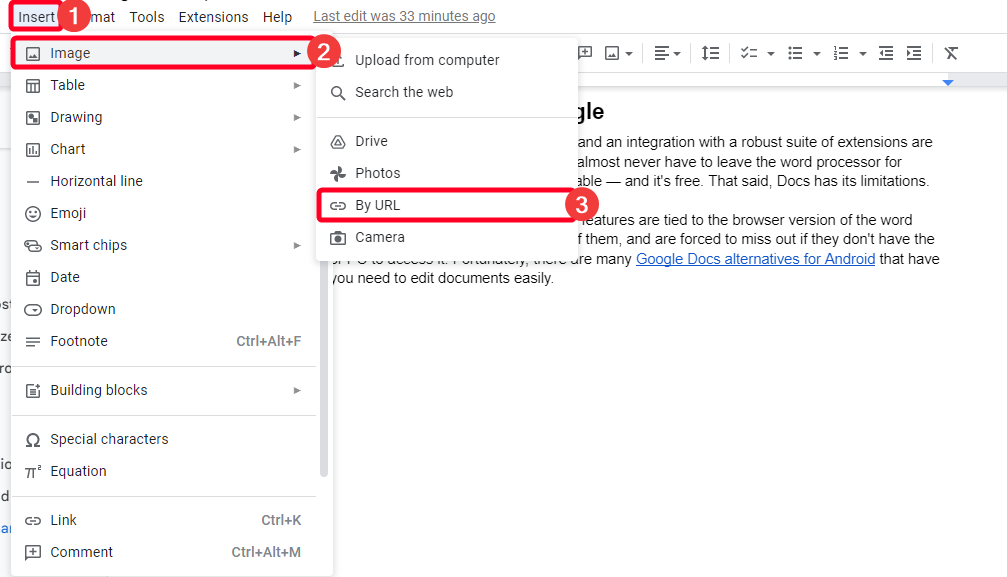
Insert images with URLs
You can embed an image from a web page into your document without downloading it from the source or taking a screenshot. You need the image URL, which saves time and storage space. On Android, the procedure is different. You can only search and add an image from the web. If you have a URL you want to add, use Docs in Chrome or another browser.
Inserting images via a URL in Google Docs doesn’t make you immune to copyright laws. Ensure you have the license to use a picture before adding it to your documents. Copyright infringement makes you liable to pay fines or damages to the copyright owner.
Insert images on browsers
- Place the cursor where you want to insert an image.
- Click Insert to expand the drop-down menu.
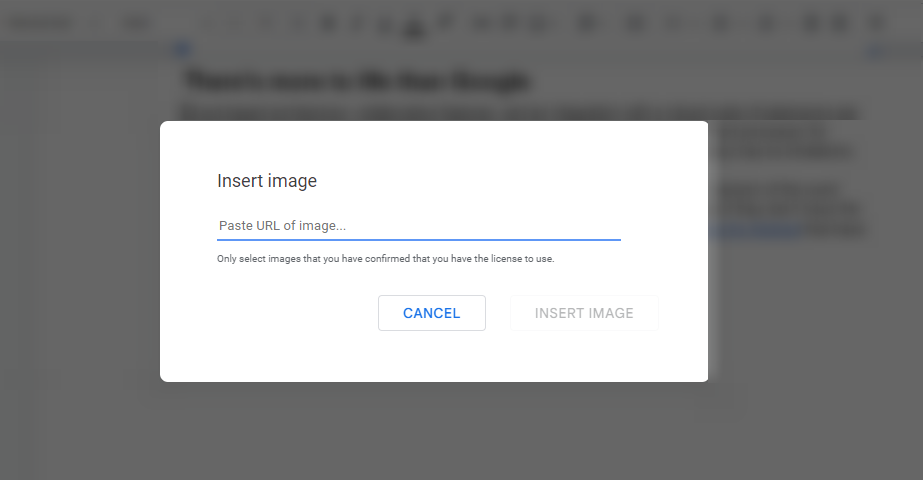
- Hover your mouse over Image and select By URL.
- Paste the image URL into the text box, and Docs displays a preview.
- Click Insert image, and it appears in your document.
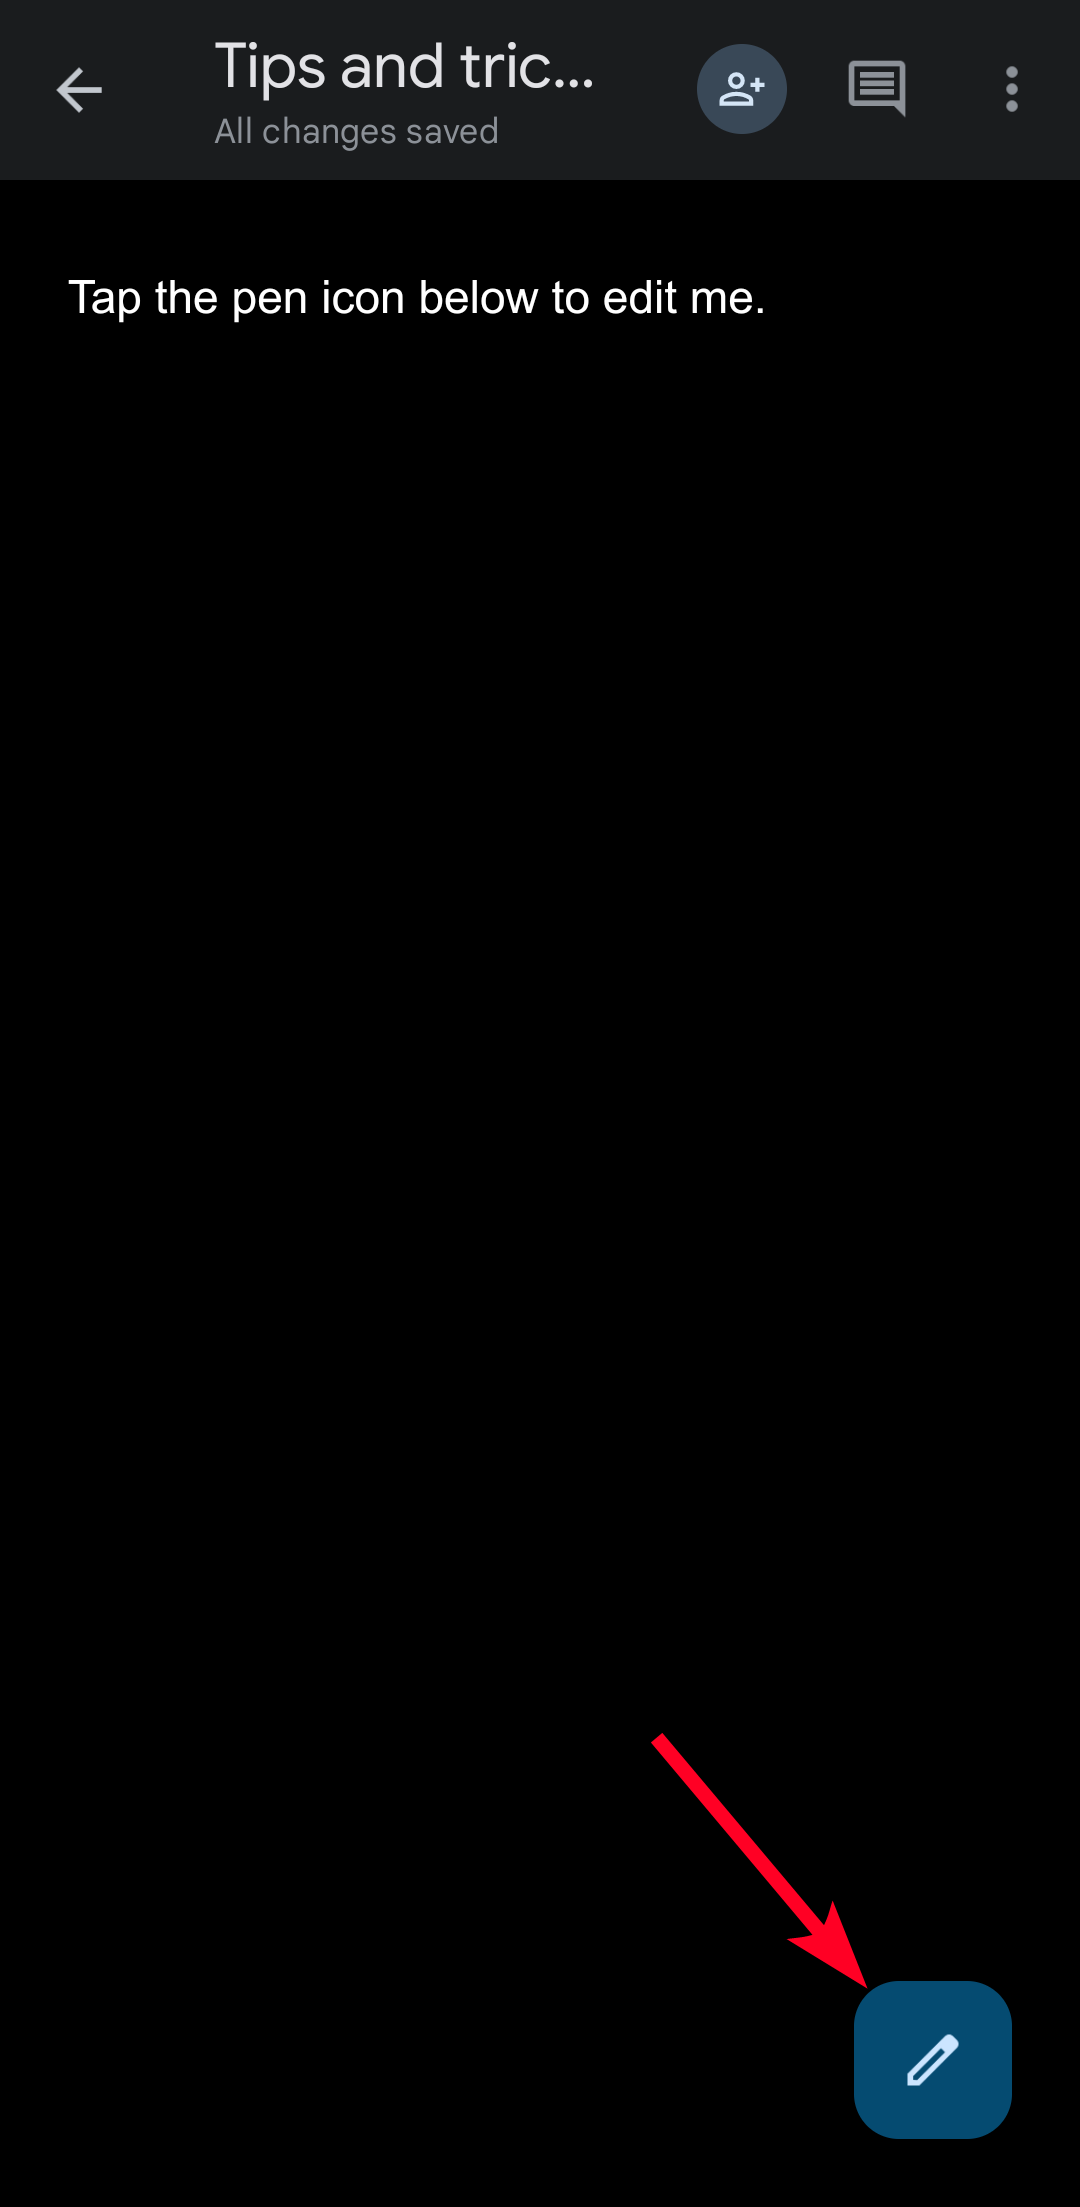
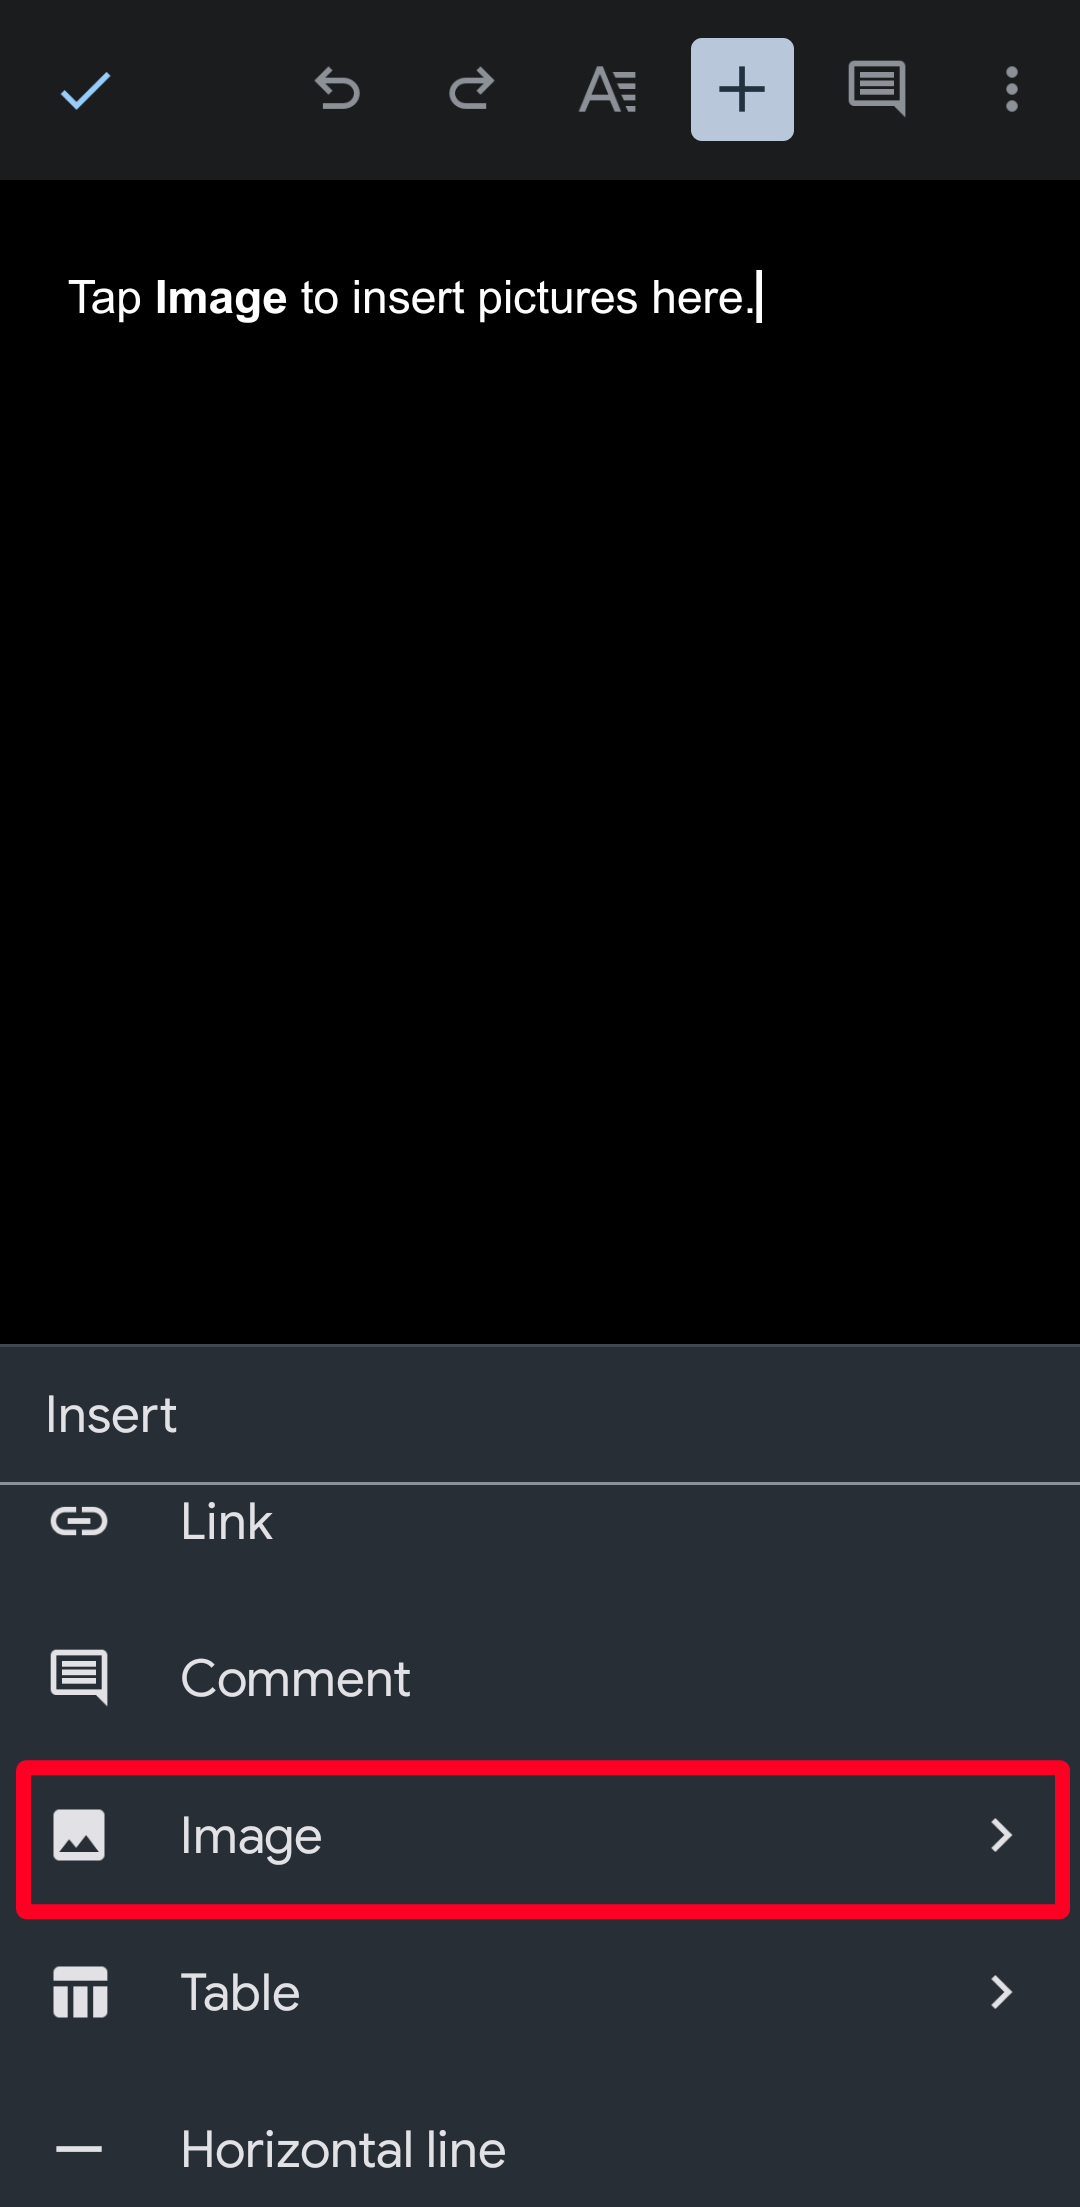
Use a URL to insert images in the mobile app
- Open a document.
- Tap the pen icon to go into editing mode.
- Tap the + icon to open the Insert menu.
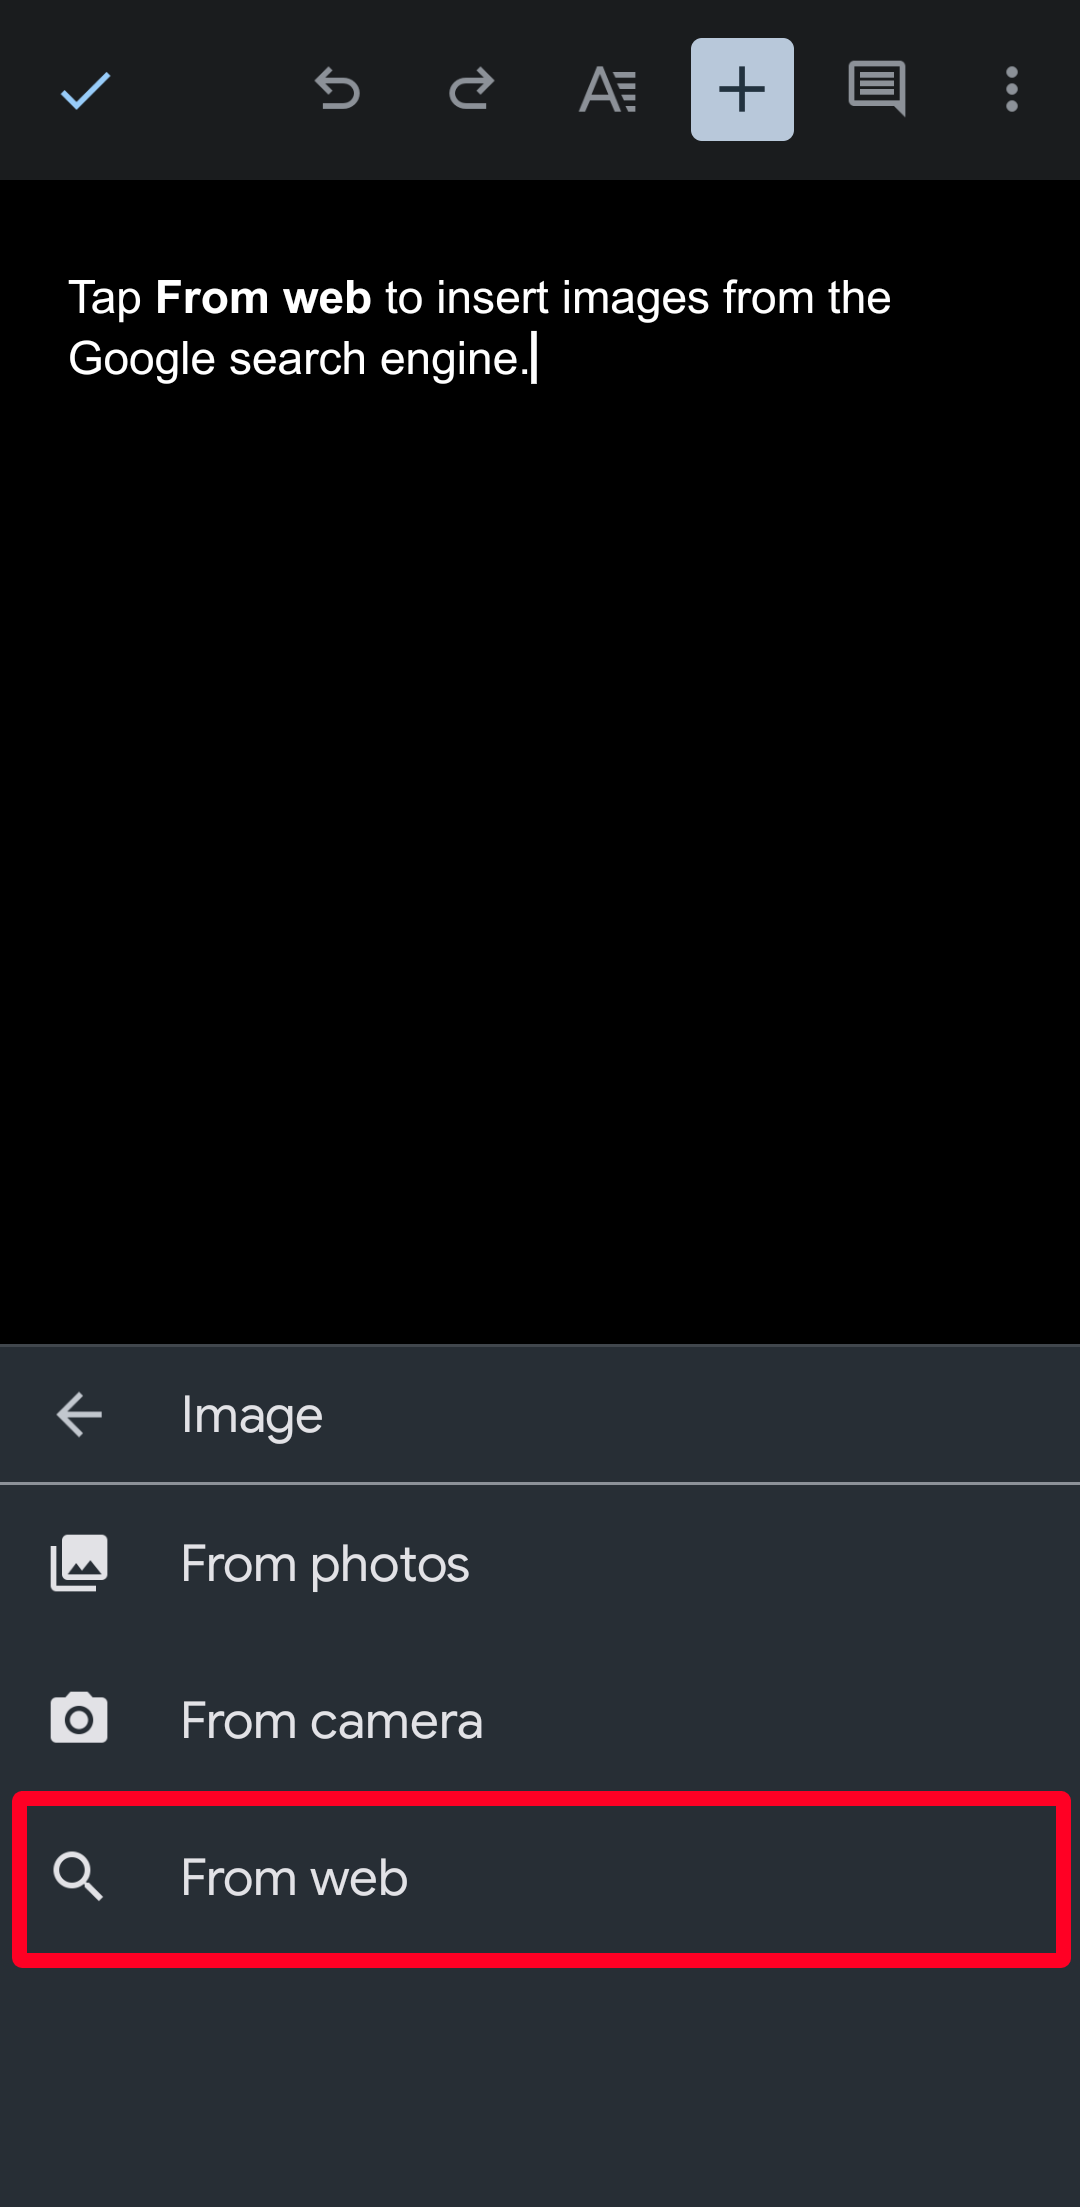
- Tap Image.
- Select From web.
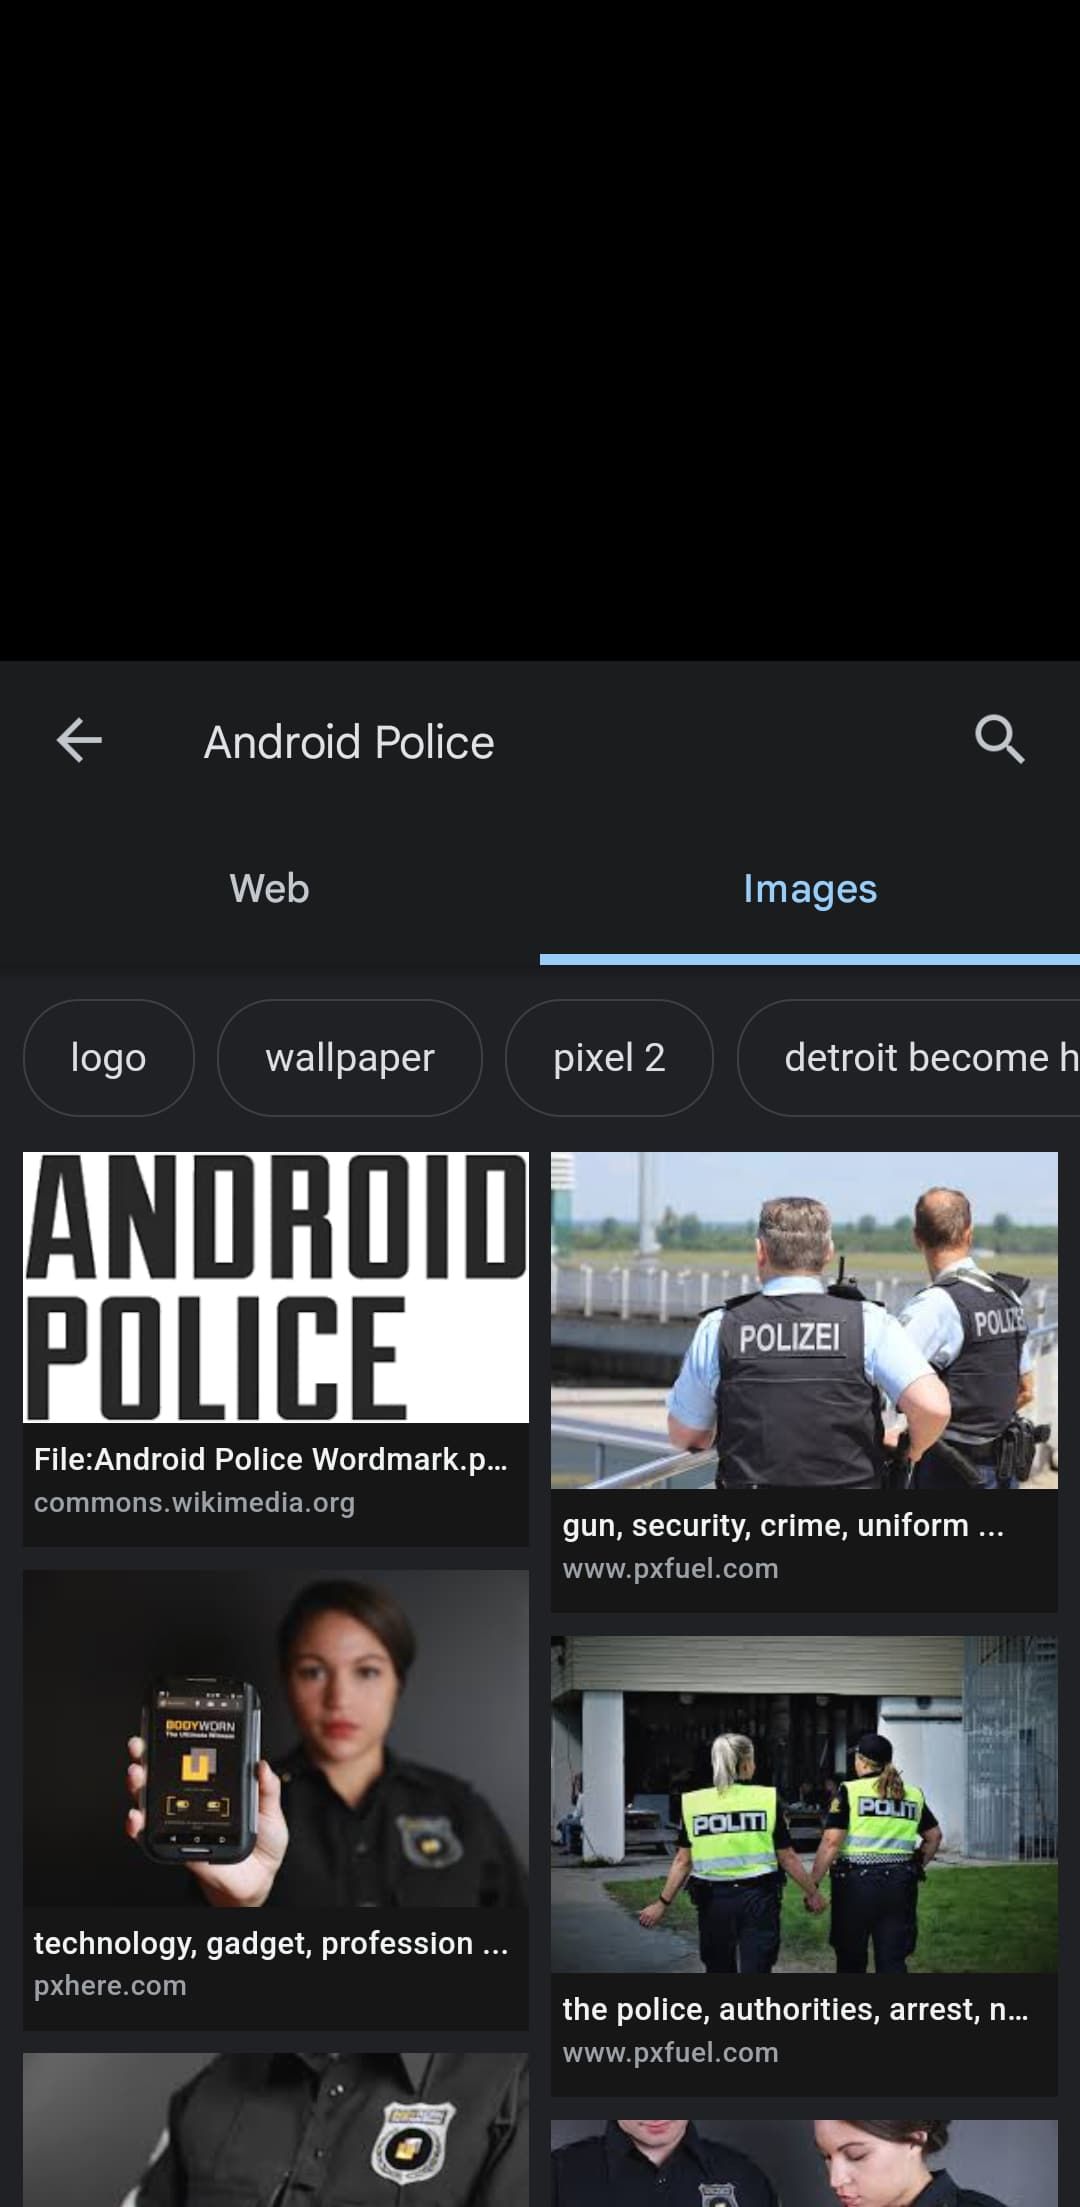
- Type a keyword into the search bar. Then tap the search icon on your keyboard.
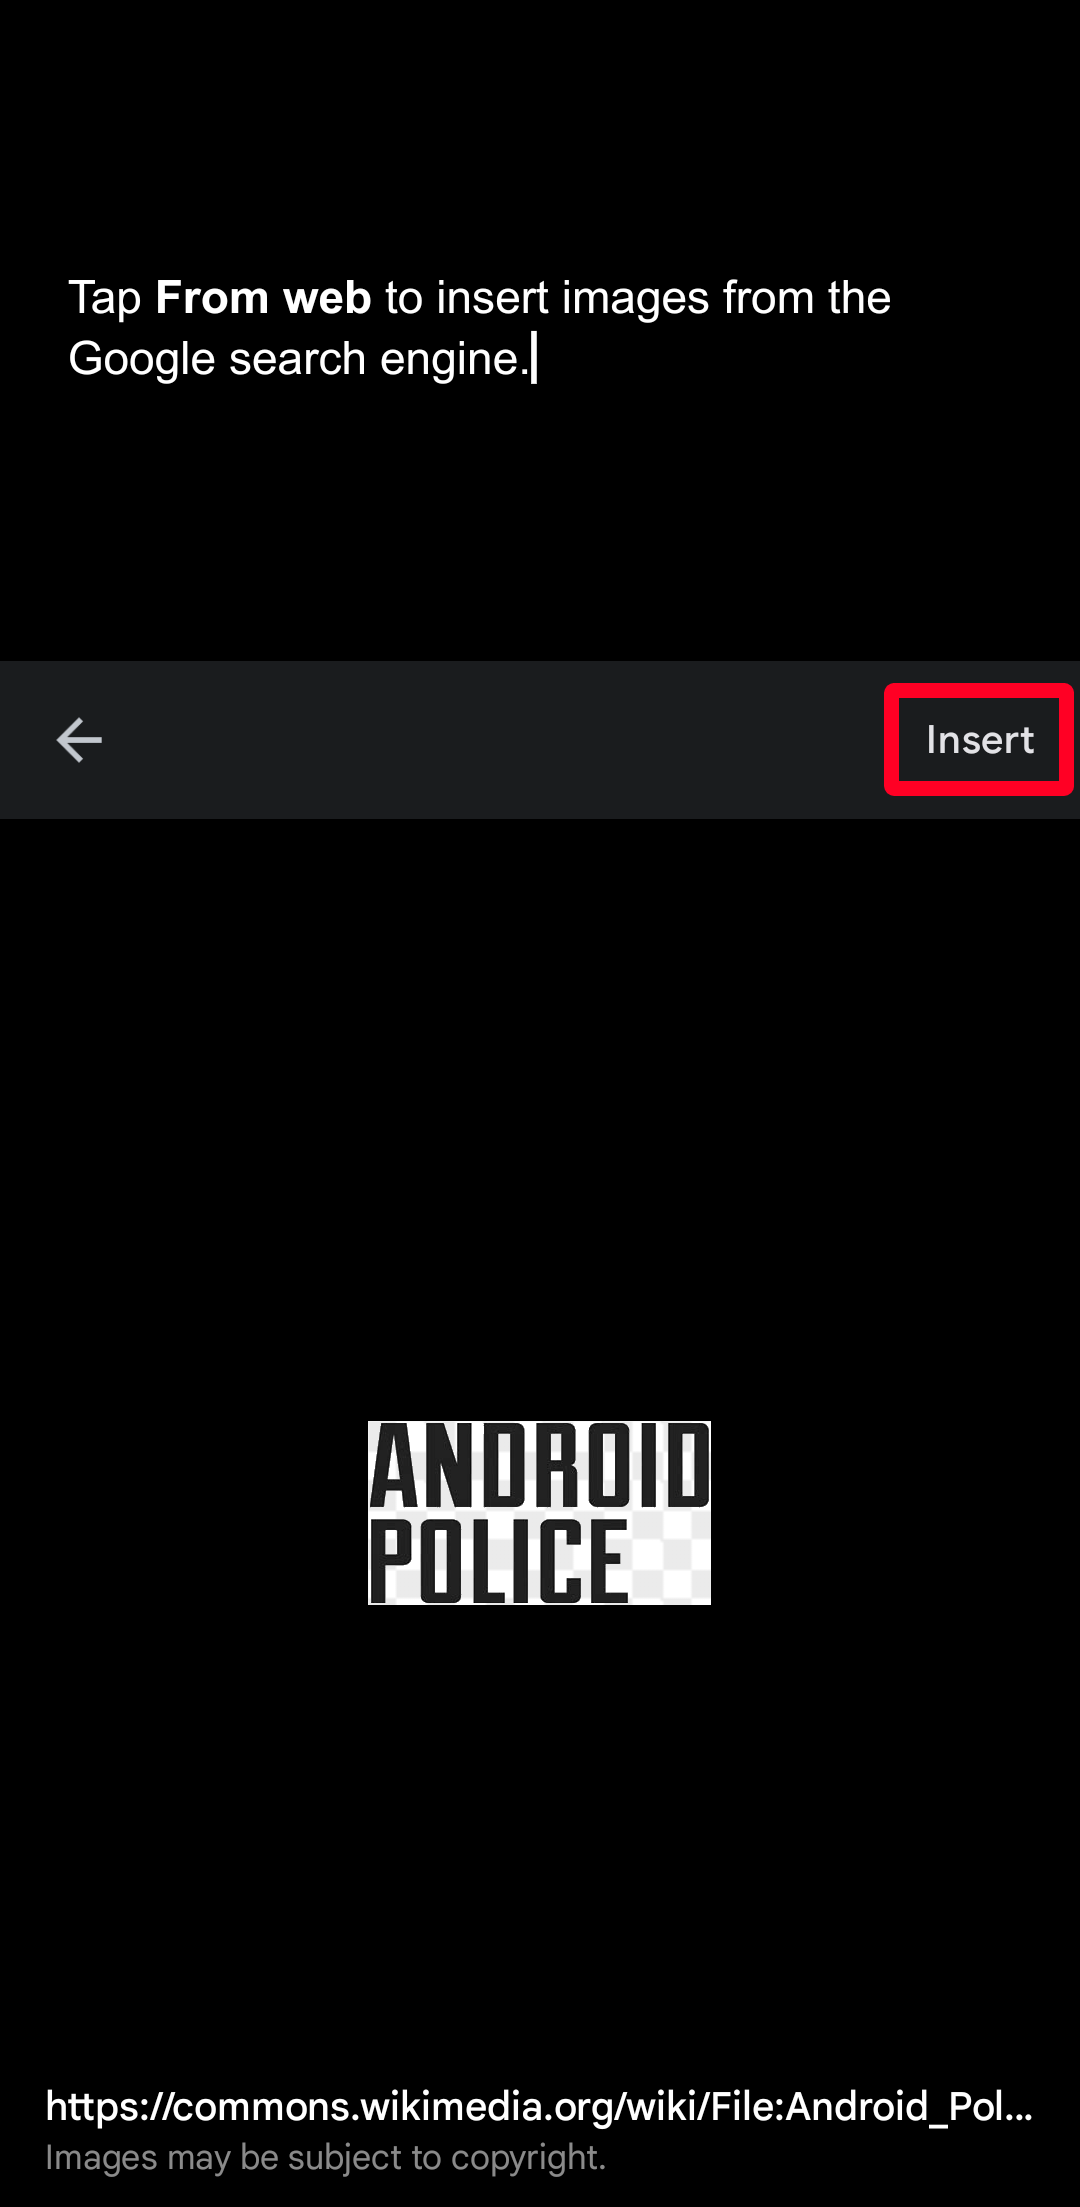
- Under Images, select a picture to feature in your document.
- Docs shows a preview. Tap Insert above the image, and it appears inside your document.
Use extensions to boost functionality
Extensions and add-ons are a valuable part of the Workspace Marketplace. They enhance the capabilities of Google Docs. Some add-ons correct your grammar, include math equations, and create a Google Form.
If you don’t find an add-on that does what you need, create one using Google AppSheet or AppScript. You don’t need to be a developer to build your add-on with App Sheet, as coding is not required.
How to use extensions on browsers
- Click + in the right sidebar to get add-ons.
- The Google Workspace Marketplace appears in a new window.
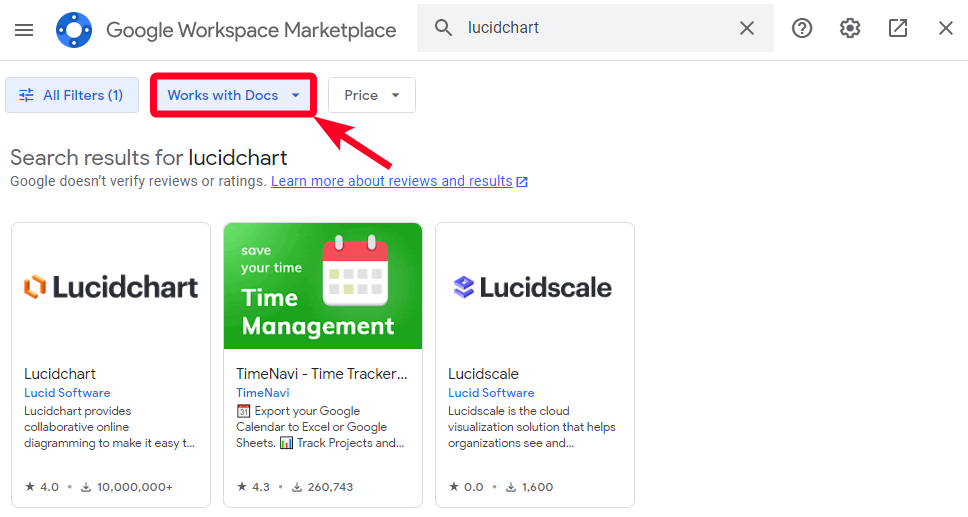
- Use the search bar to find the add-on you need.
- Use the search filter to display only add-ons compatible with Docs.
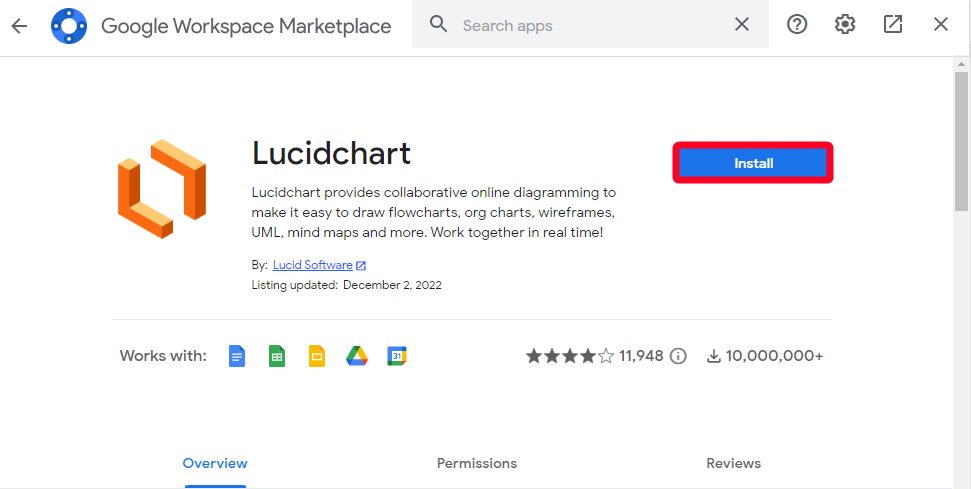
- Select an add-on, then click Install.
- Click Continue to give the add-on permission to install.
- Google prompts you to sign in to your account for authentication before installing your add-on.
- To use your installed add-on, close the Marketplace window.
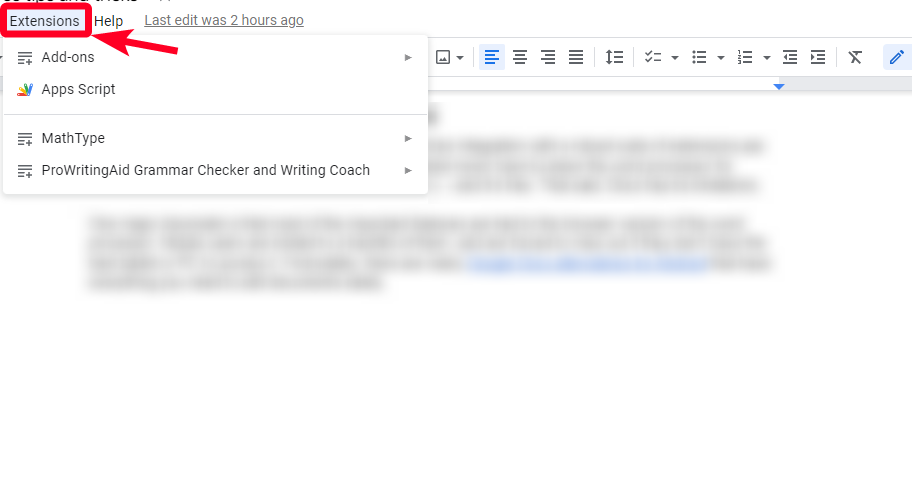
- Click the add-on in the right sidebar of Docs.
- If you don’t see the add-on, click Extensions.

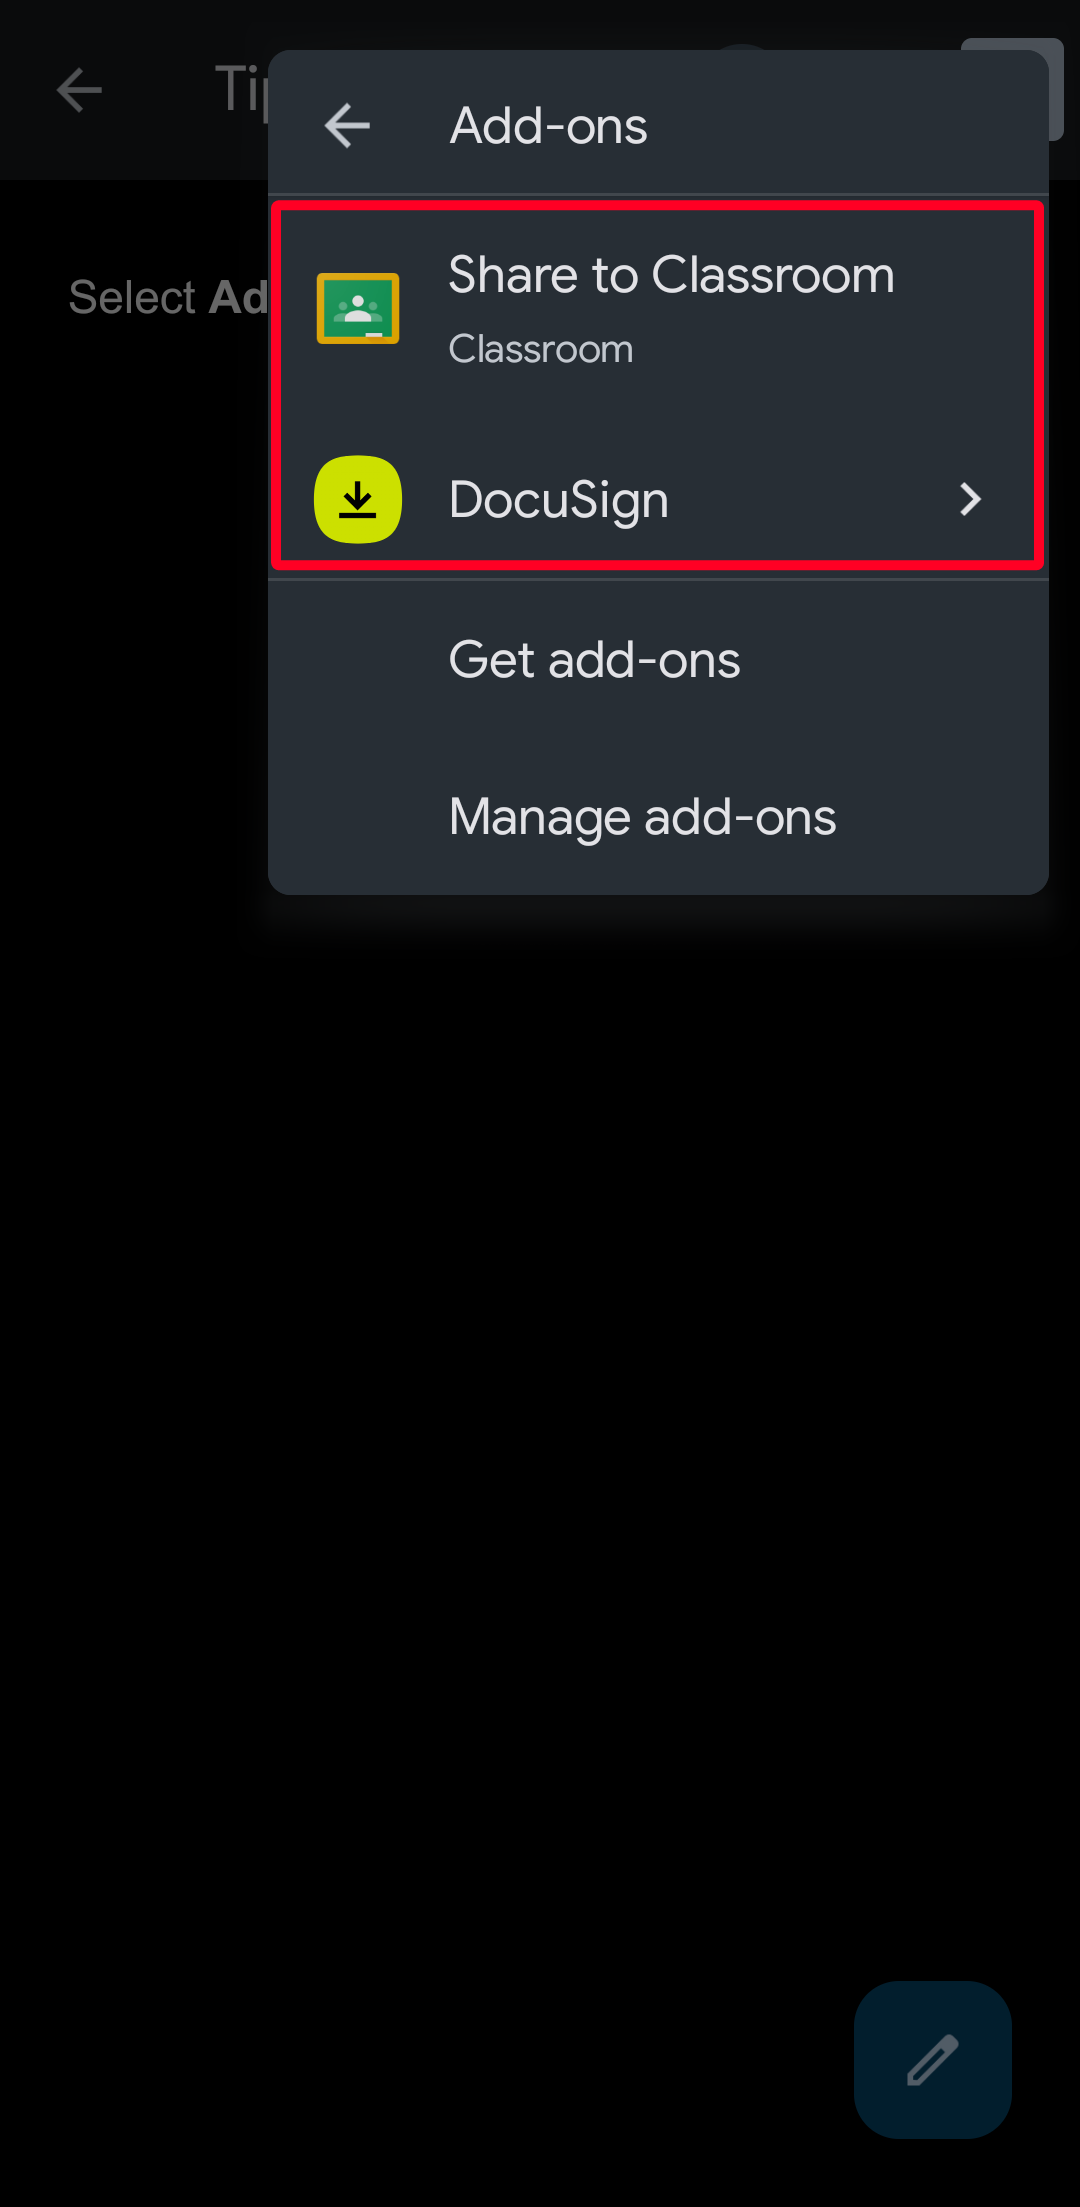
How to install an add-on on the mobile app
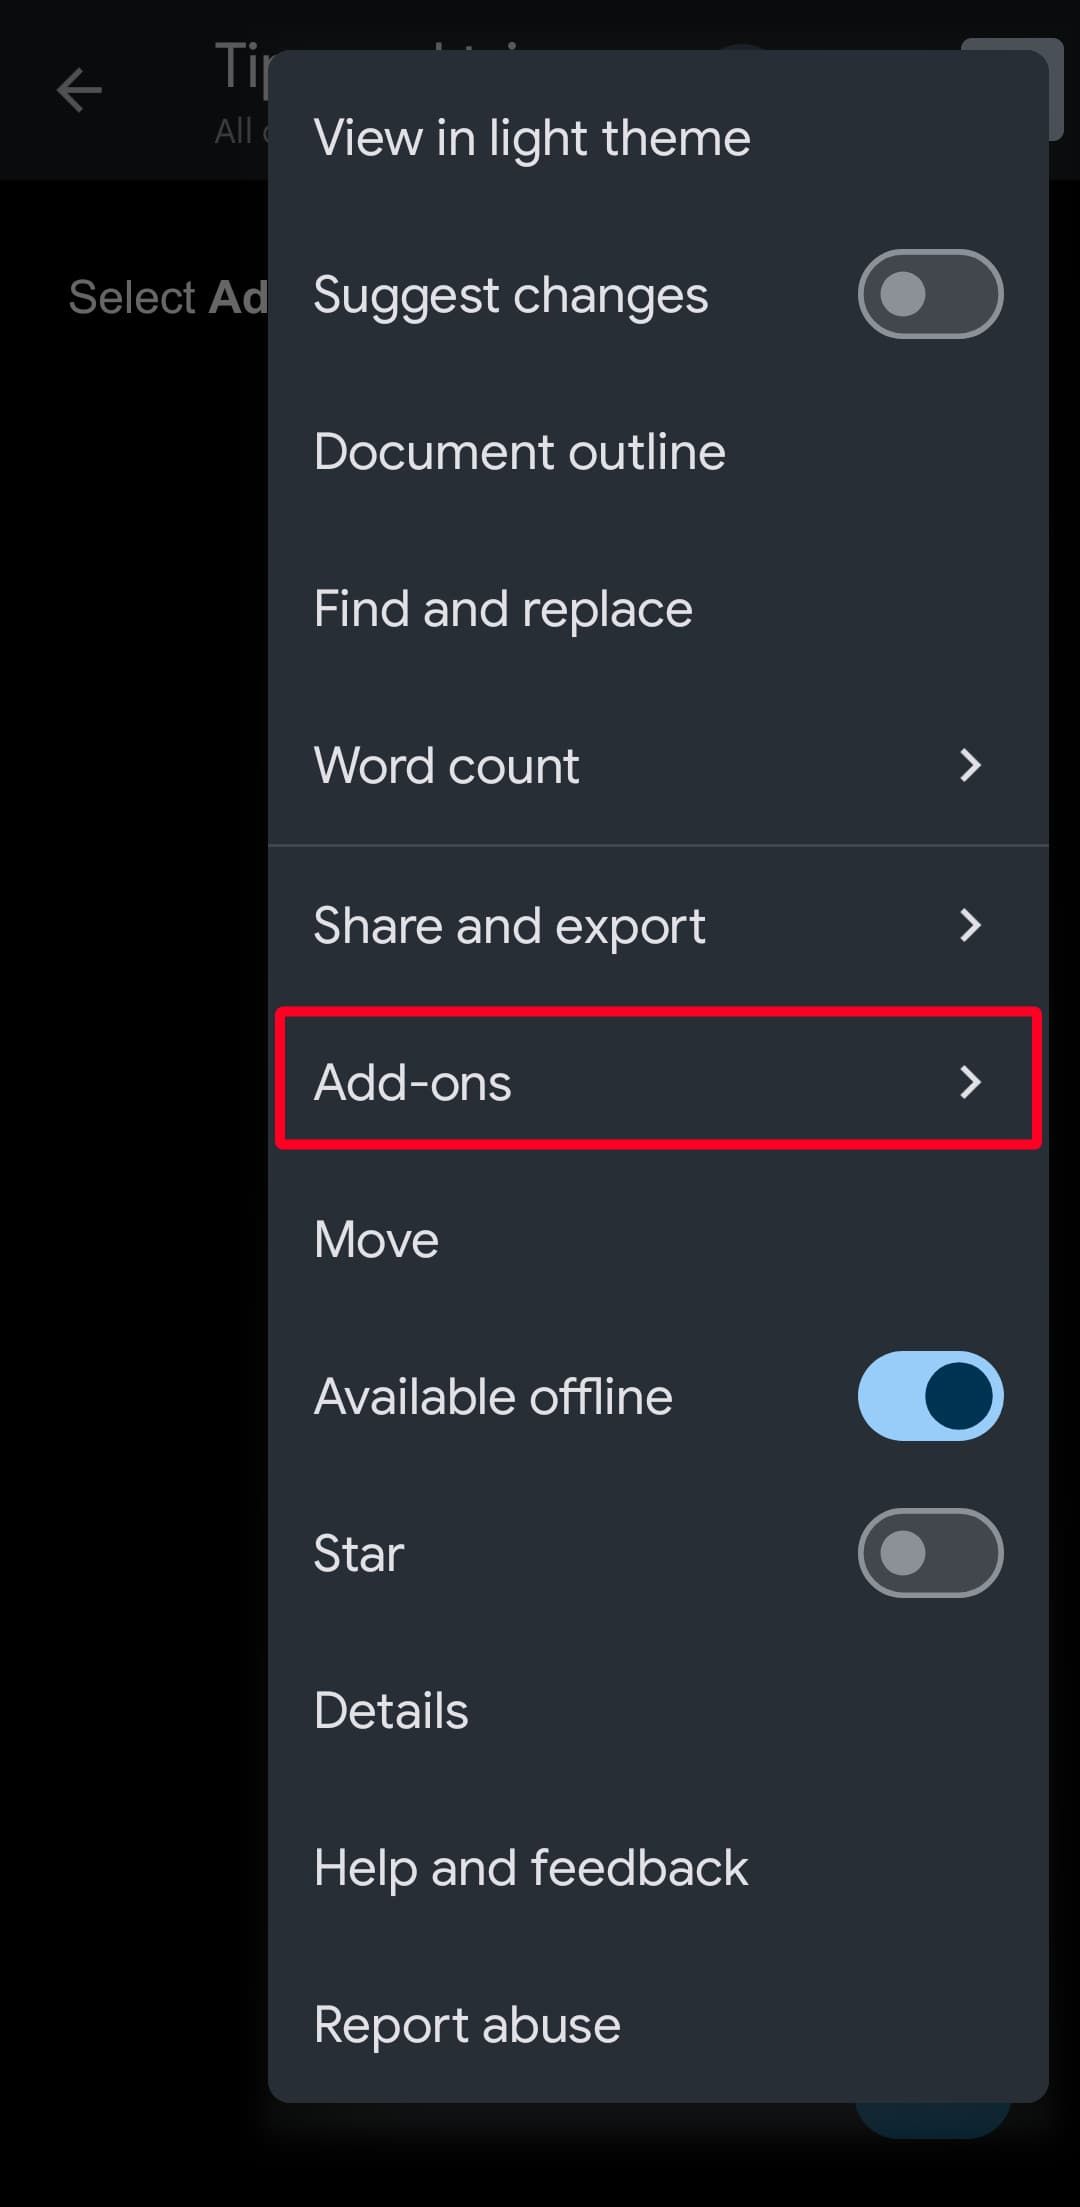
- Open a document.
- Tap the three-dot icon and select Add-ons.
- Select Get add-ons.
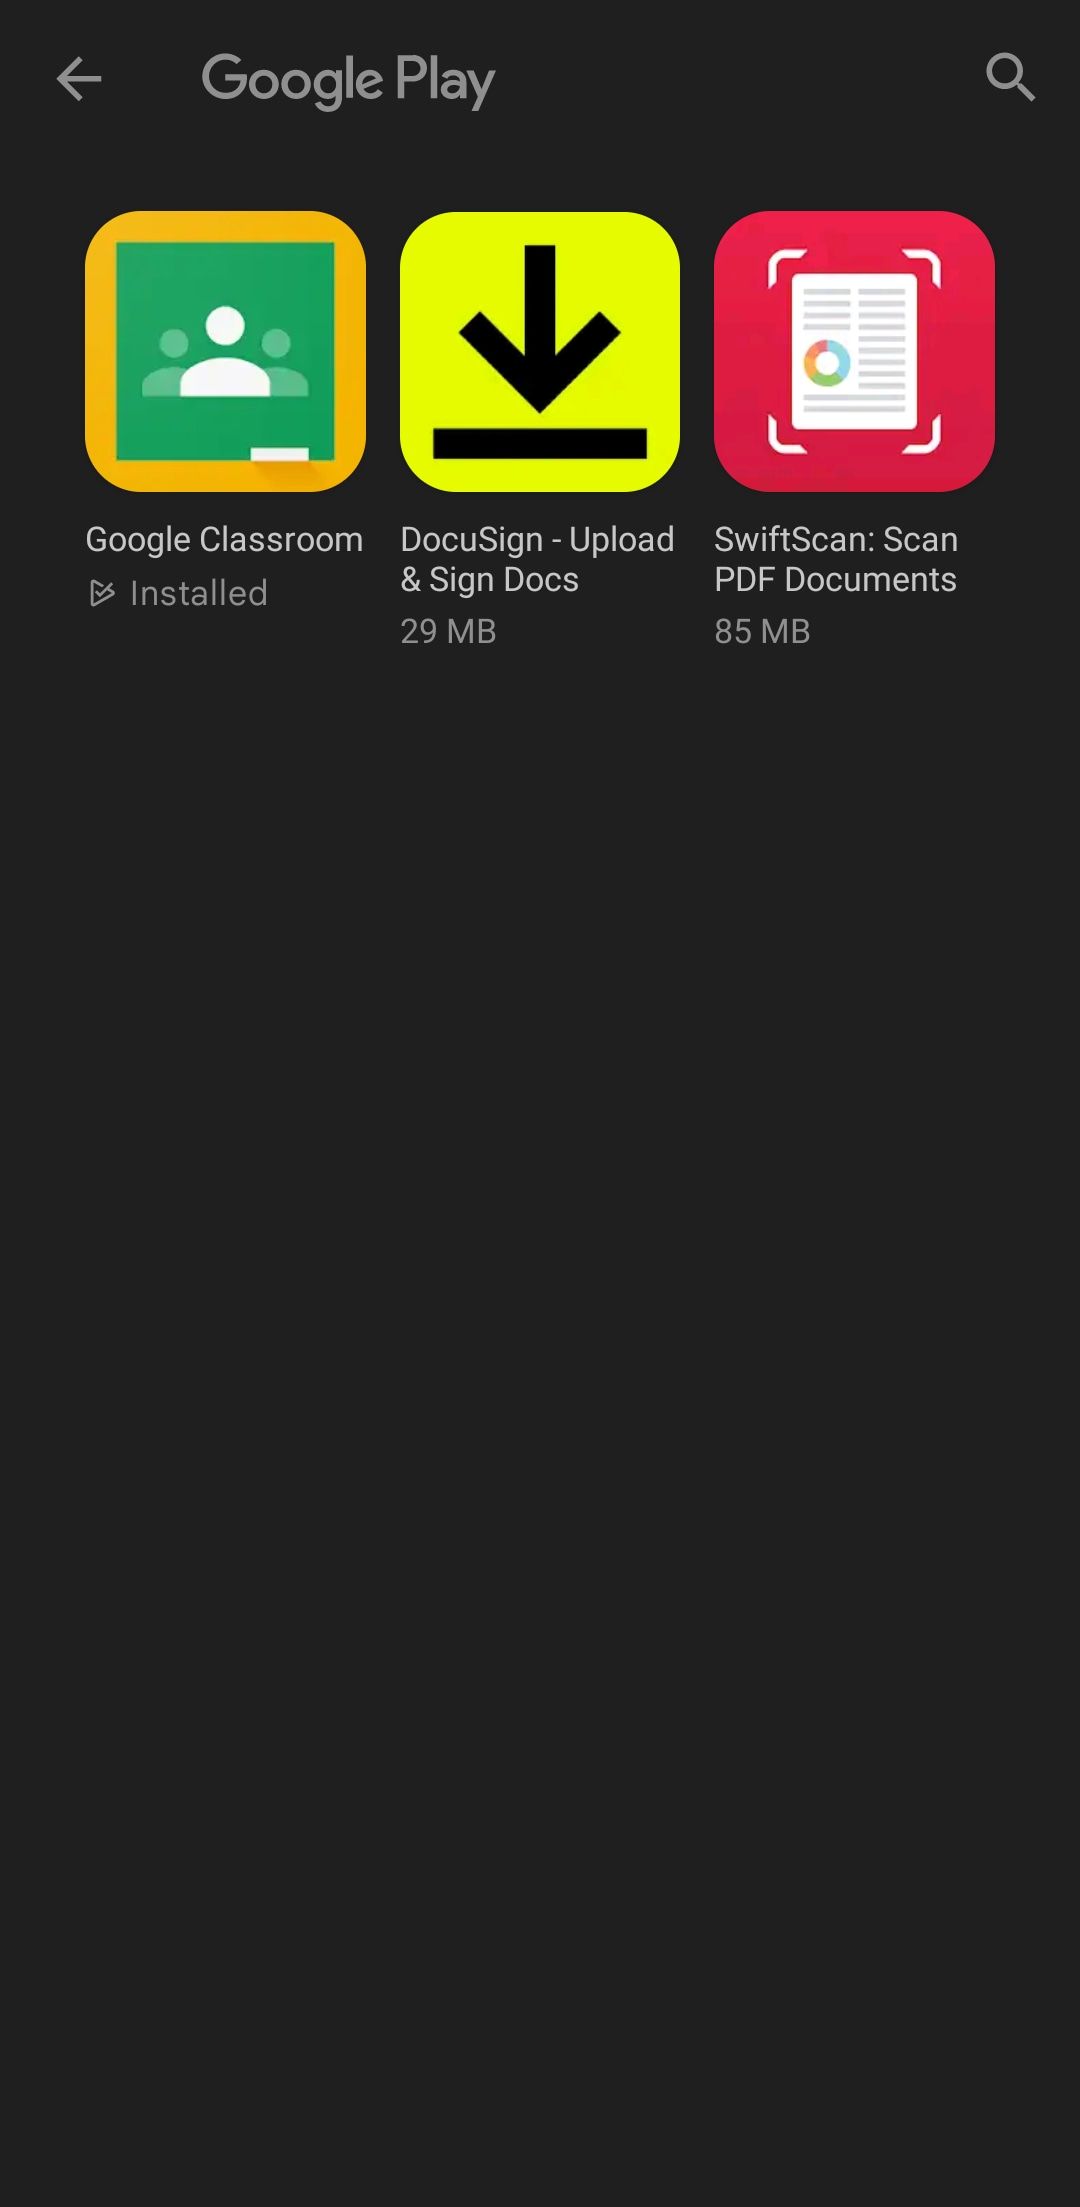
- Choose an add-on. Docs redirects you to the Google Play Store, where you can install it.
- To use your add-on, return to the Add-ons menu and tap it.

Some of the following tasks can be accomplished on the Google Docs app for Android or iOS, but the processes are difficult, frustrating, or both. We recommend using Google’s PWAs on your browser.
Use outlines to organize your document
A Google Docs outline acts as a visual roadmap to give you a clearer sense of direction in structuring your document. Outlines also work as jump links to help you find specific parts quickly. Instead of scrolling until you locate the section, click a heading, and Docs takes you there. You can create a Google Docs outline on the web and mobile apps, although Docs does it automatically when you insert headings in your document.
The outline appears as a table of contents in a left sidebar, which you can hide or expand. On Android, expand the app’s menu options and select Document outline to view and manage your outline. If you don’t want a heading visible in your outline, remove it from the list without affecting your document. You can also turn off the outline feature in the web app, and headings don’t appear in the sidebar until you turn on the feature again. This setting applies to old and new documents.
Sign documents electronically
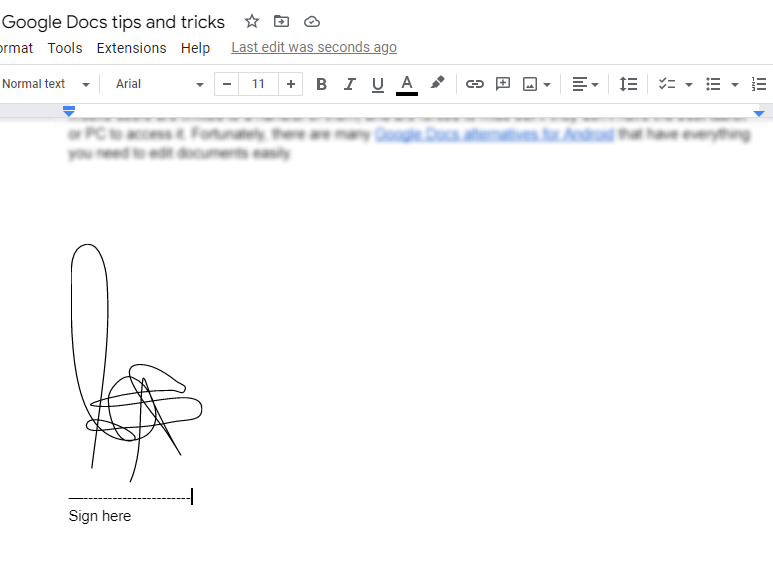
Google Docs is many things, but a professional electronic application software isn’t one of them. Google plans to roll out eSignature support for Workspace Individual subscribers. Top competitors like Microsoft Word already let you sign documents for free, but not without making you go through a lengthy process. There’s a drawing tool under the Insert menu that you can use to create and insert your signature in Docs.
Although drawing your signature is not as authentic as doing it with professional eSignature software, it’s useful when you need to sign a document urgently. The signature isn’t permanent, it doesn’t require authentication, and you can alter it whenever you want.
The drawing tool is only available on the web version of Docs. You can sign documents professionally with DocuSign and other add-ons on browsers and the mobile app.
Create illustrations
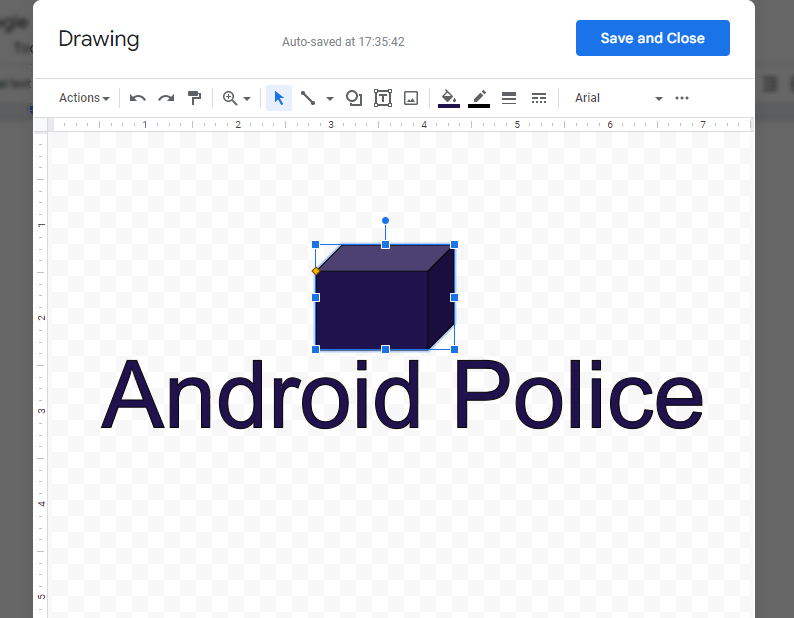
You can create illustrations in Docs with functions such as word art, images, and 3D shapes. The drawing tool is under the Insert menu, and clicking it opens a checkered window for drawing within Docs. Actions you perform in the window automatically appear in your document. You don’t need to insert every drawing you create manually. You can also download drawings in PDF, JPEG, PNG, and SVG file formats to your device.
The drawing tool doesn’t offer advanced features for drawing with a stylus pen. You’re restricted to using your mouse for clicking and dragging elements to create art. You can draw on your screen with your finger if you own a touchscreen PC.
The tool isn’t available on the mobile app. You can use other professional drawing apps if you want an advanced illustration toolbar.
Voice typing
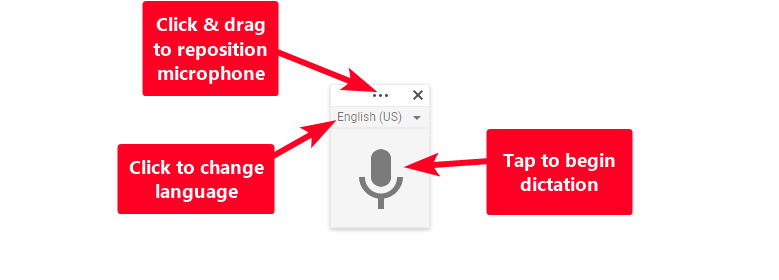
Docs has a built-in voice recognition function that allows you to create and edit documents through speaking. Your device needs a built-in or connected microphone before you can activate and use voice typing. When you activate voice typing, a microphone pops up on your screen, and you can drag it to any position. Clicking the microphone turns it red, which means it’s activated, and you can start speaking.
Words appear in the document as you say them, and you’ll need to be as audible as possible to avoid errors. You can also dictate punctuation and use formatting terms, such as “comma” or “insert a page break.”
Google Docs voice typing is not available on the mobile app. However, you can make dictations with your keyboard’s microphone icon.
- Click Tools.
- Select Voice typing. Or, press Ctrl + Shift + S on your keyboard to launch voice typing.
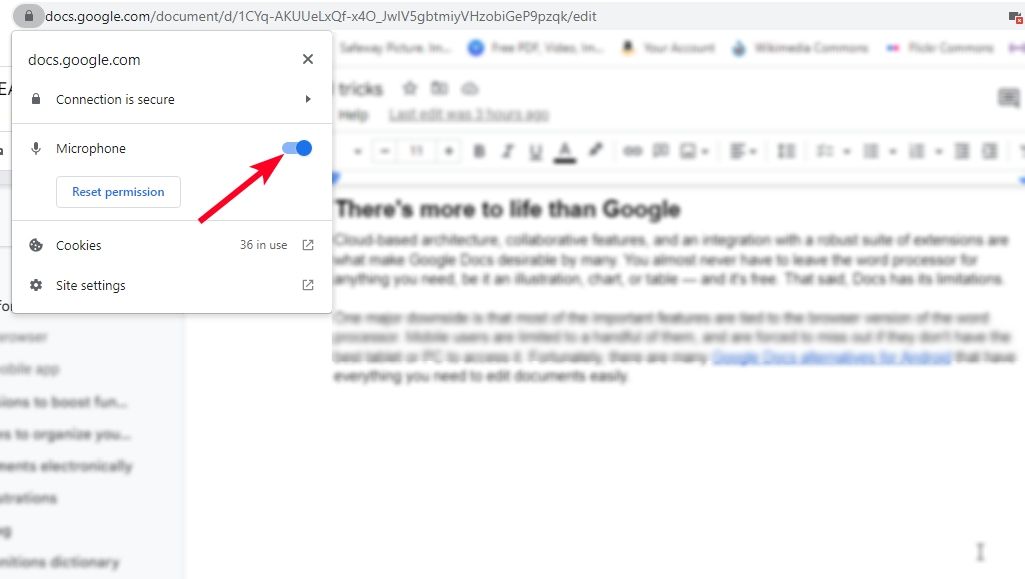
- Chrome notifies you that Docs wants to use your device’s microphone. Tap Allow to grant Docs permission.
- If you don’t see this notification, click the padlock icon near your browser’s address bar to view Docs’ information.
- Click the toggle switch beside Microphone to give Docs permission.
- Click the microphone icon to begin dictation. Click the icon again to stop speaking.
- To choose your language, click the drop-down box above the microphone and select the language you speak.
- To reposition the microphone, move your mouse icon above the drop-down box until it changes to a drag icon. Then click and drag the box to any position.

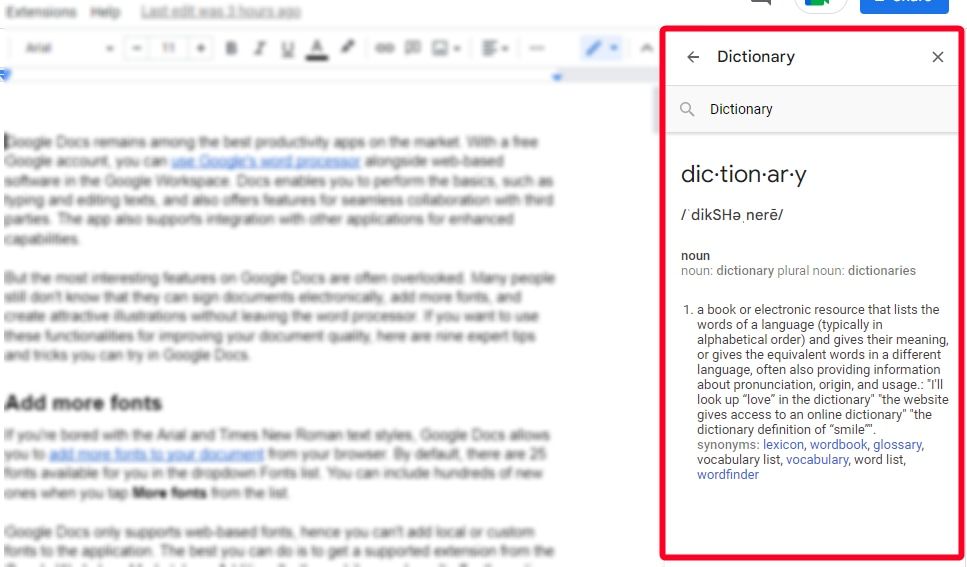
Check definitions in the dictionary
English can be tricky. Sometimes, you forget the meaning of a word or how to spell it. You don’t need to download a dictionary app, as Docs has one under the Tools menu. Clicking the dictionary option opens a right sidebar where you can search a keyword and get its meaning. Some synonyms are also hyperlinked. You can click them to open their meanings.
The dictionary is not available on the mobile app.
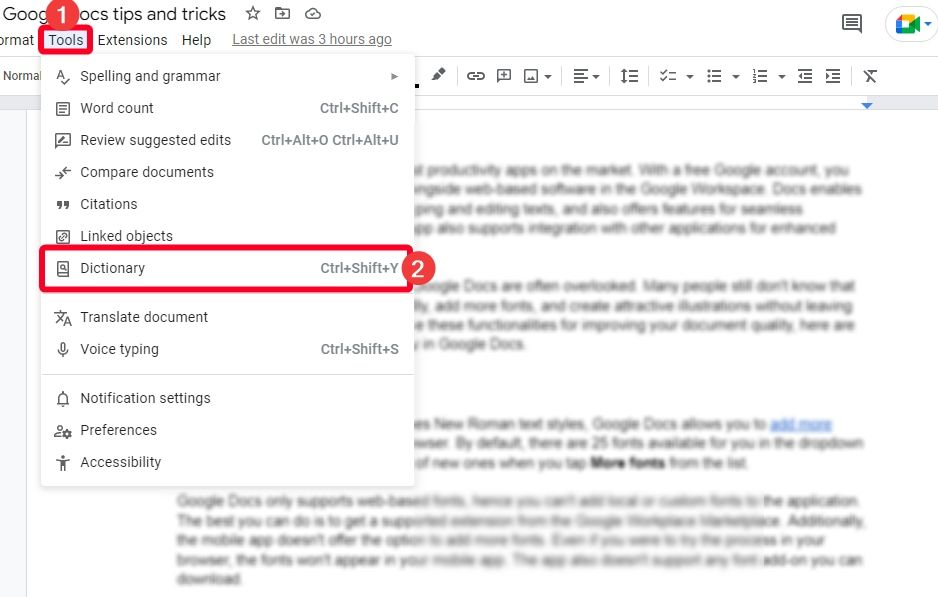
- Click Tools.
- Select Dictionary from the drop-down menu.
- A sidebar appears on the right side of your screen. Enter a keyword into the search bar, and press Enter on your keyboard.
- Docs displays the meanings of the word alongside its pronunciation and synonyms.
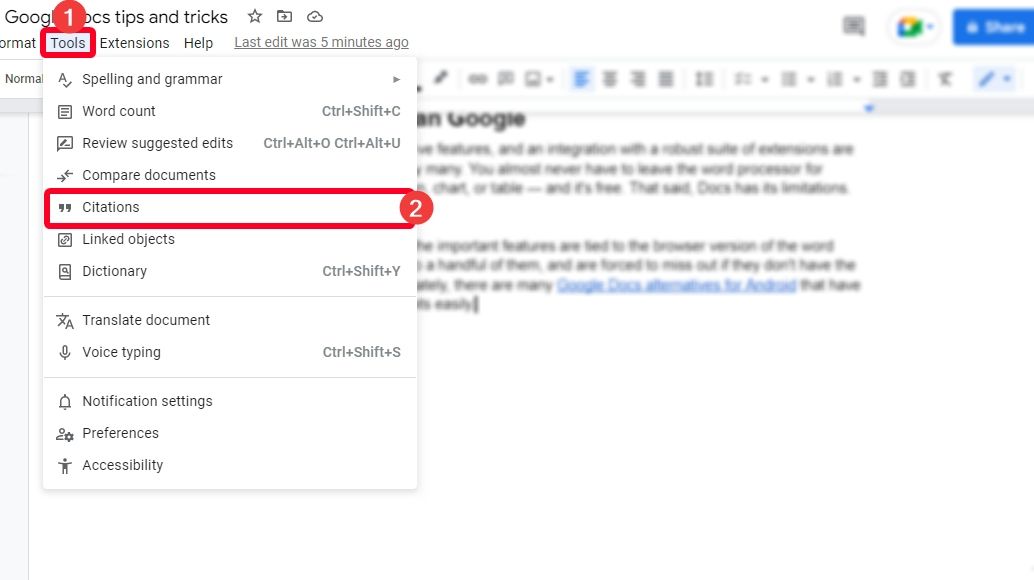
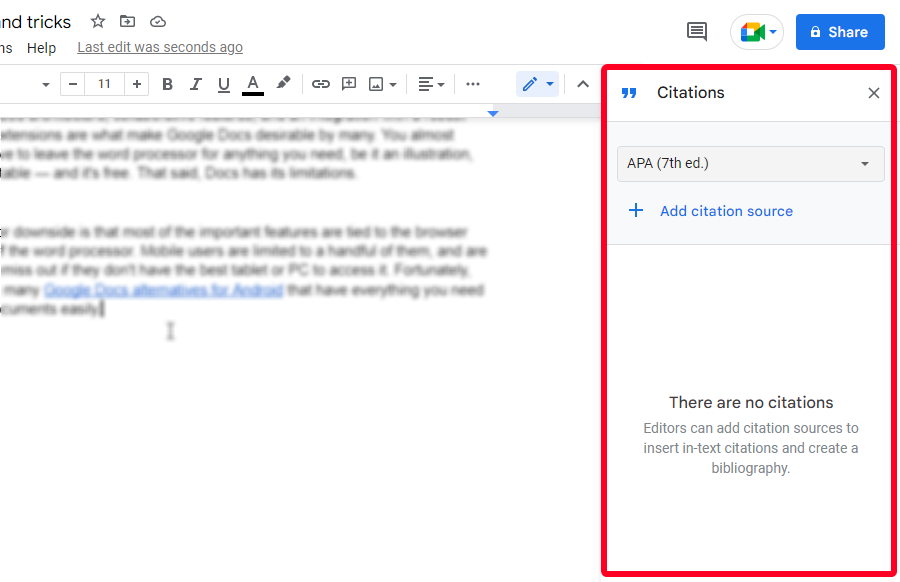
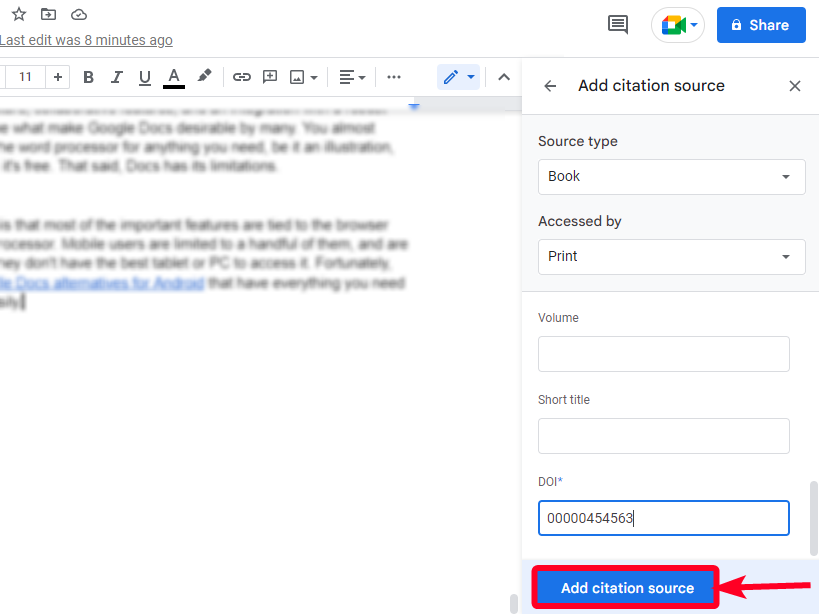
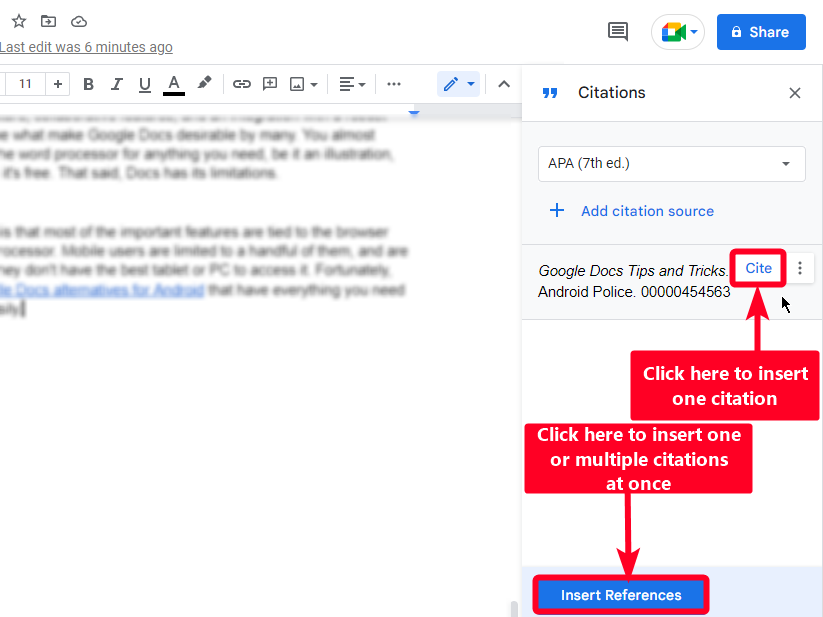
Automate citations and bibliographies
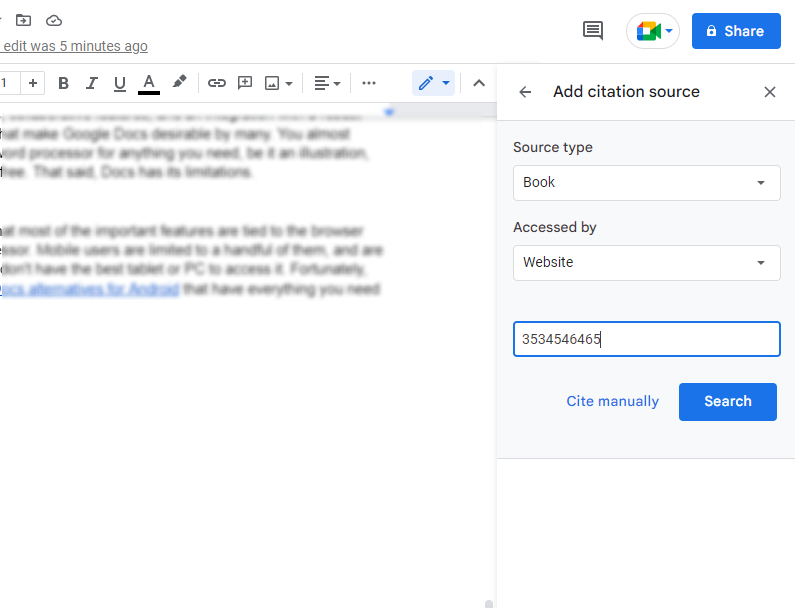
It’s important to give credit to an information source when writing a research paper, proposal, or project. Referencing can be time-consuming, and you could make mistakes, especially if you’re new to the concept. Google Docs allows you to cite sources automatically with the source type and the channel you accessed it with. For example, your source type can be the book, journal, or TV series where you got the information. The channel can be a website or print media you used to access the source type.
You can reference sources in any language, but the tool’s field titles or elements always appear in English, no matter what typing language you use in Docs. For print media or websites, enter the International Standard Book Number (ISBN) or Uniform Resource Locator (URL) into the referencing tool, and Docs automatically pulls the citation from the internet. You can then add it to your document.
You can also do referencing manually. Docs provides input fields for the author name, publisher and publication year, and other data. Docs only supports MLA, APA, and Chicago Author-Date referencing styles.
Referencing isn’t available on the mobile app, so you must access Docs from a browser.
- Click Tools.
- Select Citations from the drop-down menu.
- A sidebar appears on the right side of your screen.
- Click the drop-down box to select a referencing style.
- Click Add citation source.
- Use the drop-down boxes under Source type and Accessed by to select how you got your information.
- If your source has an ISBN or URL, enter it into the provided box and click Search to find the citation online.
- If you don’t have the ISBN or URL, click Cite manually.
- Use the input fields to cite your source appropriately. Fields with the asterisk symbol beside them are required.
- After citing your source, click Add citation source.
- Docs gives you a preview of the citation in the right sidebar. Hover your mouse icon over the citation, then click Cite to insert it into your document.
- Alternatively, add multiple citations and click Insert References to place them in your document.
There’s more to life than Google
Google Docs is cloud-based, has a load of collaborative features, and integrates with an impressive suite of extensions. Plus, you rarely have to rely on additional tools to find what you need, be it illustration tools, charts, or tables. This flexibility and accessibility make Google Docs a popular productivity tool. And it’s free.
Docs has downsides. Mobile users can only access the basic features. You can view a document and do simple edits. Anything beyond that is a job for the browser version, which is mostly unusable on a mobile device. Try it, and you’ll put your phone down and use your desktop. If you want a mobile-friendly word processor, some great alternatives to Google Docs have everything you need to edit documents.

Khám phá thêm từ Phụ Kiện Đỉnh
Đăng ký để nhận các bài đăng mới nhất được gửi đến email của bạn.